Table of Contents
Advertisement
Advertisement
Table of Contents

Related Manuals for Zline BLS-SHS

Summary of Contents for Zline BLS-SHS
- Page 1 ressure alance hower ystems Installation Guide and Users Manual...
- Page 3 Sourced with materials from across the world, ZLINE’s shower systems are easy to operate, reduce water waste, and complement bathroom décor. This exclusive collection blends modern technology with traditional appeal — offering a wide array of finishes. ZLINE showers offer an aerated water flow for resource conservation, helping both the environment and your wallet.
-
Page 4: Table Of Contents
TABLE OF CONTENTS SAFETY INSTRUCTIONS Prior to Installation Safety Tips Care and Maintenance BLISS SHOWER SYSTEM (BLS-SHS) Parts Dimensions Tools Assembly EL DORADO SHOWER SYSTEM (ELD-SHS) Parts Dimensions Tools Assembly SHOWER FAUCET Parts Tools Assembly TROUBLESHOOTING... -
Page 5: Safety Instructions
Safety Instructions Prior to Installation Make sure that the cold and hot water lines are turned off. Wrap all threaded connections with Teflon tape. Always wrap in a clockwise direction. Cover your drain to avoid losing parts. Do not disassemble the main system body, as it has been installed and commissioned correctly and precisely before delivery to the factory. -
Page 6: Bliss Shower System (Bls-Shs)
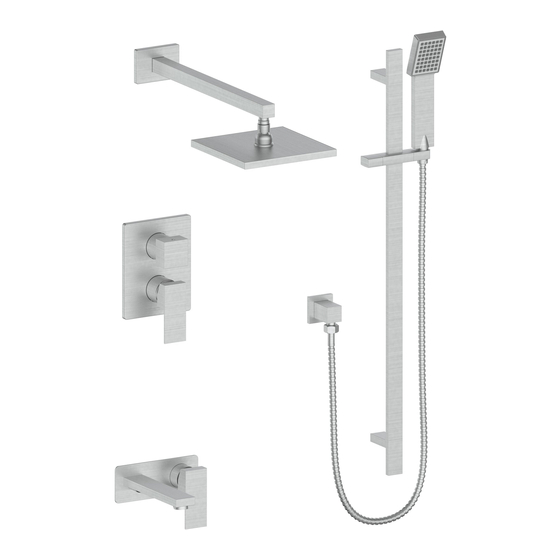
Bliss Shower System (BLS-SHS) 1. Flange cover 9. Switch handle 2. Shower arm 10. Cap 3. Top spray shower 1 1. Sleeve 4. Wall valve body 12. Flange cover 5. Faceplate 13. Angle valve 6. Sleeve 14. Shower rail 7. Washer 15. - Page 7 Bliss Shower System (BLS-SHS)
-
Page 8: Tools
Bliss Shower System (BLS-SHS) Tools: Time required: Wrench Screwdriver +/- 120 minutes Drill Legend: Cold Water Torch Hot Water Plumber’s Tape Warning... - Page 9 Bliss Shower System (BLS-SHS) Slide the sleeves onto the pipes and then insert pipes into the wall valve. Tighten the ring around the pipes with the wrench. NOTE: If welding is involved, you must remove the internal valve components prior to the...
- Page 10 Bliss Shower System (BLS-SHS) Weld the copper together or use plumber’s tape to prevent leaks.
- Page 11 Bliss Shower System (BLS-SHS) After welding, purge the water supply system for 30 seconds.
- Page 12 Bliss Shower System (BLS-SHS) Reinstall the valve components into their original positions.
- Page 13 Bliss Shower System (BLS-SHS) Use this diagram to understand the placement of the wall valve.
- Page 14 Bliss Shower System (BLS-SHS) Screw the wall valve body into the system with a screwdriver. Do not overtighten.
- Page 15 Bliss Shower System (BLS-SHS) Screw the sleeve and washer into the wall valve body.
- Page 16 Bliss Shower System (BLS-SHS) Attach the face plate and remove the plastic.
- Page 17 Bliss Shower System (BLS-SHS) Attach the steering handle.
- Page 18 Bliss Shower System (BLS-SHS) Connect the flange cover to the spout in the wall. Secure with plumber’s tape to prevent leaks.
- Page 19 Bliss Shower System (BLS-SHS) Twist the top spray shower into the shower arm.
- Page 20 Bliss Shower System (BLS-SHS) Connect the angle valve to the flange cover and screw together. Secure with plumber’s tape to prevent leaks.
- Page 21 Bliss Shower System (BLS-SHS) Use a pencil to mark the mounting holes on the wall. Use a wrench to put the screws in.
- Page 22 Bliss Shower System (BLS-SHS) Connect the components of the shower rail.
- Page 23 Bliss Shower System (BLS-SHS) Screw the shower rail into the wall.
- Page 24 Bliss Shower System (BLS-SHS) Connect the shower handle to the shower rail. Tighten with a wrench.
- Page 25 Bliss Shower System (BLS-SHS) Review the diagram to understand the hot, cold, and open settings.
-
Page 26: El Dorado Shower System (Eld-Shs)
El Dorado Shower System (ELD-SHS) 1. Flange cover 9. Switch handle 2. Shower arm 10. Cap 3. Top spray shower 1 1. Sleeve 4. Wall valve body 12. Flange cover 5. Faceplate 13. Angle valve 6. Sleeve 14. Shower rail 7. - Page 27 El Dorado Shower System (ELD-SHS) 1010 ELD-SHS-CH...
-
Page 28: Tools
El Dorado Shower System (ELD-SHS) Tools: Time required: Wrench Screwdriver +/- 120 minutes Drill Legend: Cold Water Torch Hot Water Plumber’s Tape Warning... - Page 29 El Dorado Shower System (ELD-SHS) Slide the sleeves onto the pipes and then insert pipes into the wall valve. Tighten the ring around the pipes with the wrench.
- Page 30 El Dorado Shower System (ELD-SHS) Weld the copper together or use plumber’s tape to prevent leaks.
- Page 31 El Dorado Shower System (ELD-SHS) After welding, purge the water supply system for 30 seconds.
- Page 32 El Dorado Shower System (ELD-SHS) Reinstall the valve components into their original positions.
- Page 33 El Dorado Shower System (ELD-SHS) Screw the wall valve body into the system with a screwdriver. Do not overtighten.
- Page 34 El Dorado Shower System (ELD-SHS) Place the components in the appropriate location.
- Page 35 El Dorado Shower System (ELD-SHS) Screw the sleeve and washer into the wall valve body.
- Page 36 El Dorado Shower System (ELD-SHS) Attach the face plate and remove the plastic.
- Page 37 El Dorado Shower System (ELD-SHS) Attach the steering handle.
- Page 38 El Dorado Shower System (ELD-SHS) Connect the flange cover to the spout in the wall. Secure with plumber’s tape to prevent leaks.
- Page 39 El Dorado Shower System (ELD-SHS) Twist the top spray shower into the shower arm.
- Page 40 El Dorado Shower System (ELD-SHS) Connect the angle valve to the flange cover and screw together. Secure with plumber’s tape to prevent leaks.
- Page 41 El Dorado Shower System (ELD-SHS) Use a pencil to mark the mounting holes on the wall. Use a wrench to put the screws in.
- Page 42 El Dorado Shower System (ELD-SHS) Connect the components of the shower rail.
- Page 43 El Dorado Shower System (ELD-SHS) Screw the shower rail into the wall.
- Page 44 El Dorado Shower System (ELD-SHS) Connect the shower handle to the shower rail. Tighten with a wrench.
- Page 45 El Dorado Shower System (ELD-SHS) Review the diagram to understand the hot, cold, and open settings.
-
Page 46: Shower Faucet
SHOWER FAUCET 1. Rough-in 2. Sleeve 3. Faceplate 4. Cap 5. Handle 6. Spout 7. Screw... -
Page 47: Tools
SHOWER FAUCET Tools: Time required: Wrench Screwdriver +/- 60 minutes Hacksaw and tape measure Legend: Cold Water Grease Hot Water Plumber’s Tape Warning... - Page 48 SHOWER FAUCET Mark on the wall where you want the Use a screwdriver to screw the faucet faucet to be installed. onto the wall. Attach the hose using plumbing tape Place the components in the and a wrench. appropriate location.
- Page 49 SHOWER FAUCET Screw the sleeve and washer into the Make sure that the components are wall valve body. aligned properly. Tighten the components. Take off the protective shield.
- Page 50 SHOWER FAUCET Attach faucet to base plate. Attach base plate to wall. Attach handle to the fixture. Review the diagram to understand the hot, cold, and open settings.
-
Page 51: Troubleshooting
Troubleshooting Possible Cause Problem Solution Unscrew the lever on the There is leakage under the The locking nut has handle by hand. Loosen set handle. come loose. screw with a hex wrench. Remove the handle and unscrew trim cap by hand. Tighten locking nut with an adjustable wrench. - Page 52 Kitchen and Bath Three Locations: 350 Parr Circle Reno, NV 89512 916 Delaware Avenue Marysville, OH 43040 427 Rowland Mill Road Bruceton, TN 38317 www.zlinekitchen.com 1-614-777-5004 1.1.0...
Need help?
Do you have a question about the BLS-SHS and is the answer not in the manual?
Questions and answers