Advertisement
Quick Links
Introduction
Congratulations on purchasing the Spirit Ghost Trap Wheels Upgrade kit that makes your trap
wheels look much more like the screen used ghost traps from the Ghostbusters movies.
The photos are of a Spirit Halloween Ghost Trap that has the GhostLab42 Spirit Ghost Trap
Cosmetic kit installed. After the cosmetic upgrade, the wheels just had to be upgraded...
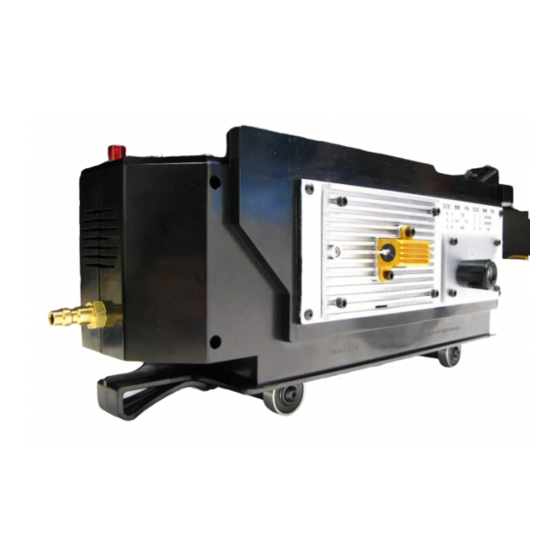
Here is the trap with the new Wheels Upgrade kit installed:
Here is a reference photo of the screen used pack (GB2) that shows a wheel assembly:
Advertisement

Related Manuals for Spirit Halloween Spirit Ghost Trap Wheels Upgrade kit


Summary of Contents for Spirit Halloween Spirit Ghost Trap Wheels Upgrade kit
- Page 1 Ghostbusters movies. The photos are of a Spirit Halloween Ghost Trap that has the GhostLab42 Spirit Ghost Trap Cosmetic kit installed. After the cosmetic upgrade, the wheels just had to be upgraded…...
- Page 2 Installation in the Spirit Halloween Pack Parts Identification: There are multiple parts included in this kit. Here are the parts laid out somewhat grouped by what area of the trap they are going to upgrade: Parts: 1) 3D printed main axel assembly (same as #2)
- Page 3 Recommended tools and supplies: • 3/32” Allen wrench (Hex Wrenches) • 9/64” Drill bits • Rotary power tool (such as a Dremel) with sanding bits • Small flat file...
- Page 4 Yes, this is a picture of a plain Spirit Halloween Ghost Trap – I forgot to get the picture of the trap with the cosmetic kit before I removed the original wheels.
- Page 5 Prepare the base of the trap: Next use the Dremel to cut and grind the 4 clips off that were used to mount the original wheels by holding the thin metal axel. Once nearly flat, I used a small flat file to make sure the area where the wheels will be mounted were smooth and flat so the main axels (#1 and #2) can sit flat on those areas.
- Page 7 Construct the wheel assembly (truck): Place the wheel alignment pieces #5 on a hard-flat surface with the larger flat side on the surface. Then press the wheels #4 onto the alignment pieces #5, being carful to keep the wheels parallel to the flat surface while pressing them onto the alignment pieces.
- Page 8 Using the 3/32” Allen wrench, screw in the four wheel assemblies into the two main axils #1 and Tighten the screws. Try and keep the screw as straight as possible since this is a metal screw into plastic you do not want to strip the connection. After tightening, loosen the screw about ¼ of a turn to allow you to center the washer and then retighten.
- Page 9 Look at the bottom of each truck: the alignment pieces #5 do extend past the bottom of the flat side of the main axels #1 and #2. This is to help with alignment to the trap and make sure the wheels will not bind: These extensions will straddle the main base that was prepared in the first part of the instructions.
- Page 10 Next drill one corner with the 9/32” drill and use one of the short screws #3 to hold the truck in place. Take care when drilling. There are wires inside this are of the trap, so do not drill too deep! In this trap, I taped the wires out of the way when I installed the cosmetic kit.
- Page 11 You are now finished, and the base of the trap should look like this: Congratulations and now go out and trap some ghosts in style!
Need help?
Do you have a question about the Spirit Ghost Trap Wheels Upgrade kit and is the answer not in the manual?
Questions and answers