diybook KG Garden Gate Closer GTS 120 Mounting
Hide thumbs
Also See for Garden Gate Closer GTS 120:
- Mounting instructions (8 pages) ,
- Assembly instructions manual (8 pages)
Advertisement
Quick Links
gardengatecloser.com
a diybook KG brand
Garden Gate Closer GTS 120/170
Mounting example type 2
Wall mounting on gates with side located door hinges
I. Check material and tool list
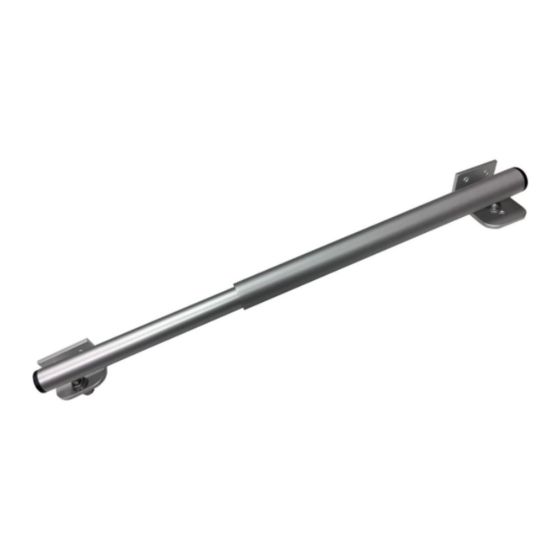
Your garden gate closer is delivered already assembled. Your product also includes two aluminium brackets with different
side lengths, 4 tapping screws and 2 cap nuts.
WARNING:
The garden gate closer is preloaded! The preloading safety should not be removed before insertion! Due
to preloading the threaded rods of the gate closer are skewed. They will adjust during assembly.
1 garden gate closer GTS 120/170
1 aluminium bracket (bracket 1): 60, 80 or 100 mm
1 aluminium bracket (bracket 2): 30 mm
2 cap nuts M6
4 tapping screws 4,8 x 19 mm
You will need a cordless screwdriver with a 4.2 mm metal drill and a cross slot (Phillips) screwdriver (PH2) for
installation. Furthermore, you need a spirit level, measuring tape, pen and two no.10 fork wrenches as well as an
impact drill, and suitable dowels and screws for your type of masonry.
diybook KG
Korneuburger Strasse 68-70/2
AT-2102 Bisamberg, AUSTRIA
UID-Nr: ATU67654415, DE313733795
FB-Nr: FN 387443 w
telephone: +43 2262 712 51
fax: +43 2262 712 51-77
email: office@gardengatecloser.com
website: https://gardengatecloser.com
page 1
Advertisement

Related Manuals for diybook KG Garden Gate Closer GTS 120

Summary of Contents for diybook KG Garden Gate Closer GTS 120
- Page 1 The garden gate closer is preloaded! The preloading safety should not be removed before insertion! Due to preloading the threaded rods of the gate closer are skewed. They will adjust during assembly. 1 garden gate closer GTS 120/170 1 aluminium bracket (bracket 1): 60, 80 or 100 mm ...
- Page 2 KG brand II. Determine type of mounting The following mounting example shows one special situation of mounting type 2, that is the mounting on gates with one-sided located door hinges. It is a special variant, because bracket 1 (that is the bracket located near the gate hinges) is mounted on the adjacent wall instead of on the gatepost.
- Page 3 KG brand Step 1: Determine mounting position of garden gate closer First, you need to determine the position of the gate closer. It can be positioned at the top of the gate, in the middle or at the bottom.
- Page 4 KG brand Note: In step 3 the exact positioning of the bracket will be checked again and possibly fine-tuned. Step 3: Check piston stroke This step is to check the measured position of bracket 1 and possibly change it slightly, so that the optimized closing performance can be guaranteed.
- Page 5 KG brand Step 4: Mount bracket 1 Mark and drill the respective holes on the wall, using the appropriate tools for your type of wall. In our picture example we use an impact drill with a 6 mm concrete drill.
- Page 6 KG brand Step 5: Position and mount bracket 2 on the gate Having positioned and fixed the first bracket (bracket 1) correctly, you´ve already done the biggest part of the mounting! Now, the second bracket (bracket 2) must be positioned correctly on the gate. Therefore, the distance between the two mounting holes (that is the chosen mounting hole on bracket 1 and the mounting hole on bracket 2) must be between 540 mm and 545 mm.
- Page 7 KG brand Now, mark and centre-punch the drilling holes. Then drill the holes using a 4.2 mm metal drill. The size of the drill is essential here. If the diameter of the hole is too small, the screw can tear off. If it is too big, the screw won´t find the hold required.
- Page 8 KG brand Step 6: Insert and tighten garden gate closer For easier mounting, the garden gate closer is pre-loaded when delivered. For inserting the gate closer, open the gate until the gate closer can be put into the respective holes without applying any force. The thicker end of the closer is to be put into bracket 1 (near the wall).
- Page 9 KG brand You’ve done it. We hope you enjoy your new Garden Gate Closer! If you have any further questions about the assembly, do not hesitate to contact us via email office@gardengatecloser.com or via our WhatsApp service +43 664 881 89 781! Also have a look at our installation videos on our homepage! The most frequent questions can be answered immediately.
Need help?
Do you have a question about the Garden Gate Closer GTS 120 and is the answer not in the manual?
Questions and answers