Table of Contents
Advertisement
Quick Links
Advertisement
Table of Contents

Related Manuals for EAT Prelude


Summary of Contents for EAT Prelude
- Page 1 European Audio Team INSTRUCTIONS FOR USE E.A.T. Prelude...
- Page 2 Please contact your dealer if you require additional assistance. The Prelude incorporates an array of features that contribute to its audiophile performance: 1. Proprietary ultralow noise AC motor and high precision frequency DC-driven AC generator for speed stability.
-
Page 3: Table Of Contents
Contents Packaging layout Product illustrations and key Setup 1. Motor installation 2. Platter and drive belt installation 3. Tonearm assembly a) Cartridge installation b) Counterweight installation, Vertical Tracking Force setting (VTF) c) Tonearm output connection 9-10 d) Vertical Tracking Angle setting (VTA) e) Azimuth setting 10-11 f) Anti-skating assembly and adjustment... -
Page 4: Packaging Layout
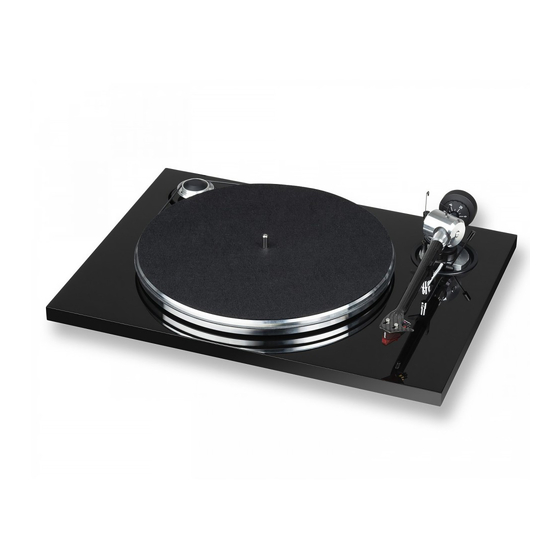
Please do your part to help protect the environment: Disposal of packaging material E.A.T. packaging is carefully designed to protect your component from damage in transit and you are strongly urged to keep the original packaging in order to safely ship or otherwise transport your turntable in the future. However, the packaging materials were chosen to be environmentally friendly, so if you must discard the packaging, please recycle. - Page 6 KEY: CONTROLS, FEATURES AND CONNECTIONS 1. ON/OFF switch 2. Platter with felt mat 3. Chassis 4. Motor base with motor and double step pulley 5. Drive belt 6. Anti-skating weight with wire 7. Anti-skating weight support hoop 8. Anti-skating stub with adjustment scale 9.
-
Page 7: Setup
SETUP 1. Motor installation Remove the complete motor base (4), (including motor, pulley and connection cable) from the packaging and place it to the required position on the place where turntable will be installed. Install the turntable chassis over the motor base. Motor base should be in the middle of the hole in left rear corner of the chassis as shown in the following illustrations. -
Page 8: Tonearm Assembly
3. Tonearm assembly The tonearm includes a combination of cardan bearings in horizontal axle and Japanese ball bearings in vertical axle. See the next steps to set up your tonearm. a) Cartridge installation * If you purchased this turntable in a package that included the cartridge, this has already been done for you. -
Page 9: B) Counterweight Installation, Vertical Tracking Force Setting (Vtf)
L- For correct cartridge alignment, use the two-point cartridge alignment protractor provided with your Prelude accessories. If unfamiliar with two-point setup, please refer to your dealer. b) Counterweight installation, Vertical Tracking Force setting (VTF) The counterweight (6) supplied is suitable for cartridges weighing between 7 - 11g. -
Page 10: D) Vertical Tracking Angle Setting (Vta)
d) Vertical Tracking Angle setting (VTA) To set the Vertical Tracking Angle, first put a record on the platter. When the needle is lowered into the record groove, the tube of the tonearm should be parallel to the surface of the record. If it is not, loosen both hexagonal screws in the tonearm base just enough to allow vertical movement of the arm pillar without force, and slide the arm up or down until it is parallel. -
Page 11: F) Anti-Skating Assembly And Adjustment
DO NOT REMOVE THE AZIMUTH SET SCREW COMPLETELY! Loosen the screw just enough to be able to gently rotate the arm tube and set the azimuth to the correct position. The correct position can be checked from the front view, preferably with the needle placed on a mirror placed on the platter. -
Page 12: Leveling The Turntable
of the wire support (7). The anti-skating force must be adjusted corresponding to the downforce as follows: Downforce Groove in the stub (8) 10 - 14mN from bearing rings 15 - 19mN " " " 20mN and bigger " " "... -
Page 13: Starting The Motor, Changing The Speed
5. Starting the motor, changing the speed Controling the turntable: • To start rotation of the platter, press the button ON/OFF switch (1) • To play 45 r.p.m., put the drive belt (5) over the larger diameter part of the motor pulley using accessory toll provided. -
Page 14: Technical Specifications
Model PRELUDE Nominal speed 33/45 rpm, manual speed change Speed variance 33rpm: ± < 0.15%, 45rpm: ± < 0.13% Wow and flutter 33rpm: ± < 0.1%, 45rpm: ± < 0.09% Signal to noise S/N Ratio (mechanical noise): - 40 dB S/N... -
Page 15: Troubleshooting, Warranty, Service
Troubleshooting The platter doesn’t turn although the unit is switched on: • The unit is not connected to the mains power supply (the building’s electrical system). • No mains power is being delivered at the socket. • The drive belt is not fitted properly or has slipped off. No signal through one or both channels: •...
Need help?
Do you have a question about the Prelude and is the answer not in the manual?
Questions and answers