Table of Contents
Advertisement
Available languages
Available languages
Quick Links
Advertisement
Table of Contents

Related Manuals for Sagola DRY TECH DT 3


Summary of Contents for Sagola DRY TECH DT 3
- Page 1 DT3/6 m a n u a l d e i n s t r u c c i o n e s i n s t r u c t i o n m a n u a l...
- Page 3 índice Versión original en Español INSTRUCCIONES DE USO Y MANTENIMIENTO DE LOS INFRARROJOS Introducción pág. 4 Advertencias pág. 4 Descripción de funcionamiento pág. 5 Datos técnicos pág. 5 Componentes pág. 6 Montaje pág. 6 6.1. Instalación de la base pág. 6 6.2.
- Page 4 Muchas gracias por haber adquirido un producto SAGOLA. Nos alegramos de haber encontrado un cliente en Usted. Los productos SAGOLA reúnen los más elevados avances técnicos, de diseño y de facilidad de manejo. Aplicamos los más estrictos requisitos de calidad a todos nuestros productos para satisfacer las expectativas más exigentes.
-
Page 5: Descripción Del Equipo
3. Descripción del equipo Este aparato utiliza como principio de funcionamiento la radiación de infrarrojos. El programa AUTO está diseñado para evitar daños en la pintura y/o barnices durante el proceso de enfriamiento. Es apto para secar productos de poco grosor, como los productos de pintura (masillas, imprimaciones, lacados) o cualquier otro producto que necesite una aportación de energía importante. -
Page 6: Montaje
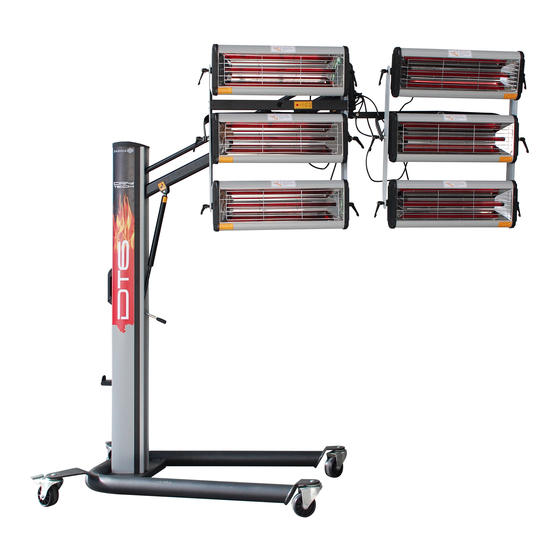
5. Componentes 1. Sensor de distancia 2. Pantallas 3. Brazo soporte 4. Columna 5. Hidráulico 6. Bloqueo del hidráulico 7. Interruptor ON/OFF 8. Base 9. Rueda 6. Montaje Los infrarrojos de onda corta se dividen en 3 partes (base, columna y pantallas). 6.1. -
Page 7: Instrucciones De Uso
6.3. Instalación de las pantallas: - Abra el embalaje de las pantallas con cuidado. - Conecte las pantallas con el brazo-soporte y apriételo con los tornillos. - Conecte los cables de control y ajuste el ángulo de las pantallas. 7. Instrucciones de uso 7.1. - Page 8 7.2. Modo automático - Monte correctamente el sistema de infrarrojos de acuerdo con las instrucciones de montaje. - Conecte el equipo a la toma de corriente y 00:00 Ajuste de tiempo enciéndalo. La pantalla pasará por el procedimiento de puesta en marcha y automáticamente predeterminado el modo automático.
- Page 9 El tiempo y la potencia de cada paso se pueden ajustar durante la ejecución, pero no cambiará los datos predeterminados. Si desea cambiar los datos predeterminados del modo automático, ajuste los parámetros de la siguiente manera antes de presionar "Start": 1.
-
Page 10: Mantenimiento
8. Tiempos de secado TIEMPO TIEMPO PRESECADO SECADO COMPLETO DISTANCIA MASILLA 10 min. 50 - 60 cm. APAREJO 4 - 6 min. 8 - 10 min. 60 - 70 cm. PINTURAS 4 - 6 min. 8 - 10 min. >70 cm. BARNICES 6 min. - Page 11 10/11 10. Repuestos Infrarrojo ed. 01 11. Lámpara infrarrojos 1.100 w 11/1 Dorada 11/2 Roja ESPAÑOL...
- Page 12 Infrarrojo ed. 01 11. Lámpara infrarrojos 1.100 w 11/1 Dorada 11/2 Roja ESPAÑOL...
-
Page 13: Esquema Eléctrico
12/13 11. Tabla de averías Avería Causa de la avería Reparación Tubo de luz dañado Compruebe tubo de luz El tubo de luz La lámpara no está enchufada Comprobar las conexiones no funciona Relé estado sólido dañado Sustituir relé estado sólido Relé... -
Page 14: Condiciones De Garantía
Las prestaciones por garantía no tienen por consecuencia una prolongación del periodo de la misma. No se atenderá en garantía ningún aparato del cual no conste en los archivos de SAGOLA S.A. el resguardo adjunto, del certificado de garantía debidamente cumplimentado. - Page 15 index Original version in Spanish OPERATING AND MAINTENANCE INSTRUCTIONS FOR INFRAREDS Introduction page 16 Warnings page 16 Description of operation page 17 Technical Details page 17 Components page 18 Assembly page 18 6.1. Installation of the base page 18 6.2. Installation of the column page 18 6.3.
- Page 16 1. Introduction Thank you very much for purchasing a product SAGOLA. We are glad you found a customer. The SAGOLA products meet the highest technical progress, design and ease of use. We apply the most strict quality requirements of our products to satisfy the most demanding expectations.
-
Page 17: Description Of Operation
16/17 3. Description of operation This appliance operates on the principle of infrared radiation. The AUTO program is designed to prevent damage to the paint or varnish during the cooling process. It is particularly well suited to drying thin products such apaint products (mastic, primer, lacquers) and any other product requiring high energy input. - Page 18 5. Components 1. Distance sensor 2. Cassette 3. Support arm 4. Column 5. Lifter 6. Lifter switch 7. Power switch ON/OFF 8. Base 9. Wheel 6. Assembly The shortwave infrared curing lamp is divided into 3 parts (base, column and cassette). 6.1.
- Page 19 18/19 6.3. Installation of the cassette: - Open the packing of the cassette with care. - Connect cassette with support arm and tighten up with the screws. - Connect control wires and adjust the angle of cassette. 7. Instructions for use 7.1.
- Page 20 7.2. Automatic Mode - Properly assemble the curing system according to the assembly instructions. - Switch on the power supply. The display will 00:00 Time adjustment go through the start-up procedure and automatically default to Automatic Mode. The system is ready to use when the parameters appears on the display screen as follows: Distance adjustment Power adjustment...
- Page 21 20/21 The time and power of each step can be adjusted during execution, but it won't change the default data. If you want to change the default data of automatic mode, adjust the parameters as follows before pressing "Start": 1. Once switching on the power supply, the display automatically defaults to Step 1 of the automatic mode.
-
Page 22: Maintenance
8. Drying times average PRE-DRYING COMPLET DRYING TIME TIME DISTANCE FILLER 10 min. 50 - 60 cm. PRIMER 4 - 6 min. 8 - 10 min. 60 - 70 cm. PAINTS 4 - 6 min. 8 - 10 min. >70 cm. SOLVENTS 6 min. -
Page 23: Spare Parts
22/23 10. Spare Parts Infrared ed. 01 11. Infrared lamp 1,100 w 11/1 Gold coated 11/2 Red ENGLISH... - Page 24 Infrared ed. 01 11. Infrared lamp 1,100 w 11/1 Gold coated 11/2 Red ENGLISH...
-
Page 25: Troubleshooting
24/25 11. Troubleshooting Problem Cause Solution Light tube damaged Check light tube Light tube Lamp is not plugged in Check the connections does not work Control silicon damaged Replace control silicon Control silicon damaged Replace control silicon Light tube does not turn off Digital display Unplugged flat wire in circuit board... -
Page 26: Warranty Conditions
Consequently, the services rendered under guarantee do not involve an extension of the warranty period. Any device for which there is no duly completed guarantee certificate in the files of SAGOLA S.A. will be rejected. The manufacturer reserves the right to make technical modifications. - Page 27 C O N D I C I O N E S D E G A R A N T Í A G U A R A N T E E C 0 N D I T I O N S C O N D I T I O N S D E G A R A N T I E G A R A N T I E B E N D I N G U N G E N CONDIÇÕES DA GARANTIA...
- Page 30 SAGOLA S.A. Urartea, 6 · 01010 Vitoria-Gasteiz · ESPAÑA Tel.: +34 945 214 150 · Fax: +34 945 214 147 sagola@sagola.com · www.sagola.com...
Need help?
Do you have a question about the DRY TECH DT 3 and is the answer not in the manual?
Questions and answers