Table of Contents
Advertisement
Quick Links
ROSCOPE i2000
DE Bedienungsanleitung
EN Instructions for use
FR Instruction d'utilisation
ES Instrucciones de uso
IT Istruzioni d'uso
NL Gebruiksaanwijzing
PT Instruções de serviço
DA Brugsanvisning
SV Bruksanvisning
NO Bruksanvisning
FI Käyttöohje
PL Instrukcja obslugi
CS Návod k používání
TR Kullanim kilavuzu
HU Kezelési útmutató
EL Οδηγίες χρήσεως
RU Инструкция по использованию
www.rothenberger.com
Advertisement
Table of Contents

Subscribe to Our Youtube Channel
Related Manuals for Rothenberger ROSCOPE i2000


Summary of Contents for Rothenberger ROSCOPE i2000
- Page 1 ROSCOPE i2000 DE Bedienungsanleitung NO Bruksanvisning EN Instructions for use FI Käyttöohje FR Instruction d’utilisation PL Instrukcja obslugi CS Návod k používání ES Instrucciones de uso IT Istruzioni d’uso TR Kullanim kilavuzu NL Gebruiksaanwijzing HU Kezelési útmutató EL Οδηγίες χρήσεως...
- Page 2 EN 301-489-1 V1.9.2, EN 60065 Herstellerunterschrift Manufacturer / authorized representative signature ppa. Thorsten Bühl Kelkheim, 22.02.2016 Director Corporate Technology Technische Unterlagen bei / Technical file at: ROTHENBERGER Werkzeuge GmbH Spessartstasse 2-4 D-65779 Kelkheim/Germany No. 1500000696 ROSCOPE i2000 + Modul TEC...
- Page 3 Intro DEUTSCH Seite 2 Bedienungsanleitung bitte lesen und aufbewahren! Nicht wegwerfen! Bei Schäden durch Bedienungsfehler erlischt die Garantie! Technische Änderungen vorbehalten! ENGLISH - Original User Manual page 21 Please read and retain these directions for use. Do not throw them away! The warranty does not cover damage caused by incorrect use of the equipment! Subject to technical modifications! FRANÇAIS page 38...
- Page 4 DEUTSCH...
-
Page 5: Table Of Contents
Saved Pictures and Video Playback Stil Image / Adding an Audio Annotation Touch Screen Navigation / Settings Wireless Transfer of Images / Video Transferring Images to a computer How to update Operation of the ROSCOPE i2000 App Cleaning Instruction Storage Troubleshooting Accessories Disposal... - Page 6 Markings in this document: Danger! This sign warns against the danger of personal injuries. Caution! This sign warns against the danger of property damage and damage to the environment. Call for action ➔ This product is covered by U.S. Patents: 7,384,308; 7,431,619 B2; 7,581,988 B2; 7,584,534;...
-
Page 7: Safety Notes
Safety Notes General Safety Rules It is recommended to read the entire manual before operating the ROSCOPE i2000: WARNING! Read all instructions. Failure to follow all instructions listed below may result in electric shock, fire and/or serious injury. The term „power tool“ in all of the warnings listed below refers to your mains operated (corded) power tool or battery operated (cordless) power tool. -
Page 8: Safety Instruction
Do not carry the A/C power supply by the power cord. Reduces the risk of electrical shock. Battery Safety • The battery in the ROSCOPE i2000 is NOT designed to be user replaceable. Call your Service Center if you believe the ROSCOPE i2000 battery is in need of service. •... -
Page 9: Technical Data / Specification
Improper care of the battery may result battery leakage, electrical shock and burns. • If the ROSCOPE i2000 is damaged, do not plug the A/C power supply into it. Do not attempt to charge. •... -
Page 10: Function Of The Unit
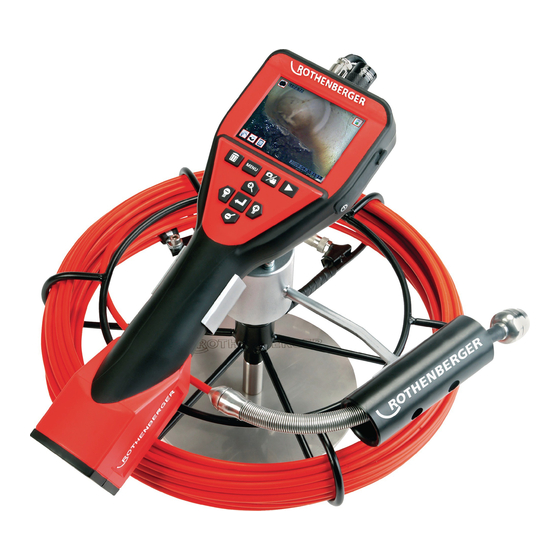
Function of the unit Description The ROSCOPE i2000, a handheld inspection device, displays live color video from an imaging source. This device is designed as a remote inspection tool to look into hard to reach areas such as home inspection, cable routing and plumbing inspections. It allows the user to capture still- images and full-motion video, along with audio. -
Page 11: Charging The Roscope I2000
(Figure No. 4). Figure No. 4 - USB Socket NOTE: The ROSCOPE i2000 will only charge the battery if the temperature is between 0°C and 40°C (32°F and 113°F). Outside of this temperature range the ROSCOPE i2000 may continue to operate but the batteries will not charge and the Charge Status LED will be off. -
Page 12: Installing The Camera Accessories
Figure 7 – Cable Connections (Connector Style “B”, Silver 5-Pin Style Connector) (Connector Style “B” is used to attach previous versions of ROSCOPE Imager Cable to the ROSCOPE i2000) NOTE: 1.2 m (4’) cable extensions are available, for Connector Style “A” imager only, to increase the length of your cable up to 9.7 m (32’) in length. -
Page 13: Installing The Sd Memory Card
Figure 9 – Installing an Accessory on the Connector “A” imager Installing the SD Memory Card Locate the tab on the port cover (Figure No. 10), lift and pull to remove the cover and expose the SD card slot. (SD card is included). Insert the SD card into the slot (Figure No. 11) making sure the contacts are facing towards you and the angled portion of the card is facing down. -
Page 14: On-Screen Navigation
On-Screen Navigation When the ROSCOPE i2000 inspection device is powered on, the first screen that is displayed is referred to as the splash screen (Figure No. 12). This screen tells you the device is booting up. Once the product is fully powered up, the screen will automatically switch to the live screen. -
Page 15: On-Screen Icons / Settings And Navigation
On-Screen Icons / Settings and Navigation Live Screen Display Capture Mode Indicator and Button (Touch screen to select camera or video) Tools/Menu Button (Touch screen to access Tools Menu) NOTE - All icons will appear when the user touches the screen or presses a hardware button and will disappear after 3 seconds. -
Page 16: Saved Pictures And Video
Back Button (Touch screen to return to Live Image) Firmware version Set Time and Date (Touch screen for settings) Auto-off Timer Function (Touch screen to select) Disabled Device will turn off after 30 minutes Device will turn off after 20 minutes Device will turn off after 10 minutes ROSCOPE “Headlight”... -
Page 17: Playback Stil Image / Adding An Audio Annotation
Playback Stil Image / Adding an Audio Annotation NOTE - Sound-Bite can be recorded on live video. / It cannot be added to saved video. NOTE - All icons will appear when the user touches the screen or presses a hardware button and will disappear after 3 seconds. -
Page 18: Touch Screen Navigation / Settings
Touch to turn feature for the time/date stamp on/off Wireless Transfer of Images / Video The ROSCOPE i2000 has the ability to wirelessly transfer saved images and video from the hand- held device to a secondary Wi-Fi enabled smart phone, such that you can share data. -
Page 19: Transferring Images To A Computer
Power Button Figure No. 14 – USB Connection for Transfer Use the Mini USB cable to connect the ROTHENBERGER handheld device to the computer (Figure No. 14). Power the device ON, a splash screen saying “USB Connected” will appear on the LCD... -
Page 20: Operation Of The Roscope I2000 App
- Click Configure in order to navigate to the hotspot settings. - Establish the name of the hotspot and the password for the mobile network. ➔ Switch on the ROSCOPE i2000, select the Extras/Menu button and activate the WLAN (IP address of the ROSCOPE i2000 visible under the hotspot name). -
Page 21: Troubleshooting
Customer service The ROTHENBERGER service locations are available to help you (see listing in catalog or on- line) and replacement parts and service are also available through these same service locations. - Page 22 • www.rothenberger.es Tel. + 86 21 / 67 60 61 • + 86 21 / 67 60 20 67 Sweden Fax + 21 / 67 20 • office@rothenberger.cn Sweden AB Hemvärnsgatan 22 • S- 171 54 Solna, Sverige Tel. + 46 / 60 23 00 • Fax + 46 8 / 54 60 23 01 Germany roswe@rothenberger.se •...
Need help?
Do you have a question about the ROSCOPE i2000 and is the answer not in the manual?
Questions and answers