FXLuminaire Luxor Quick Start Manual
Hide thumbs
Also See for Luxor:
- Quick start manual (4 pages) ,
- Owner's manual and installation instructions (38 pages) ,
- Owner's manual (42 pages)
Table of Contents
Advertisement
Quick Links
LUXOR
®
QUICK START GUIDE
The Luxor lighting controller manages groups
of lights and light intensity at desired times.
Two-wire connections power and communicate
with all lights in a system.
➊
LUXOR
➋
➌
➍
➎
➏
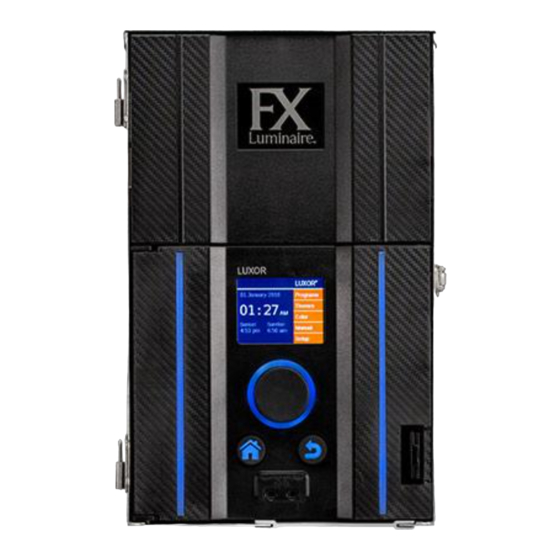
1. Facepack
2. LCD screen
3. Clickable scroll wheel
4. Home button
5. Back button
6. Fixture assignment ports
➐
➑
➒
⑩
⑪
⑫
7. Core cover
8. Chassis
9. Facepack connection
10. Chassis LED
11. Terminal blocks
12. Fuse cover
Fixture Assignment
1. Enter assignment mode by inserting stripped
wire leads into the assignment ports on the
front of the Luxor controller facepack.
1
2. Select your desired group and press
Program.If assignment fails, press Program
again.
Controller Setup
1. Select Setup from the Home screen.
2. Enter the current Month, Day, Year, and
Time (Hour, Minutes, Seconds). Then select
Auto.
3. Select your desired Language.
Location Setup
1. Select your Location from the Setup screen.
2. Select your Region.*
3. Select your Map.
4. Use the scroll wheel to navigate to the
desired location. Use the scroll wheel to
toggle between Up/Down and Left/Right.
*The time zone and longitude/latitude will
automatically change with your selected
region.
Wireless Control
Wireless of the Luxor lighting controller uses
the facepack as a connection point for both
LAN and Wi-Fi connection.
A
B
LAN
Wi-Fi
A. LAN
1. Install a network cable into the LAN
connector located on the back side of the
Luxor facepack.
2. Select SETUP from the Home screen.
3. Select LAN.
4. Confirm the LAN field displays "Connected."
Advertisement
Table of Contents

Related Manuals for FXLuminaire Luxor


Summary of Contents for FXLuminaire Luxor
- Page 1 Program.If assignment fails, press Program Two-wire connections power and communicate again. Wireless of the Luxor lighting controller uses with all lights in a system. the facepack as a connection point for both LAN and Wi-Fi connection.
- Page 2 300 seconds) for your Color Wheel cycle. The the Wi-Fi connector on the back side of 2. Scroll to your desired color label (C1–C250). shorter the duration, the faster the cycle. the Luxor facepack. 2. Select SETUP from the Home screen. Themes 3. Select Wi-Fi.
Need help?
Do you have a question about the Luxor and is the answer not in the manual?
Questions and answers