FXLuminaire Luxor Owner's Manual And Installation Instructions
Led landscape lighting controller
Hide thumbs
Also See for Luxor:
- Quick start manual (4 pages) ,
- Quick start manual (2 pages) ,
- Owner's manual (42 pages)

Related Manuals for FXLuminaire Luxor


Summary of Contents for FXLuminaire Luxor
- Page 1 LUXOR ® OWNER’S MANUAL LUXOR LED Landscape Lighting Controller Owner’s Manual and Installation Instructions for Luxor Lighting Controller...
-
Page 2: Table Of Contents
Manual Mode Block Database Reset Color Chassis Indicator Lights Operating the Luxor Controller Color Palette Navigating the Luxor Warranty Color Wheel Home Screen Mixing FX Luminaire LED, ZD, Activity Screen and ZDC Diagnostics Screen Using Other Devices with the Luxor Disable... -
Page 3: Luxor Overview
Luxor Overview Luxor is a lighting transformer and controller capable of Note controlling groups of lights that are initiated by programmed Luxor is intended for use with FX Luminaire LED events. These events are adjustments of light intensity at set fixtures or devices containing FX Luminaire times. -
Page 4: Glossary Of Terms
Color: The visual combination of hue and saturation not connect two or more power supplies in parallel. Not for use in Primary Controller: Luxor controller containing a facepack dwelling units. This presents a risk of fire. Do not place insulation under terminal plate. -
Page 5: Installing The Luxor Transformer
120-volt, 15-amp circuit to the desired location. outlet For the international/export Luxor version, the previously 12" (30.5 cm) mentioned information applies for 230-volt, 10-amp circuits. minimum 2. -
Page 6: Step 3: Running Cable To The Fixtures
Far-Zone 80–120' (24.4 m - 36.6 m) 12 AWG (2.05 mm): 100 watts max. 10 AWG (2.59 mm): 120 watts max. All Luxor controllers come equipped with a 5' (1.5 m), 12 AWG 8 AWG (3.26 mm): 180 watts max. - Page 7 Installing the Luxor Transformer Summary For maximum light output and LED life, each luminaire should be provided with 10 to 15 volts. Cable Stats Low-voltage lighting systems are typically installed using direct-burial-rated stranded cable. The most common cable used is referred to as 12/2 AWG (2.05 mm) stranded cable. The size...
-
Page 8: Low-Voltage Cable
Connecting Cables at the Terminal Block Transformer terminal block: The Luxor controller includes two Common lugs, and two 15V lugs. Common Lugs: One conductor from each cable run coming from the lights to the transformer must be connected to one of the common lugs. -
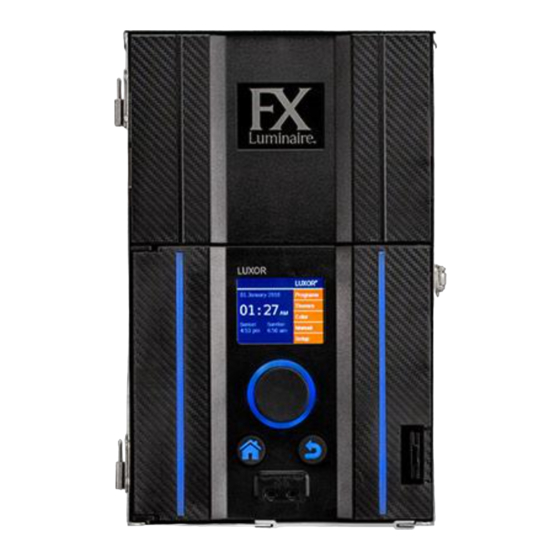
Page 9: Operating The Luxor Controller
Home screen. • While in any screen, the Back button can be pressed to return All functions on the Luxor are accessible through the Home to the previous screen. screen. The default display on the Home screen displays the following: •... -
Page 10: Activity Screen
Operating the Luxor Controller Activity Screen Diagnostics Screen After five minutes of inactivity, an Activity screen will appear on Assigned the LCD screen if the lights are running. The wait time is reduced • Controller assigned to only five seconds when the current screen is the Home screen. -
Page 11: Setup Screen
Daylight Saving Time (DST), when activated, will adjust time forward or backward by one hour at the appropriate dates each year. To initiate it, select On. To deactivate it, select Off. • Select Auto to sync the Luxor time clock every 24 hours. -
Page 12: Language
• or the Home buttons are pressed. Location The Location menu is designed to graphically represent a Luxor’s location on a map for accurate sunrise and sunset times based on the current date, time zone, and longitude/latitude settings. Figure 12: Location map of the United States First, set the time zone in the Setup screen. -
Page 13: Assign
Operating the Luxor Controller Additional Countries Assign The default map is set to the United States. To view additional When compatible fixtures are plugged in to the fixture countries, do one of the following: programming ports, the assign screen will automatically display. -
Page 14: Backup
The backup function saves all user input information, including programs, themes, colors, and setup data. To create a backup file for your Luxor, follow the steps below. Insert an SD card into the side of the facepack with the pins facing toward the front of the facepack. -
Page 15: Assigning Light Fixtures Into Groups
The assigned group number is stored in the device and not in the facepack. Thus, power loss or other errors within the Luxor controller will not affect the fixture assignment. If a device (e.g., LED board, lamp, Cube) is replaced, the new device must be programmed to the desired group number. -
Page 16: Setting Up Programs
Operating the Luxor Controller Setting Up Programs • The % field specifies the desired intensity for each event. Values range from 0% (off) to 100%. Theme events are The Programs screen is where all daily running programs are limited to On or Off. -
Page 17: Themes
Operating the Luxor Controller Themes A theme is a planned set of groups at stated colors and intensities. A user can call up themes in the Program menu for quick setting of a series of groups, or in the Manual menu for on-demand control. -
Page 18: Manual Mode
Operating the Luxor Controller • Select the Test Theme checkbox to temporarily turn on all 3. Set the duration, or the amount of time that the group groups that have been set in a theme. While this function is will run. -
Page 19: Color
Color Palette color swatch and press the scroll wheel to open the Color Colors are selected on the Color Palette screen. The Luxor can Selection screen. Adjust the Hue (top) and/or Saturation store up to 250 preset colors, labeled numerically as seen in... -
Page 20: Color Wheel
3. Select a starting color. This is a user-defined color from the Color Palette menu. 4. Select the number of seconds in which the Luxor will scan through all 300 hues, beginning first at the "Starting Color." For rapid color changes, choose a lower number of seconds. -
Page 21: Mixing Fx Luminaire Led, Zd, And Zdc
Mixing FX Luminaire LED, ZD, and ZDC FX Luminaire offers a variety of LED boards with ascending functionality when used with the Luxor. The standard board is zoneable, the ZD board offers zoning and dimming, and ZDC encompasses the first two and adds color to the mix. -
Page 22: Using Other Devices With The Luxor
FX Luminaire integrated LED boards. Two of those devices lamp that converts incandescent fixtures to energy-efficient LED include the Luxor Cube and the Luxor MR-16 ZD. fixtures. When connected to a Luxor, the MR-16 ZD adds zoning, dimming, and control capabilities to any brand of low-voltage Cube landscape lighting fixture utilizing an MR-16 socket. -
Page 23: Disable
Operating the Luxor Controller Disable The Disable option is a way to completely shut down all lighting events in the Manual and Program modes regardless of time or status, indefinitely. This mode does not turn off the unit but rather suspends all lighting events until the user decides to reactivate. -
Page 24: Luxor Linking Setup
Linking allows for a single point of control for sites that require Updating to Luxor Linking multiple Luxor controllers. Primary and satellite controllers are From product page, download the latest facepack and linked using a Cat 6 connection. A linking system can contain a chassis Luxor Linking firmware onto an SD card. -
Page 25: Connecting Satellite Controllers
Luxor Linking Setup Connecting Satellite Controllers 4. If site requires multiple satellite controllers, insert new Cat 6 cable into unused "Linking Port" of previous satellite Disconnect power to primary and satellite controllers. controller. 2. Insert one end of Cat 6 cable into "Linking Port" of the 5. -
Page 26: Chassis Communication And
Luxor Linking Setup Chassis Communication and Assignment Apply power to primary controller. 2. On facepack Diagnostics screen, verify primary controller has been "Assigned" and is "Communicating." Figure 30: Diagnostics screenshot 3. Apply power to satellite controllers. 4. On facepack Diagnostics screen, verify satellite controllers have been "Assigned"... -
Page 27: Care And Maintenance
Care and Maintenance Regular Preventive Maintenance Perform the following regular preventive maintenance procedures: CATEGORY DESCRIPTION TIMELINE Tighten all terminal lugs. Annually Transformer Blow out all bugs and webs. Annually Clean dirty lenses to minimize calcium deposits. Annually Straighten all pathway lights. Quarterly Trim all plant material as needed;... -
Page 28: Troubleshooting
Care and Maintenance Troubleshooting PROBLEM CAUSE RESOLUTION Error message: "Overload" (uppercase An uppercase “O” overload indicates Check for shorts in the line. Resolve or "O") current far in excess of normal operating repair the short circuit. current, typically caused by a short circuit. This is controlled by a hardware circuit and trips the overload immediately. -
Page 29: Firmware Updates
Firmware updates are occasionally released to add features or enhance the Luxor functionality. To update the facepack, chassis, Wi-Fi module, and flash firmware on the Luxor, an SD card is required to transfer the data from a computer to the facepack. - Page 30 Care and Maintenance Figure 33: Setup screen (firmware) Figure 34: Firmware load screenshot 7. Select the Firmware Type that will be updated. 8. Once the designed type is selected, navigate to Update and press the scroll wheel. The facepack and flash update processes usually take between 5 and 15 seconds, chassis updates typically take a couple of minutes, and fixture updates can take up to 15 minutes.
-
Page 31: Fuse Replacement
If the unit is powering on, but the fixtures attached are not receiving power, the fuse may need to be replaced. To replace, follow the directions below: Unplug the Luxor controller from power. 2. Remove all wires from common and 14V terminals on the chassis. -
Page 32: System Reset
Care and Maintenance System Reset There are two types of system resets: facepack reset and database reset. The facepack reset simply removes power to the facepack and restarts the firmware. A database reset deletes the entire database to allow the user to start from scratch. All program data is lost during a database reset, but fixture assignments remain intact. -
Page 33: Database Reset
Care and Maintenance Database Reset Chassis Indicator Lights From the Home screen, push both the Home button and An indicator light displays the communication status of the the Back button simultaneously to bring up the Diagnostics chassis to the facepack. The following colors indicate the screen (Figure 2 on page 3). -
Page 34: Warranty
Warranty Warranty FX Luminaire’s obligation to repair or replace its products as set forth above is the sole and exclusive warranty set forth by FX. Hunter Industries incorporated (“Hunter”) warrants FX Luminaire There are no other warranties, expressed or implied, including (“FX”) transformers to be free of defects in materials or warranties of merchantability and fitness for a particular workmanship under normal use for a period of ten (10) years... - Page 35 Warranty Any FX Luminaire product being returned must receive a Return Goods Authorization number from Hunter Customer Service prior to returning the product. All returned product is subject to a 25 percent restocking fee. Product must be returned within six (6) months of order date. All product returned must be in its original packaging, be undamaged and unused and never energized.
- Page 36 Our mission is to create the most energy-efficient lighting products in the world while A Hunter Industries Company maintaining the highest level of quality and reliability. In every instance we will back our innovations with the unwavering support our customers need to succeed. Gregory R.
- Page 37 Fixture Group Stickers...
- Page 38 Fixture Group Stickers...
Need help?
Do you have a question about the Luxor and is the answer not in the manual?
Questions and answers