Advertisement
Quick Links
Advertisement

Related Manuals for i3-TECHNOLOGIES i3SYNC


Summary of Contents for i3-TECHNOLOGIES i3SYNC
- Page 1 TRANSMITTER Quick start guide...
-
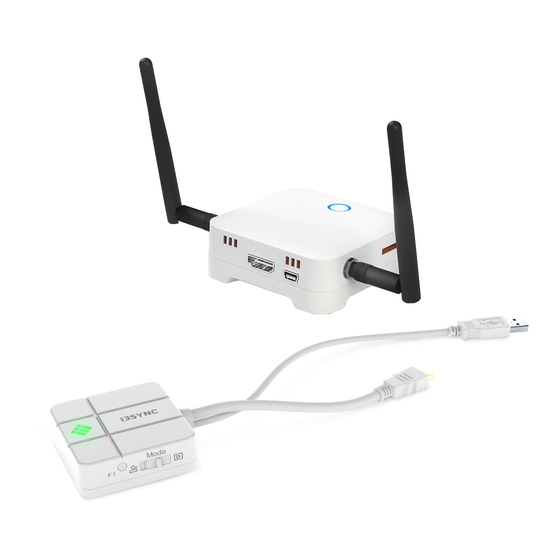
Page 2: What's In The Box
Lets see what’s in the box. i3-Technologies is conscious about the environmental impact of the products that we produce. Therefore we would like you to support us in this mission by disposing all packaging according to any local regulations. To check if we packed your product correctly, please verify if all these items are present:... - Page 3 Mode Switch: switch presentation Main button: pairing / start mode / Video mode mirroring / stop mirroring F1 button: snapshot in presentation mode / video mode Main button: pairing / start mirroring / stop mirroring i3SYNC BUTTONS i3SYNC BUTTONS...
- Page 4 Lights up constantly Micro USB Mirroring Blue Lights up constantly Error Blink Slide Switch: overwrite on/off FW update White Blink Main button: for pairing with transmitter F1 button: for firmware update Micro SD Card slot: for firmware update i3SYNC BUTTONS i3SYNC...
- Page 5 How to install. How to use. How to connect your i3SYNC TRANSMITTER and start working with it. First-time usage Receiver Connect the i3SYNC receiver to your display. 1 Connect a HDMI cable from a display to the HDMI OUT port of the Receiver.
-
Page 6: Warranty
Important warranty information. When using the i3SYNC Transmitter for the first time: Our i3TOUCH EX devices are equipped by default with a 5 year warranty. If you however have acquired the interactive display for educational purposes, this warranty can be extended. - Page 7 info@i3-technologies.com...
Need help?
Do you have a question about the i3SYNC and is the answer not in the manual?
Questions and answers