
Related Manuals for TESTING 1.0206.01


Summary of Contents for TESTING 1.0206.01
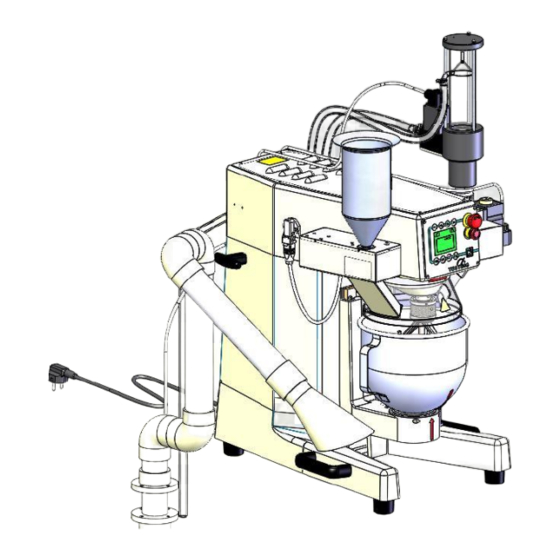
- Page 1 Laboratory mortar mixer 1.0206.01 Operating instructions Laboratory mortar mixer with sand feed program mode Model 1.0206.01...
-
Page 2: Table Of Contents
Laboratory mortar mixer 1.0206.01 Importance of the operating instructions Before operating the laboratory mortar mixer, the operating instructions must be read and understood. Contents Page Reception, transport ....................5 1.1. Reception ......................5 1.2. Transport ......................5 1.3. Removing the transport packaging ..............5 1.4. - Page 3 Laboratory mortar mixer 1.0206.01 9.4. Key symbol ...................... 23 9.4. Start conditions....................25 9.5. Basic setting in the server menu ..............25 9.6. Setting the language ..................28 9.7. Setting the display brightness ................. 29 9.8. Setting the soft start ..................30 9.9.
- Page 4 Laboratory mortar mixer 1.0206.01 23.2. Mixing program 2 according to EN 480-T1 ..........50 23.3. Mixing program 3 according to EN 196-T3 ..........51 23.4. Mixing program 4 according to EN 196-T9 ..........52 Diagram representation of the mixing processes .......... 53 according to ASTM ......................
-
Page 5: Reception, Transport
Laboratory mortar mixer 1.0206.01 Reception, transport 1.1. Reception Check the visible external condition of the delivered shipment. If the condition is correct, the shipment can be accepted by the carrier (parcel service or freight forwarder). If there is no objection or any transport damages detected, the completeness of the ship- ment must be checked against the delivery note. -
Page 6: Transport By Hand
Laboratory mortar mixer 1.0206.01 Danger The packaging materials (plastic, polystyrene, screws, nails, wood, etc.) must be kept away from children. They must be disposed of properly. Caution Before you dispose of the packaging, please check if accessories, instructions, documents and spare parts remain inside the packaging. -
Page 7: Basic Safety Instructions
Laboratory mortar mixer 1.0206.01 Basic safety instructions 3.1. Obligations of the operator The operating instructions are to be kept in the immediate vicinity of the mortar mixer. Only suitably qualified operating personnel may work with the mortar mixer. The operating personnel must be trained before using the mortar mixer. -
Page 8: Danger When Handling The Mortar Mixer
Laboratory mortar mixer 1.0206.01 3.5. Danger when handling the mortar mixer The mortar mixer is built according to state-of-the-art and recognised technical rules. Nevertheless, danger to the user's life or that of third parties or damage to machine parts or other property may occur during its use. - Page 9 Laboratory mortar mixer 1.0206.01 Intended use includes the following applications: MANUAL - Operation with selectable mixing speeds The requirements and limit values, as well as the safety instructions pro- vided in these operating instructions, must be complied with in all cases.
-
Page 10: Improper Use
6.1 4.3. Information on the CE symbol TESTING Bluhm & Feuerherdt test equipment bear the CE symbol. The CE marking confirms the conformity of the product with the EC directives to be taken into account for the product and compliance with the "essential requirements" defined therein, the generally applicable level of protection. -
Page 11: General Safety Instructions
Laboratory mortar mixer 1.0206.01 Check that the indication on the nameplate matches your mains voltage. If the device or the connection cable is damaged, pull out the mains plug immediately. Take the necessary precautionary measures when mixing, in order to prevent dust from getting into the eyes, mouth and nose from when mixing. - Page 12 Laboratory mortar mixer 1.0206.01 1) Workplace Keep your work area clean and tidy. Disorder and unlit work areas may result in accidents. Do not work with the mortar mixer in hazardous environments where there are flammable liquids, gases or powders. Electrical tools produce sparks that may ig- nite the powder or vapours.
-
Page 13: Protective Clothing
Laboratory mortar mixer 1.0206.01 4) Careful handling and use of power tools Unplug the power plug before unplugging the power cable or changing any acces- sories. This precautionary measure prevents an unintentional turning on of the de- vice. Keep unused power tools out of reach of children. Do not allow persons to use the device who are unfamiliar with the device or who have not read the instructions. -
Page 14: Description Of The Mortar Mixer
Laboratory mortar mixer 1.0206.01 Description of the mortar mixer 5.1. Mechanical design The housing of the mortar mixer is made of stable light metal casting. The mixer is made of stainless steel and is coupled with the planetary gear by a snap closure. -
Page 15: Safety Devices
Laboratory mortar mixer 1.0206.01 5.3. Safety devices The mortar mixer is equipped with the following safety devices: Emergency stop switch When the EMERGENCY STOP switch is pressed, the drive motor is disconnected from the supply network by the safety module. -
Page 16: Preparations For Commissioning
Laboratory mortar mixer 1.0206.01 Preparations for commissioning 6.1. Installation location/ambient conditions Caution The operation of the mortar mixer is only permissible in dry spaces! The following limit values apply: Ambient temperature DIN EN 60204-1, 4.4.2 +5C up to +40C Humidity DIN EN 60204-1, 4.4.3... -
Page 17: Lowering And Removing The Mixing Bowl
Laboratory mortar mixer 1.0206.01 6.3. Lowering and removing the mixing bowl Loosen the right hand lever at the right side of the mortar mixer and push it to the front as far as it will go. The mixing bowl lowers. -
Page 18: Adjusting The Distance Between The Mixing Bowl And Mixer
Turning the adjusting screw anti-clock- wise will increase the distance. Lock nut For checking, the distance template (TESTING Art. No.: 1.0203.07) can be used to check the distance between the mixer and the bowl. Figure 2 If the distance is correctly set, the lock nut, the adjusting screw and the two clamping screws must be firmly tightened on the bracket for the mixing bowl. -
Page 19: Sand Feed Mechanism
Laboratory mortar mixer 1.0206.01 Sand feed mechanism The sand feed mechanism has been developed for the intake and allowance of 1350 g of EN standard sand into the mixing trough. 7.1. Assembly The sand feed mechanism for standard sand is assembled from the front on the left side of the mortar mixer above the mixing bowl, with 2 cylinder screws with hexagon socket M6 on the threaded holes provided for this purpose. -
Page 20: Technical Details
Laboratory mortar mixer 1.0206.01 Technical details Available space approx.415x590 mm Power consumption 0.37 kW/ 0,55 kW Height approx. 590 mm Alternating current 110-240 V Weight approx. 62 kg Frequency 50-60 Hz Number of phases Speeds of the mortar mixer according to DIN EN 196-1... -
Page 21: Operation
Laboratory mortar mixer 1.0206.01 Operation 9.1. Switching on the mortar mixer After the mains connection has been made and the main switch has been switched on, the inductive proximity switches for the monitoring "mixing bowl is inserted", "mixing bowl is in mixing position" and the operating and signalling unit are supplied with con- trol voltage. -
Page 22: Explanation Of The Control Unit
Laboratory mortar mixer 1.0206.01 9.2. Explanation of the control unit R button Function keys F1-F4 After switching on the mortar mixer or unlocking the with changing tasks emergency stop switch, press the R button to confirm the operational readiness. Only then is the mortar mixer ready for operation. -
Page 23: Key Symbol
Laboratory mortar mixer 1.0206.01 9.4. Key symbol Symbol Function Description of the function Here you can find corporate and contact Info information Basic settings can be set here (operator Service menu language, display brightness) Starts the selected function (simultane- ... - Page 24 Laboratory mortar mixer 1.0206.01 Opens the valve for introducing the water water metering into the mixing trough EN 196-1 (ISO R/679, ASTM C305, BS Program 1 4550) Program 2 DIN 1164-7 (DIN 1060) Program 3 DIN 1164-5 Program 4 EN 196-3...
-
Page 25: Start Conditions
Laboratory mortar mixer 1.0206.01 9.4. Start conditions Mains connection must be established. Connect the mortar mixer MAIN SWITCH to the "-I-" or "-ON-" position. "-EMERGENCY-OFF" switch must be unlocked (to unlock, turn the red switch in the direction of the arrow). - Page 26 Laboratory mortar mixer 1.0206.01 If the R button is pressed, the design and version of the mortar mixer, as well as the software version, are all displayed for approx. 3 seconds. SV.: 001.06 may have been replaced by a newer successor version.
- Page 27 Laboratory mortar mixer 1.0206.01 Display after pressing the back space F4 Wait approximately 3 seconds in the initial menu, then it automatically switches to the operating menu.
-
Page 28: Setting The Language
Laboratory mortar mixer 1.0206.01 9.6. Setting the language A selection of different languages is possible via the service menu, as described below. After switching on the mortar mixer with the main switch (see point 9.1), retrieve the service menu by pressing F1. -
Page 29: Setting The Display Brightness
Laboratory mortar mixer 1.0206.01 9.7. Setting the display brightness To set the display backlight according to the local conditions, proceed as de- scribed below. After switching on the mortar mixer with the main switch (see point 9.1), retrieve the service menu by pressing F1. -
Page 30: Setting The Soft Start
Laboratory mortar mixer 1.0206.01 9.8. Setting the soft start In order to prevent the mix from splashing out, it is possible to set a gentle start. The setting is made in the service menu Press F2, using the up or down symbols , select the appropriate setting function for soft start. -
Page 31: Setting The Variable Speeds
Laboratory mortar mixer 1.0206.01 9.9.1. Setting the variable speeds The setting is made in the service menu Press F2, using the up or down symbols , select the appropriate speed setting function. Activate the setting function by pressing F3 (flashing background indi- cates activity) and select the desired function with F2 or F1. -
Page 32: Finish Working With The Variable Speeds
Laboratory mortar mixer 1.0206.01 9.9.3. Finish working with the variable speeds Pos. description Press F1 to access the service menu, where you can switch to normal- ized speeds. 9.9.4. Setting the normalized speeds The setting is made in the service menu Press F2, using the up ... -
Page 33: Starting The Mortar Mixer Manually
Laboratory mortar mixer 1.0206.01 10. Starting the mortar mixer manually The mortar mixer was switched on with the main switch (see point 9.1). Display Description F1-F4 In order to enter the manual mode. Note In compliance with the applicable standards, appropriate quantities ... -
Page 34: Selecting/Stopping Low Speed
Laboratory mortar mixer 1.0206.01 10.1. Selecting/stopping low speed Start the engine speed 140/62 rpm F5 Starts the low rotary movement of the mixer. F7 Press F7 to open the sand feed and start a time dis- play. The standard sand (1350 g) ran through the sand feed in approx. -
Page 35: Selecting Pause
Laboratory mortar mixer 1.0206.01 Start the engine speed 285/125 rpm F6 Stop (stops the rotational movement of the mixer and the elapsed time) 10.3. Selecting pause Pause F1 Press F1 to start the pause. F6 Pre-selection but no start of mixing speed 285/125 rpm. -
Page 36: Activating The Sand Feed Manually
Laboratory mortar mixer 1.0206.01 Note The pause function can be activated at both speeds. For example: To scrape off the mortar built up on the stainless steel bowl. Note During the pause, the stainless steel bowl can be lowered and re- moved without interruption of the total running time. -
Page 37: Fill The Water Reservoir
Laboratory mortar mixer 1.0206.01 Close the sand feed F7 Pressing F7 closes the sand feed, and the time dis- play simultaneously stops. F5 Press F5 to start low speed. 10.5. Fill the water reservoir Behind the mortar mixer on the table top of the stainless steel table is a filling possibility for the mixed water. -
Page 38: Starting The Mortar Mixer With The Automatic Program
Laboratory mortar mixer 1.0206.01 11. Starting the mortar mixer with the automatic program 11.1. Vacuum cleaner in automatic operation If an automatic program is started, the dust extraction will also be activated. 11.2. Fill the water dosage manually before starting the program Before selecting a mixing program with automatic water supply, it is necessary to fill the water dosage manually. -
Page 39: Selecting A Program
Laboratory mortar mixer 1.0206.01 After selecting a standard program, the mortar mixer will start run- ning immediately! Danger 11.3. Selecting a program Note According to the applicable standard, cement, cement and water must be filled into the mixing tank or standard sand into the storage tank of the sand feed before start- ing. - Page 40 Laboratory mortar mixer 1.0206.01 has been pressed. This starts program 2 (DIN 1164-7, DIN 1060, graphical representation in Annex). The display shows the current status (program/remaining time/sand feed/pause). Press F5 to cancel the program. has been pressed. This starts program 3 (DIN 1164-5, graphical representa- tion in Annex).
-
Page 41: Display At The End Of The Program
Laboratory mortar mixer 1.0206.01 11.4. Display at the end of the program When a selected program has run, the display on the left is switched, and all 4 programs are available for a new se- lection. 11.5. Return to the operating mode selection... -
Page 42: Error Messages In The Display
Laboratory mortar mixer 1.0206.01 12. Error messages in the display To make the mortar mixer ready for operation after switching it on, it is necessary to confirm the R button. R button: Resetting the EMERGENCY STOP function. Af- ter unlocking the emergency stop switch, press the R but- ton to confirm the emergency stop status. -
Page 43: Switching Off The Mortar Mixer
Laboratory mortar mixer 1.0206.01 13. Switching off the mortar mixer The display and control unit, as well as the electrical components, are disconnected from the power supply after the main switch is disconnected and therefore switched off. If the mortar mixer is not put into operation for an extended period of time, the mains connection should be disconnected from the mains socket by removing the mains plug. -
Page 44: Copyright
Laboratory mortar mixer 1.0206.01 16. Copyright The copyright remains with the company TESTING Bluhm & Feuerherdt GmbH These operating instructions are only intended for the operator and their personnel. It contains guidelines and indications which may not be reproduced ... -
Page 45: Maintenance Of The Mortar Mixer
Laboratory mortar mixer 1.0206.01 18.2. Maintenance of the mortar mixer The mixer is virtually maintenance-free. The spur gear unit of the three-phase motor and the planetary gear unit of the mixer head are provided with sufficient lubrication for ap- proximately 5,000 operating hours. -
Page 46: Spare Parts - Supply And Customer Service
Stainless steel stirrer 1.0203.02EN Please contact the following address to clarify any technical matters or request the sup- ply of spare parts: TESTING Bluhm & Feuerherdt GmbH Motzener Str. 26b 12277 Berlin Tel.: +49 30 7109645-0 Fax: +49 30 7109645-98 E-mail: technik@testing.de... -
Page 47: I/O Board
Laboratory mortar mixer 1.0206.01 21. I/O board... -
Page 48: Circuit Diagram
Laboratory mortar mixer 1.0206.01 22. Circuit diagram... -
Page 49: Diagram Representation Of The Mixing Programs
Laboratory mortar mixer 1.0206.01 23. Diagram representation of the mixing programs according to EN 23.1. Mixing program 1 according to EN 196-T1 / EN 413-T2... -
Page 50: Mixing Program 2 According To En 480-T1
Laboratory mortar mixer 1.0206.01 23.2. Mixing program 2 according to EN 480-T1... -
Page 51: Mixing Program 3 According To En 196-T3
Laboratory mortar mixer 1.0206.01 23.3. Mixing program 3 according to EN 196-T3... -
Page 52: Mixing Program 4 According To En 196-T9
Laboratory mortar mixer 1.0206.01 23.4. Mixing program 4 according to EN 196-T9... -
Page 53: Diagram Representation Of The Mixing Processes
Laboratory mortar mixer 1.0206.01 24. Diagram representation of the mixing processes according to ASTM 24.1. Mixing program 1 according to ASTM-C305... -
Page 54: Mixing Program 2 According To Astm-C451
Laboratory mortar mixer 1.0206.01 24.2. Mixing program 2 according to ASTM-C451... -
Page 55: Mixing Program 3 According To Astm-C305 Paste
Laboratory mortar mixer 1.0206.01 24.3. Mixing program 3 according to ASTM-C305 paste (with start delay) -
Page 56: Mixing Program 4 According To Astm-C305 Paste
Laboratory mortar mixer 1.0206.01 25.4. Mixing program 4 according to ASTM-C305 paste (without start delay) - Page 57 Laboratory mortar mixer 1.0206.01 EC Declaration of Conformity according to Machinery Directive 2006/42/EC Annex II 1.A The manufacturer/distributor TESTING Bluhm & Feuerherdt GmbH Motzener Str. 26b 12277 Berlin hereby declares that the following product Product name: Mortar mixer Manufacturer: TESTING...
Need help?
Do you have a question about the 1.0206.01 and is the answer not in the manual?
Questions and answers