Table of Contents
Advertisement
Quick Links
INSTALLATION HANDBOOK
FROGLINE HORIZONTAL LIFELINE:
Installation to Standing Seam
SafetyLink is an innovative
anchor company achieving
success and keeping you safe
whilst working at heights.
Read entire handbook before installing SafetyLink products. All products must be installed in accordance
with SafetyLink's installation handbook, using only products supplied by SafetyLink Pty Ltd. Failure to
follow all warnings and instructions may result in serious injury or death.
Asia-Pacific/The Americas
+61 2 4964 1068 | info@safetylink.com
Europe/Africa/Middle East
+33 6 1949 3867 | europe.sales@safetylink.com
Northern Europe
+44 7599 508290 | uk.sales@safetylink.com
www.safetylink.com
ROOF ANCHORS
HORIZONTAL LIFELINES
PERMANENT LADDERS
LADDER STABILISERS
TEMPORARY ANCHOR
X-RAIL - HORIZONTAL RAIL
Advertisement
Table of Contents

Related Manuals for SafetyLink Frogline Horizontal Lifeline


Summary of Contents for SafetyLink Frogline Horizontal Lifeline
- Page 1 TEMPORARY ANCHOR X-RAIL - HORIZONTAL RAIL Read entire handbook before installing SafetyLink products. All products must be installed in accordance with SafetyLink’s installation handbook, using only products supplied by SafetyLink Pty Ltd. Failure to follow all warnings and instructions may result in serious injury or death.
-
Page 2: Table Of Contents
TABLE OF CONTENTS INSTALLATION OF A SAFETYLINK SURFACE MOUNTED FROGLINE HORIZONTAL LIFELINE WARNINGS ........................... 3 MAINTENANCE – PERIODIC INSPECTIONS ..................4 WARRANTIES ..........................5 FROGLINE SURFACELINK ANCHORS – COMPLETE UNITS ..............6 FROGLINE SURFACELINK– COMPONENTS..................7 FROGLINE SURFACELINK– ASSEMBLING ..................8 ASSEMBLING STEPS FOR END, INTERMEDIATE AND CORNER UNITS ........... -
Page 3: Warnings
The building or structure for the anchorages should be assessed by an engineer, unless it is clear to a competent height safety installer that the structure is adequate. SafetyLink Height Safety Systems must only be installed as per our installation guides, to structures as specified in the installation manual for each product. -
Page 4: Maintenance - Periodic Inspections
IN ADDITION TO SAFETYLINK PTY LTD EQUIPMENT, ALL ANCILLARY EQUIPMENT MUST BE INSPECTED IN ACCORDANCE WITH APPLICABLE REGULATORY REQUIREMENTS AND THE MANUFACTURER’S INSTRUCTIONS. FOR MAINTENANCE ADVICE AND SERVICES PLEASE CONTACT SAFETYLINK ON +61 249 641068 OR 1300 789545 FOR YOUR NEAREST SAFETYLINK INSPECTION SERVICE CENTRE OR EMAIL: info@safetylink.com Return to Table of Contents... -
Page 5: Warranties
Products are maintained in accordance with Australian Standard 1891.4 (section 9). you notify any claim under this warranty to SafetyLink in writing to the address below no later than 14 days after the event or occurrence concerning the product giving rise to the claim and you pay all costs related to your claim. -
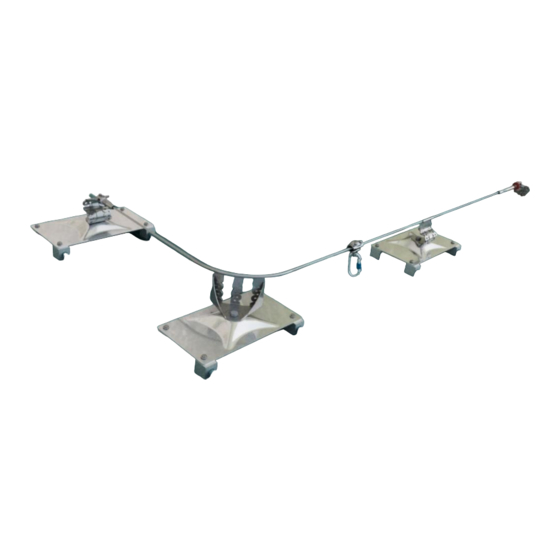
Page 6: Frogline Surfacelink Anchors - Complete Units
FROGLINE SURFACELINK ANCHORS – COMPLETE UNITS INSTALLATION OF A SAFETYLINK HORIZONTAL LIFELINE SYSTEM USING FROGLINE SURFACELINKS UP ROOF PITCHES NO GREATER THAN 15 DEGREES AND ACROSS ROOF PITCHES NO GREATER THAN 25 DEGREES PRODUCT COMPLETE UNITS FROGLINE INTERMEDIATE ANCHOR Product Code: STAT.FROGKSCF001+FIXING FROGLINE END ANCHOR Product Code: STAT.FROGKSCF002+FIXING... -
Page 7: Frogline Surfacelink- Components
Washer: 70mm OD 316 Stainless Steel Washer: M16 Spring Nut: M16 316 Stainless Steel Clamps (for different standing seam profiles, consult with SafetyLink for suitable clamps). Return to Table of Contents Ref: FROGLINE_Surface_Mounted_Standing_Seam_Handbook Page 7 of 16 Doc ID: MKT-383... -
Page 8: Frogline Surfacelink- Assembling
FROGLINE SURFACELINK– ASSEMBLING LIFELINE CABLE Following cables can be used for SafetyLink lifeline systems, • Cable (STAT.CABLE001): 8mm dia, 7x7 wire rope • Cable (STAT.CABLE_8MM_7X19_SS): 8mm dia, 7x19 wire rope. It provides high flexibility and suited for lifelines with short intermediate intervals and multiple corners. -
Page 9: Frogline Surfacelink - Installation
FROGLINE SURFACELINK – INSTALLATION Step 1 Step 2 Place the Clamps over the roofing profile and secure Ensure bolts connecting plate to the Clamps have each clamp with two set screws (if required to tighten Loctite applied and tightened correctly. set screws located under the plate, remove bolt and plate, tighten then replace plate). -
Page 10: Lifeline System Information
LIFELINE SYSTEM INFORMATION INSTALLATION: CABLE, TENSIONERS & TERMINATION FITTINGS Install Swaged/Swageless Termination to the cable in accordance with product guidelines. See Appendix A or B. 2. Determine which end is most suitable to have the cable Tensioner with Tension Indicator. (Some lifelines may require a Tensioner with Tension Indicator on both ends). -
Page 11: Appendix A - Swageless/Swaged Fittings Installation
APPENDIX A – SWAGELESS/SWAGED FITTINGS INSTALLATION Make sure that the cable matches the terminal. The SS terminal use only for 8mm 7x7 and 7 x 19 Stainless Wire. Do not reuse jaws or house. Slide the jaw housing in place on the cable. Slide the jaws onto the cable, ensuring there is equal space between the jaws. -
Page 12: Appendix B - Crimped Fittings Installation
APPENDIX B – CRIMPED FITTINGS INSTALLATION 1. Insert the cable into the open end of the fitting to be swaged, mark the cable where the cable and the fitting meet. Remove the cable and check that the mark is at least 84mm from the cable end. 2. -
Page 13: Frogline Shuttle
Product Code: STAT.SHUTL003 CONNECTING TO THE LIFELINE SYSTEM 1. Remove the Karabiner from the FrogLine Shuttle. The supplied Karabiner is a SafetyLink steel trilock and needs three distinct movements to be removed from the shuttle (Slide gate up, twist gate, depress gate). -
Page 14: Example: Horizontal Lifeline On Pitches Below 25 Degrees
EXAMPLE: HORIZONTAL LIFELINE ON PITCHES BELOW 25 DEGREES All working at heights safety procedures must be complied with when installing SafetyLink Height Safety Systems. For more information refer to your state or territories current legislation, regulations, policies and codes of practices. Horizontal height safety lifelines must only be installed and used by competent people with relevant current height safety qualifications. -
Page 15: Expert Fall Protection Planning
© 2018, SafetyLink Pty Ltd, Australia. Patents: SafetyLink Pty Ltd has a multitude of patents, patents pending, design applications, trademarks and copyrighted documents both lodged and issued. Should you wish to know the progress of our intellectual property on a specific product please email us on ip@safetylink.com and quote the product code. -
Page 16: In Case Of Accident
PERSONS WORKING AT HEIGHTS SHOULD NOT WORK ALONE. It is critical that before using any SafetyLink Systems a fall rescue plan is in place for any persons suspended mid- air following a fall. Serious injury or death can occur in a matter of minutes, particularly if a person’s movement or breathing is restricted or loss of consciousness has occurred.
Need help?
Do you have a question about the Frogline Horizontal Lifeline and is the answer not in the manual?
Questions and answers