
Subscribe to Our Youtube Channel
Related Manuals for habitat et jardin Duo


Summary of Contents for habitat et jardin Duo
- Page 1 SPA 908-M3301/M3303/M3332/ M3351/M3360/M3369/M3372/3319 Installation and Directions of Use...
-
Page 2: Table Of Contents
Content Warning ……………………………..………………page2 I、 Control system usage instructions …………………page3 II、 Brief Introduction of All SPA Models…………...…page8 III、 Description on Using Parts……………………….…page8 IV、 Description on Installation………………….….……page11 V、 Care and Maintenance…………………..………..…page12 VI、 VII、 Instructions on Maintenance……………..…………page13 VIII、 Troubleshooting………………………………………page13 IX、 Warranty process……………………………………page14 FR : SAV/INFORMATION /VIDEO/CONTACT EN: AFTER-SALES SERVICE/INFORMATION/VIDEO/CONTACT DE : REPARATUR-SERVICE UND ERSATZTEILE /INFORMATIONEN /VIDEO/KONTAKT ES: SERVICIO POST-VENTA/INFORMACIÓN/VIDEO/CONTACTO... -
Page 3: I、Warning
I、Warning : please read the following instructions before operation, which is a safety guaranty to SPA users. 1、The system must be installed by qualified technicians, switch for electricity leakage should be installed at the place convenient to be controlled. 2、The bathtub must be installed to the floor for safety purpose, if not, we won’t take responsibility for the lost of the bad grounding! 3、Taking load capacity of the wires into consideration when installed, otherwise, this will impact normal function or even occur safety accidents! -
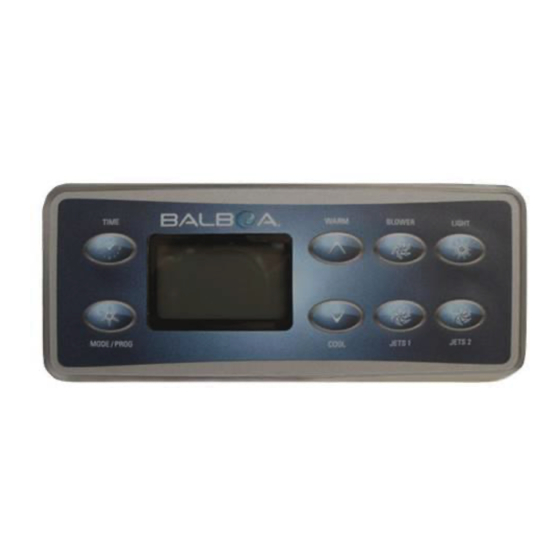
Page 4: Control System Usage Instructions
Ⅱ、Control system usage instructions (Ⅱ-1)、USA BALBOA control system :model GS523 or GS510 GS523DZ (for three SPA massage pumps) 1. First Start-up Your spa will enter Priming Mode (Pr)when it is energized. During Priming Mode, press “Jets” button (s) repeatedly and be sure all pumps are free of air. Priming Mode lasts for less than 5 minutes. Press “Warm" or “Cool"... - Page 5 (4)Sleep Mode heats the spa to within 20℉/ 10℃ of the set temperature only during filter cycles. "SLP" will display when water temp is not current, and will alternate with water temp when the pump is running. 8. Preset Filter Cycles The first preset filter cycle begins 6 minutes after the spa is energized.
- Page 6 Do not enter the water. Remove the cover and cool the “Over-heated”-Spa has shut down water. At 107°F/41.7℃, the spa should automatically .*one of the sensor has detected the spa reset. If spa does not reset, shut off the power to the spa water is 110°F /43.5℃.
- Page 7 Not action required. All the equipments will be automatically activated regardless of spa status. The equipment stays on 4 minutes after the sensors detect that the spa temperature has arisen to 45°F/7.2℃ or higher, An "Ice"-Potential freeze condition detected. optional freeze sensor may be added to protect against extraordinary freeze condition.
- Page 8 Jets Touch the “Jets” button once to activate the low speed of the pump and again for the high speed. Press the “Jets” button again to turn off the pump. If left running, the low speed of the pump will automatically turn off after 4 hours, and the high speed will automatically turn off after 15 minutes.
- Page 9 Diagnostic Messages Message Meaning No message on display. Temperature unknown. “Overheat” The spa has shut down. One of the sensors has detected 118°F/48°C at the heater. “Overheat” The spa has shut down. One of the sensors has detected that the spa water is 110°F/43°C.
- Page 10 Ⅲ. Brief Introduction of All SPA Models: Materials: it is made of acrylic plate with fiber glass reinforced. (Color of Acrylic: A001—Blue Cloud; A002—White Cloud; A003—Green Cloud; A004—Pearl White; A005—Sesame Blue; A006—Sesame Green; A007—Sesame White;A008--blue pearl;A009--Blue glittering and translucent;A010—White cloud; A011—Golden grey;A012—Pearl grey;A013—coffee;A014—Blue pearl;A016—Red; A017—Sesame black;A018—white sesame;A019--Gypsum white;...
- Page 11 Instructions Bluetooth amplifier box Switch 3.5mm voice frequency indicator light extension cord 1、 Power on, open the switch, then the indicator light will flash 2、 Open the bluetooth devices switch on Phone or Ipad, choose search device, When searching out“SPA”device, there will be bluetooth matching request on phone, input“PIN”number“5188”, press confirm, then the handling device will connect successfully with the bluetooth player.
- Page 12 Normal starting up time is 15-30 minutes Please notice that water level should not be 7cm over the tub water level to prevent air pump being burnout by water leakage. D )●Paper element filters daily maintenance: Type one: 1. REMOVE THE OUTER COVER OF THE SKIMMER PULL OUT THE FILTRATION TUCK NET CIRCUMVOLVE AND TAKE OUT THE PAPER CORE WASH THE PAPER CORE WITH WATER, RESET IT AFTER CLEANING...
-
Page 13: Description On Installation
Ⅴ. Description on Installation: Please confirm the position of the power supply switch and the drainage in accord to positions of the electric box and drainage on different SPA models. 1). Please reserve the electric leakage switch before installing the SPA, please reserve wire for at least 3*6mm to connect to SPA power, for big swimming spa, reserve at least two group of wire for at least 3*6mm... -
Page 14: Care And Maintenance
BALBOA GS523DZ Electronic control system 380V input power wiring connection diagram Notice: 1、If your spa uses BALBOA GS523DZ electronic control system, 230 V input power is confirmed with the supplier, please do not connect with 380V input power and 380V input power wiring connection diagram is not available while installation, and vice-versa.Attention, we are not responsible for any loss in any fault in Buyer’s operation. -
Page 15: Troubleshooting
pump, after replacing the pump, install power wire, fix the bolts, put into small amount of water into the bathtub, check if there’s leakage at the pump, and then install the side plate of the bathtub. 2). Replace the filter water pump: cut off power supply, open the bathtub side plate, turn off the valves on both ends of water pump, remove the wires and open the water pump, loosen the fixed bolts and take out the water pump, after replacing the pump, install power wire, fix the bolts, put into small amount of water into the bathtub, turn on the valve, check if there’s leakage at the pump, and then install the side plate of the... -
Page 16: Warranty Process
BALBOA CONTROL SYSTEM / SPA CONTROL SYSTEM WARRANTY PROCESS If a Balboa control system / SPA control system is found to be defective in the field, the RMA can be handled either through the OEM or through one of Balboa offices. In all cases, the OEM dealer/distributor is encouraged first to call one of the Balboa tech service departments to get assistance in troubleshooting the product and diagnose the problem.
Need help?
Do you have a question about the Duo and is the answer not in the manual?
Questions and answers