
Related Manuals for STEELFORCE PRO 100 HC


Summary of Contents for STEELFORCE PRO 100 HC
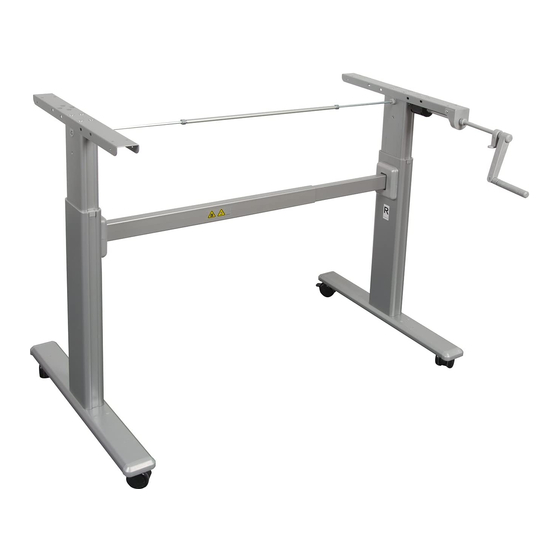
- Page 1 English STEELFORCE Deutsch Nederlands PRO 100 HC Assembly Manual Read this manual thoroughly and store in a safe place. STEELFORCE PRO 100 HC...
-
Page 2: Table Of Contents
Assembly of the parts of the Table Top ..........14 TECHNICAL SPECIFICATIONS ..............15 OPERATION AND INDICATORS ............... 16 CUSTOMER SERVICE ................16 MANUFACTURER ..................16 RECYCLING ..................... 16 Taking the workstation apart ............16 Recycling ..................16 STEELFORCE PRO 100 HC... -
Page 3: General
Do not use the workstation frame in the home; alternatively, use it only in offices. WARNING: Any changes or modifications not expressly approved by the manufac- turer could void the user’s authority to operate the equipment. STEELFORCE PRO 100 HC... -
Page 4: Content Box
M6x16 Adjusting Screw 13.3 M6 Collar Nut 13.4 M6 Ring 13.5 M6x6 Set Screw 13.6 10 x Screw 4.5x20mm 13.7 M10 Spanner 13.8 M3 Allen Key 13.9 M5 Allen Key 13.10 Screwdriver 13.11 Hexagon-stopper 13.12 Cover Cap STEELFORCE PRO 100 HC... -
Page 5: Safety Information
This puts them at serious risk of self-injury, possibly with fatal consequences. The desk may only be used in an environment that is suitable for it. Do not use the desk on an uneven surface. The desk will then not be stable. STEELFORCE PRO 100 HC... -
Page 6: Specific Dangers
The desk may only be used: for the intended purpose; if it is completely safe. STEELFORCE PRO 100 HC... -
Page 7: Assembly
1,30 cm Name 13.2 M6x16 Adjusting Screw Leg L 13.8 M3 Allen Key Leg R Place the set screws in the threaded bores. G Screw the set screws into the threads and tighten them slightly STEELFORCE PRO 100 HC... - Page 8 Screw the collar nuts onto the set screws on both legs. Tighten the collar nuts with the M10 mounting wrench. Mount both caps on the ends of the crossbars by pressing them lightly. STEELFORCE PRO 100 HC...
-
Page 9: Mounting The Feet
First choose the position of the legs! 13.12 Cover cap A = position of the T-foot Attach the blanking cap to the location shown B = position of the C-foot Attach the blanking cap to the location shown STEELFORCE PRO 100 HC... - Page 10 Mount a foot on each leg. Use four screws and washers for this. Attach cover caps to the unused holes (as shown on the previous page). Tighten the eight screws with the Allen key. STEELFORCE PRO 100 HC...
-
Page 11: Installation Of The Wheels / Adjustable Feet
Screw either two leveling feet or two wheels into each foot. Use the installation key for this. The desk is only stable when the adjustable feet are used. The use of the wheels is at your own risk! STEELFORCE PRO 100 HC... -
Page 12: Mounting The Drive Shaft
Slide the drive shafts (hexagon) from the outside to the inside through the hexagonal openings in the legs. Slide the two axles into the frame about 15 cm. Attach a hex stopper to each axle. Now slide the two hexagonal shafts into the receiving shaft. STEELFORCE PRO 100 HC... -
Page 13: Assembly Of The Hand Crank
3.4.5 Assembly of the Hand Crank Install the following components: Name Hand crank Hand crank extension Hand crank guide When your worktop is in the correct position on the tray supports, insert the crank into the hexagonal opening as shown. STEELFORCE PRO 100 HC... -
Page 14: Installation Of The Hand Crank
22 mm. Otherwise, follow the instructions in the separate assembly instructions for the worktop. 3.4.9 Assembly of the parts of the table top If you have purchased the frame including worktop, read the loose ones assembly instruc- tions. STEELFORCE PRO 100 HC... -
Page 15: Technical Specifications
Maximum frame height 1050 mm 1090 mm Maximum stroke 410 mm 410 mm Frame width 800 - 1200 Frame depth Minimum worktop depth Maximum frame load / surface load Stroke per revolution 13 mm per pendulum swing STEELFORCE PRO 100 HC... -
Page 16: Operation And Indicators
8.1 Taking the workstation apart In case of de-assembling please follow the manual backwards or contact cus- tomer service. 8.2 Recycling Please split all parts to their type of material. Keep notice of National restrictions! STEELFORCE PRO 100 HC...
Need help?
Do you have a question about the PRO 100 HC and is the answer not in the manual?
Questions and answers