Advertisement
Advertisement
Table of Contents

Subscribe to Our Youtube Channel
Related Manuals for Nextech QV3866


Summary of Contents for Nextech QV3866
- Page 1 380° Dual 1080p Dash Camera with 1.5” LCD Screen QV3866 User Manual...
-
Page 2: What's In The Box
1. What’s in the box? A: Dual 1080p Dash Camera B: Suction Cup Mount C: Car Charger D: USB Data Cable F: Reset Pin... -
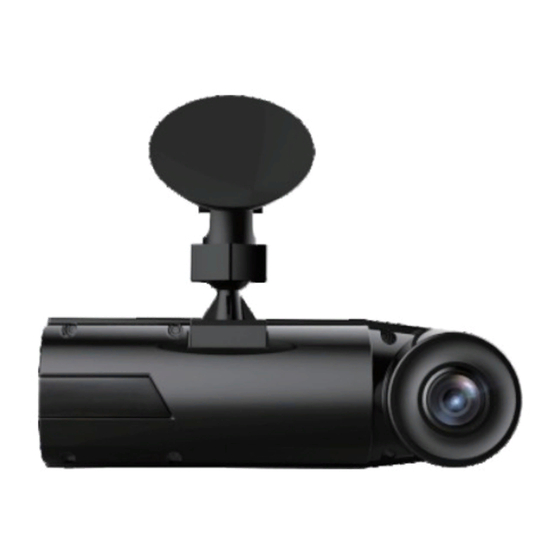
Page 3: Camera Structure
2.Camera Structure Name Description M ount connector Connects to the Suction Cup Mount F ront Camera lens Front Facing Camera for recording road events... - Page 4 Rear Camera Lens Inside cabin facing camera video recording. P ower Button Power ON/OFF Turn off LCD screen. Up Button Move selector up; rewind. Microphone on/off. Down Button Move selector down; fast for ward; Switch the Single front or Dual lens OK Button Confirms the action;...
- Page 5 LED Indicator Red light blinks: Camera is recording Green light is visible : Camera is charging. Screen over view Motion Detect ON Parking Mode ON Recording Time G-Sensor ON (current clip) Loop Recording Time Recording MIC ON Time Lapse OFF 00:00:14 MIC OFF Time Lapse ON...
-
Page 6: Getting Started
3.Getting Star ted 3.1 Before first use, charge the camera for 1-2 hours A. Charge using the supplied USB. B. Charge using the supplied Car charger. Ensure the Micro USB Cable and Car Charger are well connected The indicator light of the car charger will be red light when charging. - Page 7 3.2 Installing a Memory Card Please use a genuine micro SD memor y card from 8GB to 128GB with a speed rating of class 10 or higher. Carefully insert the memor y card into the camera’s card slot until it clicks. To remove the card, power off the camera first, then push the card into the slot until it clicks again.
- Page 8 Please do not remove the card while the camera is recording to prevent data loss/ corruption. Installing the camera onto your windshield Attach the Suction Mount to the camera’s Mount Connector, pushing it in until it fastens. Thoroughly clean the windshield using water or alcohol, and wipe clean with a dry cloth.
-
Page 9: Basic Operation
Carefully route the power cable around the windscreen and tuck it under the trim. 7. Start the car. 8. The camera will auto power on and start recording. 4. Basic Operation 4.1. There are two ways to power ON/OFF the camera: A. - Page 10 4.2. Menu Settings After powering ON the camera, press the MENU button to enter the setup process. (If the camera is recording video, press the OK button to stop recording before pressing the MENU button.) Settings Settings Autostart Recording Motion Detect Single recording 60FPS +0.0...
- Page 11 -Loop Recording: To rewrite the oldest file when card is full, Default is 3 minutes per video clip, Press Up or Down button to switch duration: Off , 1,3,5 minutes. -Time Lapse: Default is OFF. Press UP or DOWN followed by OK to set time interval: Off,4, 8, 12 hours.
- Page 12 -Auto Power Off: Default is Off. Press UP and DOWN button followed by OK to switch it 15, 30 secs, 1min, or Off to disable it. *A setting of 1 MIN means the camera is ON but not in use, it will auto turn OFF after 1 minute of inactivity.
- Page 13 4.3. Photograph Mode Press button to enter photography mode, and then press OK to take photos. Num:0 2019-02-13 05:34:03 4.4. Viewing Video/Picture on the Camera Press button twice and go to "File Type", press OK and UP/DOWN button to navigate to - "Event" or - "Video"...
- Page 14 0212_072806 0212_072638 0212_072625 0212_072551 00:00:20 00:00:20 2019-02-12 07:28 28.61 MB 2019-02-12 07:28 28.61 MB 2019-02-12 07:28 28.61 MB Press the MENU button and then press Up and down button follow by OK button to delete a single video/photo. Delete This File? Confirm Cancel 4.5 Viewing files on a computer...
- Page 15 "MSDC" and "Charging" will be displayed on the camera screen, please select to "MSDC" and press OK button to transfer data. Depending on your computer OS, the device will appear either as a removable drive or a removable volume. NOTE: When connected to your computer under "MSDC"...
- Page 16 Detailed Instruction: 1.Set Date&Time: Press the MENU button, navigate to ”Date&Time”, and press the OK button to set the date/time. Navigate UP or DOWN to select date and time values. Press M button to confirmand proceed. To finish setup, just press the OK button to exit.
- Page 17 Settings Auto Single recording Single 30FPS Loop 60FPS Time G-Sensor set Parking Monitor -Loop recording: After inserting a memory card, the camera will (by default) immediately start loop recording video when connected to a power source and powered ON. You can choose to disable it or switch it to 1,3,5 mins.
- Page 18 When Loop Recording is turned off, the camera will record video in 30 minute clips, but will not overwrite old video files when the storage card is full. -Time Lapse: If TIME LAPSE is selected, the camera will take the video at the set time interval –...
- Page 19 The camera will start auto recording,once the camera detects any movements around the car. Owing to the 360 degree camera lens,makes the motion detection the same as 360 degree detection area around the car horizontally. To ensure the camera is able to function in Motion detection Mode, please keep it powered with a mobile power bank or hardwire it directly to the car battery.
- Page 20 4.6 Working Temperature The camera is designed to operate in temperatures from -4 to 158°F (-20 to 70°C), temperatures outside this range risk degrading the camera’s performance work and causing damage. 4.7 To avoid damage In hot weather, do not expose the camera directly to the sun when the car is parked.
-
Page 21: Specifications
5. Specifications Model Processor SP 63 50A + 7003 Dual Processor Image Sensor Front: Sony IMX323 Rear : Sony IMX323 Display 1.5 inch TFT LCD (4:3) Lens Front: 190°wide viewing angle, full 6 layer glass lens with F/2.0 wide aper ture. Rear : 190 wide viewing angle, full 6 layer glass lens with F/2.0 wide aper ture. -
Page 22: Common Problems And Solutions
6.Common Problems and Solutions ① :The dash cam will stop automatically when recording. Solution: (1) Check whether the memor y is full. (2) Check whether the loop recording function of the dash cam is working. (3) Check the memor y card write speed, make sure it is a high speed card (Class 10 or above). - Page 23 (4) Please soak the suction mount in warm water for a moment then retry. (5) If the mount failed, please contact us for a free replacement. ④ :Without external power supply, the camera only lasts ver y shor t time, or it just can't turn on.
- Page 24 :The screen is closed when recording, and the indicator light is on. Solution: (1) If the Auto LCD Off function is turn on. The G1 dash cam will protect the screen within the set time, but recording will continue with red light blinks. You can press any button to light on the screen.
Need help?
Do you have a question about the QV3866 and is the answer not in the manual?
Questions and answers