
Related Manuals for mr. steam iTEMPO


Summary of Contents for mr. steam iTEMPO
- Page 1 Basic Butler / Linear iTempo Control PUR100474 10-19 AromaSteam SteamHead PUR100421 10-15 Linear Steamhead PUR103936 06-20 MS / Super AutoFlush PUR100200E 09-19 Condensation Pan TS0012 02-19 2020-10-30...
- Page 2 Installation, Operation & Maintenance Manual ® ® i T E M P O & i T E M P O P L U S C O N T R O L S steam ® Feel Good Inc. www.mrsteam.com...
-
Page 3: Important Safety Instructions
When installing and using this electrical equipment, basic safety HypertHermia occurs when the precautions should always be followed, including the following: internal temperature of the body IMPORTANT SAFETY INSTRUCTIONS reaches a level several degrees above the normal body temperature of 98.6° 1. -
Page 4: Table Of Contents
Dimensional Information ........6 and operation of this generator. These are Installations ............7-9 types of potential hazards that may occur during installation and operation: iTempo Operating Instructions ....10-11 iTempoPlus Operating Instructions .....12-15 Indicates a potentially WarNiNG hazardous situation, which, if not avoided, Care and Maintenance ........ -
Page 5: Before Installing
Please call MrSteam at 800 767-8326 for a free replacement erated with iTempo controls. Doing so may result or if you have any questions regarding the warning sticker. in an inoperative installation. -
Page 6: Dimensional Information
® ® 1” ” ” 2 ” 5” ” Box Contents: • iTempo or iTempoPlus Control • Control Cable (30 ft.) 5” • Steam head • Tube of Silicone sealant • Owner’s Manual ” ” 12” long pigtail... -
Page 7: Installations
Step 1 Determine the desired installation location of the control. The iTempo and iTempoPlus controls are designed to be installed inside or outside the steam room as a matter of personal preference. If the control is installed inside the steam room the control must be located: •... - Page 8 steam ® Installation & Operating Instructions _________________________________________________________________ Step 2 Diagram 1 Make a 2- 5 ⁄8” wide by 3- 7 ⁄8” high cutout in the desired control location. Do not oversize or under size the cutout. Step 3 Diagram 2 Route the control cable (provided with the DiaGram 2 control) from the wall cutout to the steam...
- Page 9 steam ® Installation & Operating Instructions _________________________________________________________________ Step 5 Diagram 4 Remove and discard peel-off paper to expose adhesive liner. DiaGram 5 Step 6 Diagram 5 Run a bead of silicone (provided) as shown to the outer edge of the control faceplate, following the contour of the circle or square shape.
-
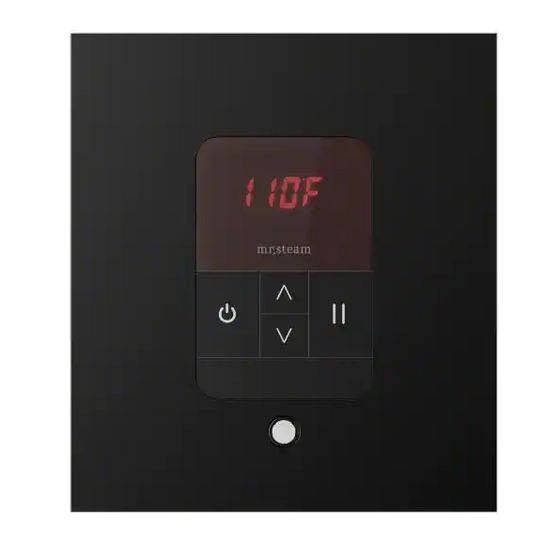
Page 10: Itempo Operating Instructions
Installation & Operating Instructions _________________________________________________________________ itempo Operating instructions ® The iTempo Control features programmable digital temperature control, a fixed (60) minute duration, ON/OFF and PAUSE. The control can be set at a temperature range from 80˚ up to 120˚ Set the steam bathing temperature... - Page 11 steam ® Installation & Operating Instructions _________________________________________________________________ timer FeatUre When the control is turned ON a 60 minute time duration is initiated. The control will turn off after 60 minutes unless the control is turned off manually. memOry FeatUre If the control is turned off manually before 60 minutes then the default temperature of 110˚F will be used the next time the control is turned on.
-
Page 12: Itempoplus Operating Instructions
steam ® Installation & Operating Instructions _________________________________________________________________ itempoplus Operating instructions ® The iTempoPlus Control features programmable temperature control, programmable time duration, clock, AromaSteam, ChromaSteam , ON/OFF and ® mr.steam two personal settings. Set the steam bathing temperature WarNiNG temp time according to personal preference, however it is highly recommended to begin steam bathing at a low temperature setting for a very short duration to gauge... - Page 13 steam ® Installation & Operating Instructions _________________________________________________________________ SettiNG tHe CLOCK Diagram 3 When the display is not flashing: Press and hold the mr.steam TIME key until the display starts flashing. Use the UP/DOWN keys to select the desired time, temp DiaGram 3 at this time the AM/PM logo will be displayed.
- Page 14 steam ® Installation & Operating Instructions _________________________________________________________________ SettiNG tHe temperatUre Diagram 6: Press TEMP key to set the desired temperature or display the temperature setting. mr.steam Diagram 7: The control is preset and will display a tempera- ture setting of 110˚F (default setting). With the temperature DiaGram 6 time displayed, press the UP or DOWN keys to set the desired tem-...
- Page 15 steam ® Installation & Operating Instructions _________________________________________________________________ CHaNGiNG tHe temperatUre UNitS (˚F/˚C) When the generator is Off, Press and hold ON/OFF aroma key for 10 seconds. The temperature units will be mr.steam displayed as Fahrenheit (TuF) or Celsius (TuC). Use the UP/DOWN keys to choose between (TuF) and (TuC).
-
Page 16: Care And Maintenance
Care tips for all Controls and Steamheads 1. Use only mild soap and water on a soft cloth to clean the control and steamhead. 2. Do not use abrasive cleansers 3. If the decorative cover is damaged on the iTempo or iTempoPlus ®... - Page 17 MusicTherapy, Spa Package, Steam@Home, Steam Therapy, Sussman, Valet Package, Virtual Spa System, Voice Genie and Voice Wizard are registered trademarks of Sussman-Automatic Corporation. AudioWizard, HomeWizard, iButler, iTempo, iTempoPlus, Smart Sizing, SteamStart, The Intelligent Steambath are trademarks of Sussman-Automatic Corporation.
- Page 18 steam ® S T E A M H E A D ___________________________________________________________________________________________________________________________________________ I N S TA L L AT I O N I N S T R U C T I O N S 1/8" minimum clearance required when Acrylic Shield is used. See installation instructions IMPORTANT: See the Installation and Operation Manual Use Teflon...
- Page 19 Installation, Operation and Maintenance Manual Linear Steam Head Residential Model: 144080 ____________________ teri IMPORTANT: Leave this material with the homeowner. steam ® Feel Good Inc. ®...
- Page 20 Linear Steam Head ® ® Installation Section – Read Me First & Cautions Model 104480 READ ME FIRST! This signals a situation where injury or property damage may As you follow these instructions, you will notice CAUTION occur if you do not follow instructions. and IMPORTANT NOTE symbols.
- Page 21 Linear Steam Head ® ® Installation Section – Read Me First & Cautions Model 104480 • Steambath controls feature an integral temperature • See the Installation and Operation Manual provided with sensor. Locate the Steam Head in a location where steam the steam generator for additional important installation emissions will not come in direct contact with the control and operation information.
- Page 22 Linear Steam Head ® ® Installation Section Model 104480 BOX CONTENTS: • Linear Steam Head • AromaTray • Faceplate • Silicone Sealant • Diverter • Installation Instructions Figure 1 3/4” Steam Outlet Connection 1/16” 16 " Slotted Mounting Slotted Mounting Holes Holes Adjustment Screws 1/4”...
- Page 23 Linear Steam Head ® ® Installation Section Model 104480 INSTALLATION STEPS Copper STEP 2. Confirm proper stud spacing: The studs must have Tubing or Brass Pipe a minimum spacing of 14-1/16” and a maximum spacing (Not Provided) 19". If the stud spacing is outside the required range then Threaded Adaptor or shim or otherwise reposition the studs as required.
- Page 24 Linear Steam Head ® ® Installation Section – Model 104480 Installing the Linear Steam Head Steps Faceplate STUD STUD STUD STUD TION INSTALLER: Because the steam head, faceplate and direct Cement Board Cement Board Cement Board Cement Board steam emission are very hot, locate the steam head and faceplate where Thin Set Thin Set...
- Page 25 Linear Steam Head ® ® Installation Section Model 104480 STEAM EMISSION ZONES W AND W/O THE DIVERTER • Plumbing must be installed by a qualified and licensed STEP 6. Run the steam generator for a few steam cycles plumber. Plumb with rigid copper tubing or brass pipe to observe and verify that the steam head, steam head from the generator to the steam head.
- Page 26 Linear Steam Head ® ® Installation Section – Model 104480 Installing the Linear Steam Head Steps Diverter CAUTION Because direct steam emission is very hot, Diverter will become hot during steam session, and will remain hot for a period of Tile Tile time after steam session.
- Page 27 Linear Steam Head ® ® Installation Section – Model 104480 Installing the Linear Steam Head Steps AromaTray ! CAUTION: The AromaTray will become hot during a steam bath session, and will remain hot for a period of time after the steam bath session. Never touch the AromaTray during a steam bath session or for a period of time after the steam bath session.
- Page 28 Linear Steam Head ® ® Installr Section Model 104480 P104481 - Linear Steam Head, SteamHead only 104483 - LSH Faceplate 104484 - Diverter for Linear SteamHead 104482 - AromaTray for Linear SteamHead LSH Faceplate Brush Bronze 104483BB LSH FaceplateBrush Nickel 104483BN LSH Faceplate Matte Black 104483MB...
- Page 29 Linear Steam Head ® ® Model 104480 IMPORTANT SAFETY INSTRUCTIONS READ AND FOLLOW ALL INSTRUCTIONS FLAMMABLE LIQUID AND VAPOR • Keep the AromaSteam and fragrance away from • Contains denatured ethyl alcohol. heat, sparks, electrical outlets, open flames such as •...
- Page 30 2020 © Sussman-Automatic Corporation I MrSteam and des., A Lifetime of Pleasure, AirTempo, AromaFlo, AudioWizard, AutoFlush, AutoSteam, Butler Package, ChromaSteam, Clean Steam...Every Time, Club Therapy, CT Day Spa, Digital 1, Express Steam, Feel Good Inc., From Bathroom to Spa, HomeWizard, iButler, iGenie, iSpa Package, iSteam, iTempo, iTempo/Plus, Linear Steamhead, Making Wellness a Way of Life, Music Therapy, My Steam, SmartSizing, Spa Package, Steam Genie, Steam on Demand, Steam in a Box, Steam@Home, SteamStart, SteamTherapy, Sussman, Tala, Tala Bath &...
- Page 31 mr . steam ® ® Optional AutoFlush System ____________________________________________________________________________________________________________________________________________ INSTA LLAT ION INS TRUCTI ONS BOX CONTENTS: • AutoFlush System Valve with Cord • Installation Instructions. ® ASSEMBLY OF OPTIONAL AUTOFLUSH SYSTEM 3 Pin Connector for AutoFlush AutoFlush Cord Connector AutoFlush Cord Steam Generator AutoFlush Valve...
- Page 32 AutoFlush Shown Fully Assembled INSTALLATION INSTRUCTIONS ® 1. Plumbing to be performed by a qualified plumber and shall be in accordance with applicable National and Local codes. Unit drains by gravity. A drain line that is lower than the AutoFlush assembly must be available.
- Page 33 AutoFlush Shown Fully Assembled INSTALLATION INSTRUCTIONS ® 1. Plumbing to be performed by a qualified plumber and shall be in accordance with applicable national and local codes. Unit drains by gravity. A drain line that is lower than the AutoFlush assembly must be available.
- Page 34 steam ® Technical Specifications Condensation Pan 103867 & 104402 Mr.Steam strongly recommends the use of a condensation pan in the unlikely event of a plumbing leak. Locate the condensation pan on a solid level surface and place the steam generator inside the condensation pan. Insure the steam generator is level.
Need help?
Do you have a question about the iTEMPO and is the answer not in the manual?
Questions and answers