Table of Contents
Advertisement
Quick Links
Advertisement
Table of Contents

Related Manuals for SE Audiotechnik C Series


Summary of Contents for SE Audiotechnik C Series
- Page 1 USER MANUAL Self-powered PA Column System C-Line...
- Page 2 Check our website for the latest digital version of this manual. If you encounter any errors in this document, feel free to let us know. Copyright by SE Audiotechnik 2018. All rights reserved. ® The content of this document is subject to change without prior notice to...
- Page 3 Please read this user manual carefully, so you can make optimum and troublefree use of your product. Keep this document in a safe place and follow its instructions diligently. When in use, this product is capable of producing high Sound Pressure Levels (SPL) that can lead to irreversible hearing damage to anyone.
-
Page 4: Table Of Contents
TABLE OF CONTENTS TABLE OF CONTENTS 1 INTRODUCTION 1.1 How to use this manual 1.1.1 Symbol description 1.2 Safety instructions 1.2.1 Electricity 1.2.2 General 1.2.3 Setup & operation 1.3 Product overview 1.3.1 Package contents 1.3.2 Unboxing 1.3.3 Intended use 1.3.4 Main features 2 GETTING STARTED 2.1 Quick start guide 2.1.1 Precautions... -
Page 5: Introduction
INTRODUCTION INTRODUCTION How to use this manual Symbol description Throughout this document you will Especially on the product itself you come across several symbols, which may see different types of labels. indicate various types of information. Here you can look up their meanings. You can find each symbol and it‘s meaning in the list below. -
Page 6: Safety Instructions
INTRODUCTION Safety instructions This unit has been engineered and manufactured to ensure your personal safety. IMPROPER USE CAN RESULT IN POTENTIAL ELECTRICAL SHOCK OR FIRE HAZARD. Read the following precautions carefully and stick to them in order to avoid the possibility of serious injury or even death from electrical shock, short-circuiting, fire or other hazards. -
Page 7: General
INTRODUCTION Read these safety instructions carefully. General 01. Please notice all the safety warnings. 05. Clean the equipment using a dry cloth. 06. Beware to comply with all applicable Never remove safety warnings or other information from the equipment. disposal laws in your country. During 02. -
Page 8: Product Overview
Keep the shipping carton as evidence for inspection. Contact your SE Audiotechnik dealer or support center for help. Save all packaging materials and full package contents if you... -
Page 9: Intended Use
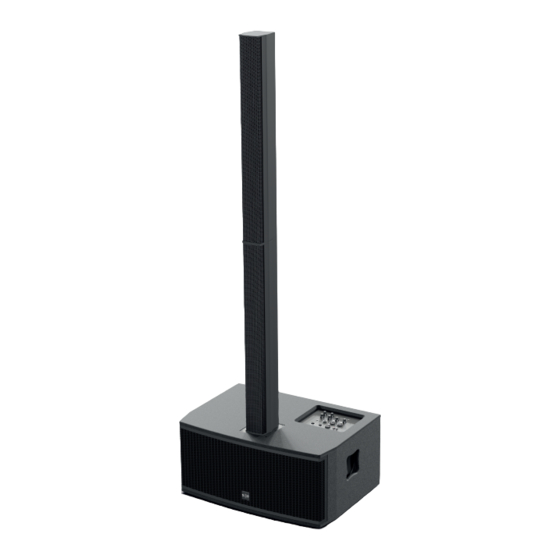
INTRODUCTION Intended use Professional plug and play PA system for indoor use with modular structure and versatile connectivity. Suitable for medium sized venues with a few hundreds of listeners, providing direct control via the built-in mixer. Main features 8x 3.5” Midrange speakers 2x 0.5”... -
Page 10: Getting Started
GETTING STARTED GETTING STARTED Quick start guide This guide briefly describes the main steps of setting up a C6 column system in stereo mode. Precautions The subwoofer of C6, as well as the subwoofer extension C6 SE must be placed on level ground, standing on its rubber feet. -
Page 11: Assembly
GETTING STARTED Assembly How do I assemble the C6 column system? 1 Place the subwoofer at the Array column desired location. 2 Slide the support column’s four metal pins in the according slots located at the subwoofer’s top. The multi-pin connectors will Support column automatically be coupled. -
Page 12: Recommended Minimum Audience Distance
GETTING STARTED Recommended minimum audience distance 3-4 m 1,2 m The ear level height of seated audiences is around 1,2 m in average. In the setup shown above the recommended min. distance between the C6 system and the listeners should be no less that 3-4 meters. User interface Rear panel PRODUCT SERIAL NUMBER... -
Page 13: Mixer Overview: Connectivity
GETTING STARTED Mixer overview: connectivity 6,35 mm Hi-Z TSR COMBO LINE IN L/R (XLR/6,35 mm jack TRS) TO C6S E COMBO MIC IN (XLR/6,35 mm jack TRS) XLR LINE OUT (C6 SE Subwoofer Extension) BLUETOOTH 4.0 AUDIO ® XLR SYSTEM OUT 3,5 mm STEREO JACK RCA L/R Mixer overview: controls and indicators... - Page 14 GETTING STARTED SUB LEVEL ROTARY KNOB BLUETOOTH ® Adjust the subwoofer volume relative BLUETOOTH LED to the main volume. A constant blue color indicates operation. A flashing blue color MAIN LEVEL ROTARY KNOB indicates active pairing mode. Adjust the total system volume. HOLD TO LINK Push button for pairing or canceling MAIN INDICATORS...
-
Page 15: Audio Input
GETTING STARTED Audio input Bluetooth ® How do I pair my audio source device with the C6 via Bluetooth ® Make sure that your device is compatible with Bluetooth ® Profiles: A2DP v1.2 & AVRCP v1.4 1 POWER ON the C6 system. The BLUETOOTH LED should emit a constant blue light indicating that the module is on. -
Page 16: Stereo Setup Example
GETTING STARTED Stereo setup example How do I set up a stereo C6 column system? 1 Place both subwoofers at the 4 Use an XLR cable and connect desired locations and add the column the master’s SYSTEM OUT to the modules to each one. -
Page 17: Technical Information
TECHNICAL INFORMATION TECHNICAL INFORMATION Specifications Parameter Value Type All-in-one self-powered column system with bass-reflex subwoofer and built-in mixer Transducers Subwoofer: 2x 10” woofers (2.5”VC) Array column: 6x 3.5” fullrange woofers (1”VC) 2x 3.5” co-axial fullrange speakers (1”VC) 2x 0.5” compression drivers (1”VC) Crossover Frequencies 250 Hz (LF/MF), 3 kHz (MF/HF) Frequency range (-6 dB) 43Hz - 20kHz Nominal dispersion (HxV) 120°... -
Page 18: Mechanical Dimensions
TECHNICAL INFORMATION Parameter Value Amplification Lows (Subwoofer): 800W Class-D Mids: 600W Class-D Highs: 100W Class-D Signal processing Crossover, limiter, EQ Protection Short circuit, temperature, current limit Mains connection Neutrik powerCON ® Mains power 100 - 240 VAC Dimesnsions (WxHxD), mm Subwoofer: 750 x 347 x 532 Columns: 100 x 855 x 129 Weight Subwoofer: ~ 32.5 kg Array Column: ~ 6.45 kg... - Page 19 C6 user manual v.2 EN...
Need help?
Do you have a question about the C Series and is the answer not in the manual?
Questions and answers