
Related Manuals for Meyra-Ortopedia McWET 8013039


Summary of Contents for Meyra-Ortopedia McWET 8013039
- Page 1 OPERATING MANUAL SHOWER- AND TOILET WHEELCHAIRS MODEL 8013039 / 8013041 We move people.
-
Page 2: Table Of Contents
Contents Foreword ....................... 4 Use ......................... 4 Check upon receipt ..................4 Delivery condition ..................4 Overview ....................... 5 Model: 8013041 / 8013039 ...................5 Safety information ..................6 User information ....................8 Reaching for objects ..................9 Correct procedure when reaching for objects ..........9 Propelling the wheelchair ................10 Accompanying person ..................10 Assembly ..................... - Page 3 Maintenance ....................19 Cleaning and Care ....................19 Upholstery .....................19 Finish ......................19 Desinfection ......................20 Reinstallment ......................20 Repairs .........................20 Disposal .......................20 Maintenance instructions ..................21 Flat tyre .......................24 Tyre change ....................24 Adjusting the pressure brakes ................25 Fine adjustment of the pressure brakes ............25 Technical specifi...
-
Page 4: Foreword
FOREWORD We thank you for selecting this This product serves people with lim- MEYRA-ORTOPEDIA product. ited mobility as an aid for taking a shower or using the toilet. This manual is to help you get accus- tomed to the handling of the shower... -
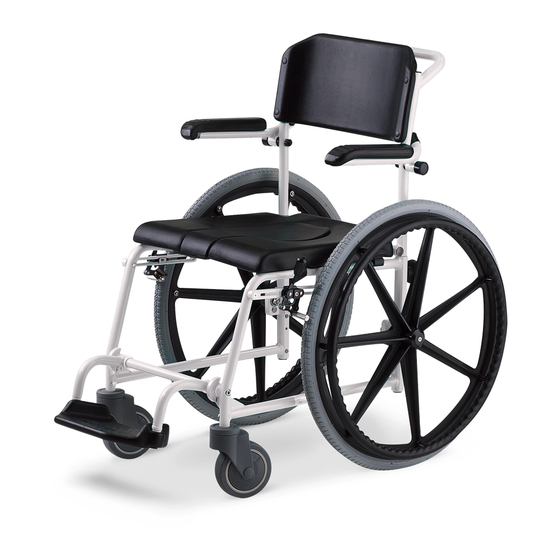
Page 5: Overview
OVERVIEW Model: 8013041 / 8013039 The overview shows the most important components and operating equip- ment. Pos. Description Pos. Description ➀ ➀ Back support Push bar ➁ ➁ Armrest Drive wheel ➂ ➂ Seat cushion Handrim ➃ ➃ Insert cushion Linchpin ➄... -
Page 6: Safety Information
☞ SAFETY INFORMATIONS With open wounds use a sterile pad for seat, back, foot and arm A shower and toilet wheelchair is a support cushions! technical aid for which the follow- ☞ ing safety instructions have to be ob- Do not rest your legs on furniture served at all times: or other items. - Page 7 ☞ ☞ The shower and toilet wheelchair Only use the shower and toilet should only be used with the help chair on level, fi rm and slip-proof of an attendant. surfaces. – Danger of overturning! ☞ ☞ Only permitted for transport of Use is not permitted for: one person! –...
-
Page 8: User Information
User information Approaching an obstacle The following pages give general in- formation and suggestions for the handling and use of the shower and toilet wheelchair in everyday situa- tions. New situations must be prac- tised with the support of a helper. ☞... -
Page 9: Reaching For Objects
Reaching for objects Avoid an extreme forward or back- ward inclination of the upper body when picking up or placing heavy ob- jects. – Danger of tipping over or tilt- ing! ☞ Before moving the upper part of the body far forwards whilst in the shower and toilet wheelchair, increase the stability of the wheel- chair by moving it rearwards un-... -
Page 10: Propelling The Wheelchair
Propelling the wheelchair ☞ If possible propel the wheelchair over the handrims. – Perhaps dan- ger of jamming in the area of the brake! ☞ Uncontrolled rolling movements when scuttling are to be prevent- ed! – Danger of accidents! ☞ Do not brake the shower and toi- let wheelchair with your feet if the footboard is folded upward. -
Page 11: Assembly
ASSEMBLY We supply the product disassembled in parts groups. Assembly is to be car- ried out as follows: 1. First insert the back tubes from the top into the two rear frame parts [1] the screw the handwheels in tightly (2) . 2. -
Page 12: Brake
BRAKE By activating the brakes [1] the show- er and toilet wheelchair is secured against unintentionally rolling away (parking brake). Attention: The shower and toilet wheelchair loaded with the user may not let itself be pushed in with the brakes engaged. -
Page 13: Pressure Brakes
Pressure Brake A metered braking from driving speed (operating brake) is possible with the brake levers (1) of the pres- sure brakes. Service brake Press the two brake levers evenly, only slightly to the front, this brakes the shower and toilet wheelchair in a me- tered fashion. -
Page 14: Lockable Castors
LOCKABLE CASTORS The rear castors can be locked [1]. Attention: When only one parking brake is locked, the free-running wheel can run around the braked wheel. – Danger of accidents! Locking the castors Press the large lever (2) down with your foot as far as possible to lock the castors. -
Page 15: Foot Board
FOOT BOARD The footboard can be folded forward out of the frame [1]. Folding up the footboard For this fi rst remove the feet from the footboard. Afterwards fold the foot- board up as far as possible [2]. Attention: When the footboard is folded in- ward it is not locked into place and can fold outward during transport of the shower and toilet wheel-... -
Page 16: Seat Cushion
SEAT CUSHION The seat cushion can be removed for cleaning purposes [1]. Removing the seat cushion For this grab hold of the front of the seat cushion and lift it upward off of the frame tubes [2]. Then lift the seat cushion off of the rear cross tube [1]. -
Page 17: Toilet Pail
TOILET PAIL The toilet seat is equipped with a toi- let pail rail. The toilet pail, with or without lid, can be slid from the back underneath the toilet seat into the guide rails. ☞ Note: For use, the toilet top must be pushed in to a point where it is aligned with the toilet seat hole. -
Page 18: 24"-Drive Wheels
24" DRIVE WHEELS The drive wheels are on a quick re- lease axle. ☞ No person may be seated in the shower wheelchair during assem- bly or removal. The shower wheel- chair must stand on a level and fi rm surface. Secure the shower wheelchair against unintention- ally rolling away before removing a wheel. -
Page 19: Maintenance
MAINTENANCE Upholstery Clean the upholstery with warm wa- Despite of the sturdy design assembly ter and hand washing liquid. parts, such as castors and cushions are Spots can be removed with a sponge subject to wear. We therefore recom- or a soft brush. mend that the item is checked by a ☞... -
Page 20: Desinfection
Desinfection Disposal If the product is used by more than • The product packing material can one person (for example in a care cen- be disposed of as recyclable mate- tre), the use of a commercial disinfect- rial. ant is mandatory. •... -
Page 21: Maintenance Instructions
Maintenance instructions WHEN WHAT REMARK If they can still turn, the Before use Check the brakes for brakes must be repaired perfect functioning by a specialist workshop. Activate the brake or tilt- ing levers as far as possi- ble. The locked wheels/ castors should not be able to turn under oper- ating conditions. - Page 22 Maintenance instructions WHEN WHAT Remark Use a tyre pressure tester Before use Check air pressure of or, if not available, the the tyres 'thumb press' method or Standard tyres: similar 4 bar = 56 psi High-pressure tyres: 8.0 bar = 116 psi If the tyre profi...
- Page 23 Maintenance instructions WHEN WHAT Remark Components must Every 8 weeks Lubricate the follow- free from used oil resi- (depending on frequen- ing components with dues before lubrication. cy of use) a few drops of oil Please ensure that excess – Brake lever bearings. oil does not contaminate the environment (e.g.
-
Page 24: Flat Tyre
Flat tyre Tyre change of the drive wheels Attention: If a fl at tyre occurs to the air fi lled Ensure that the tyre cover is always tyres due to puncture by sharp objects removed and reinstalled with the such as nails, screws, glass splinters, appropriate tyre levers (bicycle ac- etc. -
Page 25: Adjusting The Pressure Brakes
Adjusting the pressure brakes According to the < Maintenance in- structions > the brakes are to be checked for function after each repo- sitioning of the drive wheels and re- adjusted if necessary. – Loosen the clamping screw (1) of one pressure brake. -
Page 26: Technical Specifi Cations
TECHNICAL DATA GUARANTEE We accept liability for this product ac- Model 8013039 / 8013041 cording to the legal regulations and All data within the following list re- it also applies to faults in the mate- lates to the standard version of the rial and workmanship. - Page 27 GUARANTEE COUPON Fill in the details! If necessary, copy and return. Guarantee Model designation: Delivery note no.: Vehicle ID No. (Fz-I-Nr.) (view type plate): Date of delivery: Stamp of the dealer:...
- Page 28 Your specialist dealer: MEYRA-ORTOPEDIA Vertriebsgesellschaft mbH Meyra-Ring 2 · D-32689 Kalletal-Kalldorf P.O. Box 1 703 • D-32591 Vlotho Fon +49 (0)5733 922-355 Fax +49 (0)5733 922-9355 info@meyra.de · www.meyra.de We move people. info@ortopedia.de · www.ortopedia.de 205 321 001 (Status: 2006-10) All technical modifi cations reserved!
Need help?
Do you have a question about the McWET 8013039 and is the answer not in the manual?
Questions and answers