Advertisement
Quick Links
Advertisement

Related Manuals for Kendall Howard PERFORMANCE Series


Summary of Contents for Kendall Howard PERFORMANCE Series
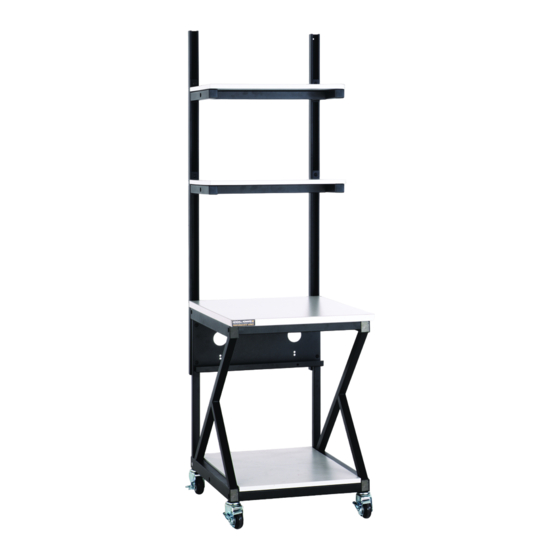
- Page 1 KENDALL HOWARD Assembly and Maintenance Manual Workbenches LAN Stations And Accessories...
- Page 2 Your New Performance Workstation Congratulations on your new Kendall Howard Performance LAN Station Workbench. This manual will step you through the assembly process. If you have trouble, please feel free to call our customer service department from 8:30 AM to 5:30 PM CST.
- Page 3 Step 2. Assemble the Upper Shelves Place the upper shelves so that the hardware inserts are facing up. Next, place one of the cross bars on the shelf lining up the holes on the shelf with the brackets on the cross bar.
- Page 4 Step 3. Assemble the Work Surface With the work surface placed with the hardware inserts facing up, attach 2 cross bars to the shelf with (4) cross head screws but DO NOT FULLY TIGHTEN. You will notice a small gap between the bracket and the shelf. This was designed so that after the bench is assembled, you will tighten all the cross head screws which will pull the shelf down tight against the frame.
- Page 5 Step 4. Assemble the Lower Shelf Place the lower shelf so that the hardware inserts are facing up. Next, place two of the cross bars on the shelf lining up the holes on the shelf with the brackets on the cross bar.
-
Page 6: Step 5. Frame Assembly
Step 5. Frame Assembly On this step you may want to have someone help you with the assembly. Attach the Lower shelf to left side with (2) 1 ½ Hex Drive Bolts. Next assemble the Right side in the same way. DO NOT FULLY TIGHTEN YET. Screw in the (4) Levelers provided into the bottom of the frame (Not shown in the picture). - Page 7 Step 6. Attach the Work Surface Stand the bench in its upright position and place the work surface on top of the bench. Attach work surface with (4) 1 ½ Hex Drive Bolts on each side. You may now tighten both the Hex Drive Bolts and the cross head screws on both the work surface and the lower shelf.
- Page 8 Step 7. Attach Cable Tray and Shelf Channels Place the Cable Tray/Shelf Support in the correct position and insert (4) 2 ½” Hex Drive Bolts. Next, turn the Channel Nut onto each of the 4 bolts just until the nut is flush with the end of the bolt and pointing up.
- Page 9 Step 8. Attach Upper Shelves Insert a 1 ½ Hex Drive Bolt into each shelf support hole and place a channel nut onto the bolt as you did for step 9. Remember to keep the hex bolt facing up and down. Place the shelf on the shelf channel with the channel nuts inside.
- Page 10 Step 9. Add the Plastic End Caps Insert the plastic end ¾” round caps into the left and right side frames as well as the upper shelf supports.
- Page 11 Maintaining Your New Workbench Your new Kendall Howard Performance Workbench is constructed with some of the highest quality materials available today. To keep your Workbench looking new, we recommend cleaning it regularly damp cloth using a mild soap and water solution.
-
Page 12: Limited Warranty
As provided herein, the Kendall Howard product is warranted to be free of defects in material and workmanship for a period of one year from the date of product purchase from Kendall Howard, not to exceed fifteen (15) months from the date of product manufacture. The date of purchase will be determined only from the Kendall Howard sales order acknowledgment. - Page 13 Warranty Performance of Component Manufacturers: It is Kendall Howard’s practice, consistent with its desire to remedy Warranty defects in the most prompt and effective manner possible, to cooperate with and utilize the services of component manufacturers and their authorized representatives in the performance of work to correct defects in the Kendall Howard components.
Need help?
Do you have a question about the PERFORMANCE Series and is the answer not in the manual?
Questions and answers