Table of Contents
Advertisement
Quick Links
Advertisement
Table of Contents

Related Manuals for EASYPRINT compact cm


Summary of Contents for EASYPRINT compact cm
- Page 1 Easyprint User Documentation Compact CM Compact IM...
-
Page 2: Table Of Contents
CONTENTS REGULATION...................... FCC Notice ...................... European EMC Statement................HEALTH AND SAFETY..................Symbols......................Warning Notices ....................Caution Notices ....................INTRODUCTION ....................General ......................Description .................... Intended Use ..................System Specification..................Compact Touchscreen................Printer Specification ................Power Supply Unit................. Optional Touchscreen ................INSTALLATION .................... - Page 3 OPERATION......................Start-Up ......................Shut Down ....................... Disconnect Compact Touchscreen / Touchscreen from Printer..............Printer Shut Down ................. Screen Functions..................... General ....................Editor Screen ....................New Message ....................Add ......................Save Message ..................Selecting an Existing Message................ Changing an Existing Message ............. Global Print Settings..................
-
Page 4: Regulation
REGULATION FCC Notice This equipment has been tested and found to comply with the limits for a Class A digital device, pursuant to part 15 of the FCC Rules. These limits are designed to provide reasonable protection against harmful interference when the equipment is operated in a commercial environment. -
Page 5: Health And Safety
HEALTH AND SAFETY Notes: (1) Please read the entire Health and Safety section in your Product Manual (Part No. EPT033612) before operating the printer. Unless stated otherwise, information provided is applicable to all printer variants. The printer and its component parts must only be used for the purpose for which they were sold, and for which they are designed and constructed. -
Page 6: Warning Notices
Warning Notices Warning notices denote a potential hazard to the health and safety of users. These notices clearly state the nature of respective hazard and the means by which it can be avoided. WARNINGS: (1) Only trained and authorised personnel may carry out maintenance work. - Page 7 (e.g., Benzene, acetone). (5) To avoid the risk of damage to the print head use only Easyprint spares, parts and consumables. (6) Do not run the printer without ribbon material, as this may damage the print head.
-
Page 8: Introduction
The Easyprint Compact is intended to print variable data, bar codes and images onto flexible packaging films and labels. The Compact CM and Compact IM are entry level, compact TTO printers with a 32mm wide print head. The maximum ribbon length is 770m which gives an effective length of 960m when economy mode is used. -
Page 9: System Specification
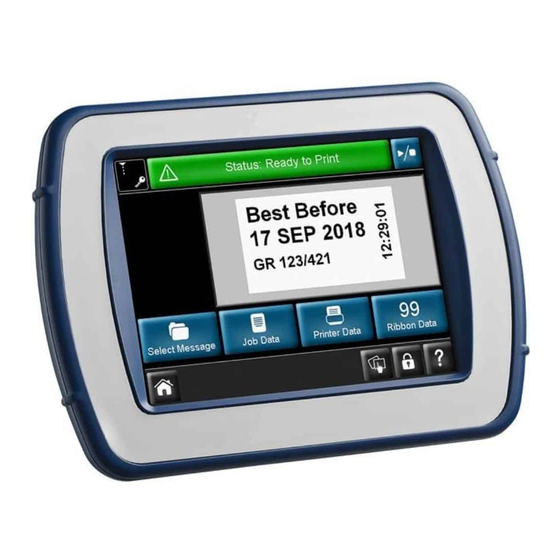
System Specification Compact Touchscreen Type 5.7 inch, full colour Compact Touchscreen (640x480 resolution), handheld, with docking station. Compact 170(W) x 127.9(H) x 33.7(D) Touchscreen Dimensions (mm) Weight (kg) 0.385kg Connectivity USB, Ethernet, (Mini USB for power / data connection to printer) Network Interface Ethernet 10/100 base TX Accessories... - Page 10 Fonts Most TrueType fonts Controller / hardware No dedicated controller required. Hardware interface options interface options: Easyprint Compact Touchscreen (via USB cable- hot swappable), Shared Compact Touchscreen (via Ethernet cable or network), PC-based interface (via Ethernet cable or network) Connectivity...
- Page 11 Humidity 20-80%, RH non-condensing Requirements EPT033789 Issue 2 February 2018...
-
Page 12: Power Supply Unit
Power Supply Unit Dimensions: 135mm x 58mm x 35mm Weight: 0.5kg Rated Input Voltage 90-264V; 1.5A Range: Output Voltage: +24V d.c. Rated Output Power: 120W subject to de-rating Working 0 to +50°C subject to de-rating Temperature: Storage -20°C to +85°C Temperature: Optional Touchscreen Display... -
Page 13: Installation
805mm) and must be ordered separately. • The Quick Release (QR) Carrier Assembly (P/N EPT006141) is available for mounting the printers directly onto Easyprint Compact flat pack window brackets (IM bracket EAS002706 and CM bracket EAS002717). Use this assembly in wash-down environments or other situations where printers need to be removed on a regular basis. -
Page 14: Mounting The Printer In The Bracket System
Mounting the Printer in the Bracket System Note: Tool required: 5mm Allen key Mount the printer in the bracket system, using four M6 screws (supplied with bracket). When mounting the printer in the CM bracket, ensure the print head is positioned above the top point of the rubber roller. -
Page 15: Connectivity
Connectivity The following diagram shows general connectivity for the printer. This example shows a Compact Touchscreen connected directly via USB. Mini USB Ethernet cable port (to connect to PC or network) CAUTION: Socket provides Power over Ethernet (PoE) CM Printers only Packaging Machine I/O Cable:... -
Page 16: Set Up Printer - Final Steps
Set Up Printer - Final Steps CAUTIONS: (1) The printer must be calibrated before installing it on the production line. See below. (2) In dusty environments, it may be beneficial to fit a Compact Positive Air Kit (P/N EAS002970). Calibrating the Printer CAUTION: When calibrating, the print head must be able to extend fully, please ensure enough space is allowed to perform this function. - Page 17 Print Head Peel-off Offset 0 to Roller Print Head Ribbon Printing Rubber Roller Guide Roller Bracket Mounting - Continuous Mode (CM) Peel-off Print Head Ribbon Roller Guide Roller Platen Bracket Mounting - Intermittent Mode (IM) Set the Print Trigger as required at Settings > Production Line Setup > Print Trigger. For more information, See “Print Trigger”...
-
Page 18: Print Trigger
Print Trigger Go to Settings > Production Line Setup > Print Trigger This menu changes for CM printers and for IM printers. Set details of how printing is triggered: Trigger By: • For CM printers, from the pull-down menu, select the source for the print trigger - External Input, Internal (Distance) (which prints continuously while the print trigger is closed) or Internal Continuous (which prints continuously while a valid message is selected and there are no errors or warnings active). -
Page 19: Operation
• Long-press the device name for details and then select either Connect or Cancel. Enter Username and Password if requested, the Home screen will display. From a PC or laptop: Launch the Easyprint Web Browser application. At the Connection screen, either: • Select the required device to connect to, or •... -
Page 20: Shut Down
Shut Down Disconnect Compact Touchscreen / Touchscreen from Printer From the Log In screen, select Disconnect. From any other screen, Select and then select Disconnect from printer. If a Compact Touchscreen is being used, it will turn off when its power is removed. If it is connected by USB, this will happen automatically when the printer is shut down. -
Page 21: Editor Screen
Editor Screen Menu Buttons Redo Undo Select Item Menu Vertical Scroll Horizontal Scroll Breadcrumb Trail Log Off User or Disconnect from Printer Notes: (1) Long-press can be used on most buttons to view a short description of the button’s function. When an icon is greyed out, its function is not available from that screen. -
Page 22: New Message
New Message Select Messages > New Message to open the Message Editor - note that for new messages, the default menu will be Add: Undo/ Redo Menu Breadcrumb Trail Notes: (1) The Undo/Redo buttons can be used at any stage of the message creation or editing process to undo or redo the previous action. -
Page 23: Add
Add various items into the message. Image Barcode, Text, Text Variable Barcode Variable Line/Shape Clone Item (Clocks, etc.) Items Available to Add into a Message For details of the above items, refer to Product Manual (Part No. EPT033612), PART 3, ‘NEW MESSAGE’. -
Page 24: Selecting An Existing Message
Selecting an Existing Message At the Home screen, select either the message area OR the Messages button to open the message store. Select the required message from the list and the following screen will display: Vertical Scroll Choose to Edit, Preview, Send to Print or Cancel. Changing an Existing Message To change the selected message, select Messages, then open the required message store and select the required message. -
Page 25: Global Print Settings
Global Print Settings Print settings and parameters can be set and adjusted. Settings that are likely to be set or adjusted on a day-to-day basis follow. For more detail and settings, refer to Product Manual (Part No. EPT033612), ‘ADJUSTING PRINTING PARAMETERS’. Quality The Quality menu allows the alteration of parameters that will normally affect print quality. -
Page 26: Economy
Economy The Economy menu enables the definition of some of the parameters that have a direct cost savings effect for the print run. All the values entered in this menu will therefore influence the consumption of ink ribbon. Ribbon Economy -This feature uses the FADING technique, which is one the printer's patented features. -
Page 27: Position
Position Print go from packing machine Start Pulse Offset Y-Offset X-Offset X-Offset X-Offset -Moves the print position across the print head (the X Axis). By entering a minus value the print will be moved towards the rear of the printer, and entering a positive value will move the print towards the front of the printer. -
Page 28: Maintenance
MAINTENANCE Common Errors and Acknowledgement Note: This list is not exhaustive. For the full list of errors, see your Product Manual (Part No. EPT033612). Error No. Error Text Action Label too The total print length (Y-offset + label) is longer than the long supported print length. - Page 29 1018 Head Set the correct distance of 0.2-2.0mm between the print head Position and substrate for both CM and IM printers. Adjust the print head error by selecting Settings> Production Line Setup > Print Head > Print Head Height. 1019 Calibration CAUTION: required...
-
Page 30: Ribbon Breaks
Ribbon Breaks Problem Action Ribbon breaks may be Check that the encoder matches the substrate speed correctly, caused by one of the otherwise the ribbon may be dragged out of the printer and following issues: eventually break. For IM printers: Check that the printer is printing whilst the substrate is stationary. -
Page 31: Replacing The Ribbon
Replacing the Ribbon WARNING: Ensure the printer is offline. WARNING: Replace ribbons with care to avoid cutting hands or fingers. CAUTIONS: (1) To ensure good quality print, always clean the print head and capstan before fitting a new ribbon to the printer. (2) When fitting a new ribbon, ensure loose ribbon is wound up on the rewind spindle to create tension in the ribbon path. -
Page 32: Ribbon Threading Procedure
Ribbon Threading Procedure Rewind Unwind Spindle Spindle Dancing Dancing Ribbon Ribbon Guide Guide Roller Roller Bridge Capstan Cover Ribbon-Threading - Right-hand Printer Rotate the quarter-turn latch anti-clockwise. Gently pull the printer’s front cover straight out towards you to remove it. Fit the new ribbon roll on the unwind spindle and the empty core to the rewind spindle. - Page 33 Ribbon Web Path - Left Hand Ribbon Web Path - Right Hand Note: To change the printer from left hand to right hand - or vice versa -see your Product Manual (Part No. EPT033612), ‘Changing Printer Configuration.’ Wrap the ribbon around the empty ribbon core several times, taking up any slack in the ribbon path to complete the operation.
-
Page 34: Cleaning The Print Head
Cleaning the Print Head Always use the following parts when cleaning the print head: • Cleaning Pens - P/N VPR0223 • Cleaning Fluid - P/N WJ-111 • Print Head Cleaning Wipes - P/N MT25215 WARNING: Power off the printer and allow head to cool before cleaning. CAUTIONS: (1) Always clean a new print head before use. -
Page 35: Cleaning The Capstan Roller
Cleaning the Capstan Roller Capstan Roller WARNING: Power off the printer before cleaning. Clean the capstan roller daily, using Cleaning Fluid (P/N WJ-111) and Print Head Cleaning Wipes (P/N MT25215). EPT033789 Issue 2 February 2018... -
Page 36: Maintenance Schedule
Maintenance Schedule The Easyprint Compact printers do not require component replacement as part of a preventative maintenance routine. We recommend regular checks to ensure optimum performance is maintained and to allow any parts requiring future replacement to be identified early. - Page 37 Easyprint Communicator CM & IM User Documentation Easyprint A/S has a policy of continuous product improvement, the Company therefore reserves the right to modify the specification contained within this document without notice. © Easyprint A/S 2018. All rights reserved. For additional documentation, including other available languages, either scan the QR code, or go to https://www.easy-print.com/downloads...
Need help?
Do you have a question about the compact cm and is the answer not in the manual?
Questions and answers