Advertisement
Quick Links
DETAIL K2 INC.
DK2 POWER USA
4301 S Valley View Blvd STE 10-11
Las Vegas, NV 89103
1-702-331-5353
PARTS AND SERVICE 702-331-5353 OR
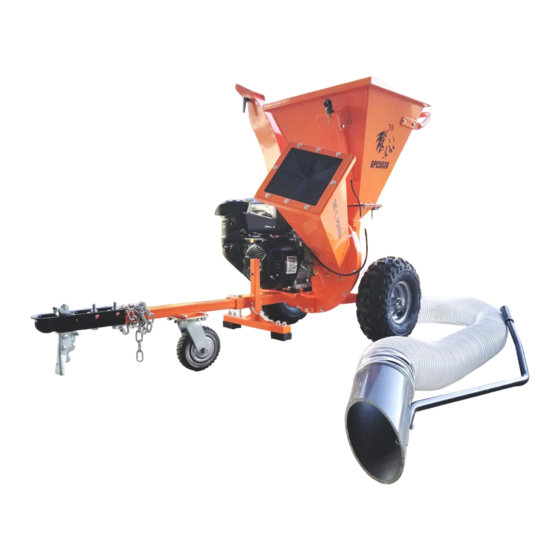
OPC503V 3 INCH LEAF VAC
DETAIL K2, INC.
1080 Clay Avenue Unit 2
Burlington, Ontario, Canada L7L0A1
LEAF VAC CHIPPER SHREDDER
CHIPPER SHREDDER
CHIPPER ASSEMBLY GUIDE
MODEL: OPC503V
3 IN CHIPPER SHREDDER
WWW.DK2POWER.COM
DK2 USA EAST
6245 Industrial Parkway
Whitehouse, OH 43571
CONTACT US
LEAF VAC
3 IN CHIPPER
SHREDDER
REV 1 – 9-19-2019
Advertisement

Related Manuals for DK2 Power OPC503V


Summary of Contents for DK2 Power OPC503V
- Page 1 Las Vegas, NV 89103 Burlington, Ontario, Canada L7L0A1 Whitehouse, OH 43571 1-702-331-5353 PARTS AND SERVICE 702-331-5353 OR WWW.DK2POWER.COM CONTACT US LEAF VAC CHIPPER SHREDDER LEAF VAC 3 IN CHIPPER SHREDDER OPC503V 3 INCH LEAF VAC CHIPPER SHREDDER REV 1 – 9-19-2019...
- Page 2 The CHIPPER is shipped in a crate. Remove all sides before you begin. NOTE: UPON INSPECTION OF PARTS IF YOU FIND ANY DAMAGE OR MISSING PARTS PLEASE CALL DK2 POWER AT 702-331-5353 OR CONTACT US VIA OUR WEBSITE WWW.DK2POWER.COM WE WILL REPLACE ANY MISSING PARTS TO YOU FREE PLEASE DO NOT RETURN TO THE STORE REV 1 –...
-
Page 3: Install The Handle
STEP 2: 1. INSTALL THE HANDLE 2. Use 4 bolts and hardware provided Install hardware and tighten REV 1 – 9-19-2019... - Page 4 STEP 3: 1. INSTALL THE CHIP CHUTE 2. Install using the 5 bolts and hardware included 5 BOLTS AND WASHERS REV 1 – 9-19-2019...
- Page 5 STEP 4: 1. INSTALL THE TREE FEED CHUTE 2. Remove the 4 nuts and hardware 3. Be cautious NOT TO DROP them into the cutting chamber. 4. Install chute and tighten 4 NUTS AND WASHERS REV 1 – 9-19-2019...
- Page 6 STEP 5: 1. INSTALL THE LEAF VAC HOSE 2. Remove the 3 nuts and hardware and the cover plate. 3. Keep the plate in case you will remove the hose in the future. 4. Install the hose plate and shown, replace the nuts and tighten.
- Page 7 STEP 6 1. LEAF VAC HOSE STORAGE 2. Wrap the hose OVER the chip chute as shown 3. Wrap the hose across the front of the hopper 4. Place the HOSE HANDLE across the push bar as shown and UNDER THE HOSE. 5.
- Page 8 STEP 7 1. INSTALL THE TOW BAR TROLLEY COMBO 2. Remove the pin, insert the tow bar with wheel down, re-pin. Install tow bar Wheel in down position to trolley mode REV 1 – 9-19-2019...
- Page 9 STEP 8 1. TOW BAR TROLLEY COMBO 2. Shown is trolley mode 3. Remove Tow Bar and flip over for TOWING position. 4. When tow bar is removed, to increase your work area when chipping, use the drop stand. Wheel down for easy transport Drop stand when tow bar is Flip bar over for towing removed to increase work area...
- Page 10 STEP 9 1. DROP STAND 2. Drop stand is up when trolley wheel is down. 3. Drop stand is up when tow bar is reversed for towing. REV 1 – 9-19-2019...
- Page 11 STEP 10 1. WHEEL LOCK FEATURE 2. REMEMBER TO RAISE YOUR DROP STAND AND TO UNLOCK YOUR WHEELS BEFORE TOWING 3. Wheel shown is in free wheeling position 4. Remove pin, slide wheel forward, re-pin wheel and axel together to keep wheel from rolling and LOCK. 5.
- Page 12 STEP 11 1. ENGINE 2. Change oil after first 5 hours of use on brand new engine 3. Fill oil full, your engine has a low oil shutoff and will not start if low on oil. This is a protection system for your engine.
- Page 13 STEP 12 1. SAFETY KIT AND TOOLS 2. The white bottle is used for oil fill 3. Work gloves, safety glasses, ear protection included. 4. A 1 7/8 tow ball is included 5. Manuals and assembly tools. 6. Storage tool bag REV 1 –...
- Page 14 REV 1 – 9-19-2019...
- Page 15 Specification No.2 Specification3 M10*70 bolt M6locknut hitch trailer spring washer⌀6 washer⌀10.5*⌀22*2 washer⌀6.4*⌀12*1.6 spring washer⌀10 side chipper room M10locknut side chipper room cover M8*45 bolt M6*12 bolt washer⌀8.4*⌀20*1.6 M8*20 bolt Rubber pad M8*25 bolt support feet rubber pad M8locknut swtich key wire spring washer⌀8 top feed hopper tow bar...
-
Page 16: Maintenance
READ THE KOHLER ENGINE MANUAL SUPPLIED WITH YOUR UNIT FOR FULL ENGINE OPERATION, SAFETY, AND MAINTENANCE. YOUR UNIT HAS A COMMERCIAL KOHLER ENGINE WITH A 3YR PARTS AND SERVICE WARRANTY. FOR WARRANTY IN YOUR AREA CONTACT THE NEAREST KOHLER DEALER. VISIT WWW.KOHLERENGINES.COM FOR PARTS, SERVICE,... - Page 17 OPERATION – BEFORE TURNING KEY AND PULL STARTING ENGINE CLEAR AREA OF ALL PEOPLE AND PROPERTY THAT COULD BE DAMAGED. THINK SAFETY. CHIPS ARE FLYING PROJECTILES AND CAN CAUSE INJURY. WEAR SAFETY GLASSES, HEARING PROTECTION, AND GLOVES DO NOT WEAR LOOSE FITTING CLOTHES THAT COULD GET STUCK IN THE MACHINE MOVING PARTS, ONLY CHIP WOOD, CHILDREN SHOULD NOT RUN THIS EQUIPMENT, STAY ALERT OF YOUR SURROUNDING AND PERSONS THAT COULD APEAR IN THE CHIP PATH WHILE YOU ARE WORKING.
- Page 18 If within one (1) year from the original date of purchase this product fails due to defect in material or workmanship. DK2 POWER outdoor power equipment is 1-year parts only warranty no labor. Upon expiry of one (1) year, Detail K2 will have no further liability related to the product. Detail K2 does not authorize any party, including its authorized distributors or dealers, to offer any other warranty on behalf of Detail K2 Inc.
Need help?
Do you have a question about the OPC503V and is the answer not in the manual?
Questions and answers