
Related Manuals for KAT VR Walk C


Summary of Contents for KAT VR Walk C
- Page 1 KAT Walk C OWNER'S MANUAL This product is for home use ONLY. Any form of commercial use is prohibited.
- Page 2 Acknowledgement Thank you for purchasing our product! Please, read this instruction manual carefully and keep it safely stored for future use.
- Page 3 INDEX FIRST & FOREMOST Declaration Safety Instructions Health Warnings PRODUCT INTRODUCTION Product Description KAT Walk C Description KAT Walk C Dedicated Shoes Introduction KAT Walk C Sensor Introduction Product Parameters INSTALLATION PREPARATION Precautions Unpacking Method Tool Preparation List of Items...
- Page 4 SOFTWARE SET-UP System Requirements Software Set-Up Instructions KAT Gateway Introduction Downloading the Software DISASSEMBLY & MAINTENANCE Disassembly Procedure Component Maintenance: APPENDIX Optional Accessories List Contact Information...
- Page 5 First & Foremost This owner’s manual contains all the information you need to install your KAT Walk C. The following symbols are used to indicate important information and instructions for the device set-up process: This symbol is a precaution, it usually provides additional information to help you with a task, as well as information that applies only to certain situations.
- Page 6 2m/6'7" of height (recommended 1.65m/ 5'5" to 1.95m/6'5” ) and weight below 130kg (185 lbs). Do not use the KAT Walk C if you do not meet the age, height or weight require- ments, or if your physical condition does not allow for moderate to intense physical activity.
- Page 7 Placement risks: Do not place this device in the following locations: (1) Outdoor with direct exposure to the sunlight; (2) Inclined or unstable surfaces; (3) Exhibition booths made of glass or those that are incapable of meeting the weight support requirements; (4)...
- Page 8 Violation of the above safety instructions or any other misconduct may cause personal injury or damage to the product, for which KAT VR will not be held responsible. Health Warnings The following health warnings will be updated regularly to ensure accuracy and completeness: Before use, it is required to carefully read the product manual and follow all the given instructions.
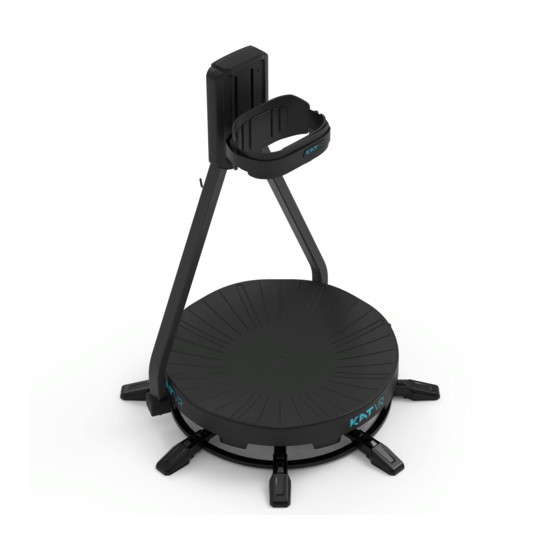
- Page 9 Product Description KAT Walk C Description KAT Walk C is the world’ s first gamer-dedicated, personal VR Omni-Directional Treadmill (ODT) ‒ A new generation mechanical device that allows for 360 degrees of human motion, creating infinite movement area in VR on minimum physical space in reality.
- Page 10 KAT Walk C Sensor Introduction The KAT Walk C sensors are designed to be mounted on top of the special shoes and serve the purpose of physical movement translation into movement in VR to ensure a highly accurate simulation of walking in any direction.
- Page 11 Base diameter 1.2㎡ (12.91 Square Feet) Footprint 5V DC Voltage Installation Preparation Incorrect installation of the KAT Walk C may lead to safety hazards. Before proceeding with the installation, read carefully the following instructions: Precautions Precautions Precautions Precautions Tools preparation...
- Page 12 Finding a suitable place Place the device in a reasonable distance from your PC to ensure that the USB cable can reach it. It is not advised to place the device on smooth surfaces that are easily scratched by metal, e.g wooden or tiled floor.
- Page 13 Now, tighten the back-support Install the waist harness. Make the bottom of the rods ( Items screws. Note: Tighten them well sure the KAT VR logo faces up No.14 and 15). Note:Tighten to avoid safety hazards. and align the screw holes with them well to avoid safety hazards.
- Page 14 Install the eight Pull out the wire. base stabilizing The installation is feet (List: No.14、 complete! No.15). Tool preparation Before assembly, check carefully whether the quantity and type of tools and accessories is con- sistent with the below list. If anything is missing, contact our customer service at service@kat- vr.com before you proceed.
- Page 15 List Quantity KAT Shoes 2 Set of Sensors 5mm Hexagon Wrench Open-End Wrench Pair of Gloves Accessories 16mm hole plugs M6x50 Hexagon Head Screws 6mm flat washers M8×20 hexagon flat head screws 8mm flat washers Static Eliminator Bottle of maintenance oil...
- Page 16 Thread the wire harness into the the expansion screw sleeve into wire harness. the hole. Software Set-Up Software set-up instructions 1.KAT Gateway Software Introduction KAT Gateway is an independent software platform designed by KAT VR for the management of the KAT Walk C.
- Page 17 VR input device for your needs. Through KAT Gateway, you can achieve real-time control over your KAT Walk C with all of its settings as well as quickly adapt the device to all supported content. With SteamVR you can oper- ate the device without taking off...
- Page 18 Select KAT Walk C and proceed to the product resource page Download KAT Gateway and install it on your PC 2.KAT Gateway functions introduction 2.1 Device Detection: KAT Gateway will detect all the currently connected KAT Devices but can only run one at a time. If no device or multiple devices are detected, KAT Gateway will inform the user about it and ask to connect only the intended device.
- Page 19 Second case - Multiple devices detected...
- Page 20 Connect the USB data cable of the KAT Walk C to the PC USB port. Once the below window appears, the treadmill pairing is complete. Click “NEXT” and use the gray cable of the tiple-ended micro USB wire from the KAT Walk C sensor kit to connect the foot sensors to your PC.
- Page 21 Complete the sensor pairing process (Follow the instructions in KAT Gateway) Sensor Installation The sensors should be mounted on top of the dedicated shoes. Push the sensor slot into the shoe The slot at the back socket from the of the sensor fits top toward the into the socket toes side.
- Page 22 2.2 Device Status KAT Gateway dashboard once KAT Walk C is connected: Home page of KAT Gateway displays the current device connection status: -Headset direction; -Connection status and direction of the foot sensors; -Connection status and direction of the left foot sensor;...
- Page 23 This page allows you to adjust the below settings in real time: -Adjustment of the forward movement sensitivity; -Enabling the lateral movement and adjustment of the lateral movement sensitivity; -Enabling the backward movement and adjustment of the backward movement sensitivity; -Enabling the cruise mode and adjustment of the cruise mode sensitivity;...
- Page 24 inSteam is furtherly divided into Turbo and Global locomotion modes. With the Turbo Mode enabled, the software will automatically recognize the current game and load the pre-set settings configuration optimal for this game. Global mode allows you to set a manual configuration. The Keyboard Mode lets you achieve movement in all directions by emulating the function of the WSAD buttons in some games.
- Page 25 2.5Configuration library In the configuration library page, you can view the list of supported games including the recom- mended and manually added ones, as well as check and modify their configuration settings. Adding a game: Fill in the Steam ID of the game or choose the game EXE file.
- Page 26 Adding a new configuration (through manual input or by file import): Deleting the game: View, select or delete the configuration files. Viewing the game configuration tips of the recommended games:...
- Page 27 2.7 Recommended Games Library In the recommended games page, you can view the popular games, check whether the game is currently installed on your PC or proceed directly to the Steam Store page to purchase it. 2.8 System Settings The system settings page shows the currently selected language and the current inSteam driver and KAT Gateway versions.
- Page 28 2.9 Device Manager The device manager page shows the status of each sensor and the SN of the device. Through this page, you can initiate the sensor pairing process...
- Page 29 Direction calibration: a. First press the System Button on your hand controller to enter KAT Gateway. Select the loco- motion mode in KAT Gateway and start the game (More about the modes in the KAT Gateway soft- ware introduction below). b.
- Page 30 Note: If you experience problems with the walking direction, check if the waist harness is fastened correctly and carry out the direction calibration. In case of the following situations, or when using the KAT Walk C for the first time, you should calibrate the sensor direction to achieve the correct movement direction in VR.
- Page 31 The KAT Shoes 2 have two anti-friction stripes on the shoe sole and offer four adjustable levels of friction (as pictured). NOVICE Their purpose is to let the user adjust the kinetic friction force STANDARD USER between the shoe sole and the platform to own preferences. When using the device for the first time, it is recommended to EXPERIENCED USER keep the friction force on the Novice level, and gradually...
- Page 32 Note 1: The KAT Walk C dedicated shoes can only be used to walk on the KAT Walk C and are strictly prohibited to be used for any other purpose. Note 2: It is expected that due to the friction force, walking and running may cause scratches on the platform surface.
- Page 33 Grab and pull forward the outer In the same order from left to In the same order from left to belts. Stretch them hard to right, fasten the belts on your right, fasten the belts on your tighten the harness. waist making sure the Velcro is waist making sure the Velcro well aligned.
- Page 34 Before getting off, Take Press the silver buttons on side Unfasten the belts and get off off your VR HMD and place it of the buckle to open it. the platform. on the hook at the back of the supporting rods,pull down the anti-slip protection straps onto the shoe heel.
- Page 35 Tighten the nuts holding the waist harness. First Steps ‒ How to walk? To trigger movement forward in When on the platform, try to Try to squat. VR, move your feet alternately. slowly start walking. To trigger continuous movement To trigger movement backward, To trigger strafing left, place your forward without walking (cruise place one of your feet at the center of...
- Page 36 To trigger continuous movement To trigger movement backward, To trigger strafing left, place your forward without walking (cruise place one of your feet at the center of right foot at the center of the mode), place one of your feet at the platform and keep the other one platform and keep the left one at the center of the platform and...
- Page 37 Disassembly & Maintenance Disassembly procedure: If you need to move your KAT Walk C to another location, you should carry out the device disassembly in the reverse order to the device installation procedure, that is, starting from pulling out the USB cable from your PC, through removing the waist harness and the back support plate to taking out the supporting rods in order to ensure that the structure and components are not damaged during transportation.
- Page 38 Appendix In order to ensure your maximum user experience, we have prepared a number of optional accessories to choose from: Optional Accessories List Name Quantity Appearance Note KAT PiSystem(For PSVR) 2 Package Contact Information Company: Hangzhou Virtual and Reality Technology Co., Ltd Add:...
- Page 39 www.kat-vr.com Version: 202008...
Need help?
Do you have a question about the Walk C and is the answer not in the manual?
Questions and answers