All Weather Inc AWOS 3000 Installation And Checkout Manual
Automated weather observing system
Hide thumbs
Also See for AWOS 3000:
- Installation and checkout manual (132 pages) ,
- User manual (143 pages)

Related Manuals for All Weather Inc AWOS 3000

Summary of Contents for All Weather Inc AWOS 3000
- Page 1 Automated Weather Observing System Installation Checkout Manual 3000-017 Rev. P All Weather Inc. • 1065 National Drive • Sacramento, CA 95834 • USA • 800.824.5873 • www.allweatherinc.com...
- Page 2 Copyright © 2012–2021, All Weather, Inc. All Rights Reserved. The information contained herein is proprietary and is provided solely for the purpose of allowing customers to operate and/or service All Weather, Inc. manufactured equipment and is not to be released, reproduced, or used for any other purpose without written permission of All Weather, Inc.
- Page 3 AWOS 3000 INSTALLATION AND CHECKOUT Revision History Revision Date Summary of Changes 2012 Jan 6 Updated Drawing M403316-003 Sheet 3 to show 7150 BP sensor. Updated Freezing Rain Sensor and Present Weather sensor wiring to DCP, removed 7190 BP instructions, added PW sensor wire colors to Table 4, added...
-
Page 4: Table Of Contents
C O N T E N T S AWOS 3000 INSTALLATION AND CHECKOUT T able of Contents 7.2 Mounting 1. USING THIS MANUAL ............1 7.3 Wiring 1.1 General Precautions 7.4 Checkout 2. CENTRAL DATA PROCESSOR ........2 8. MODEL 5190 TEMPERATURE/RH SENSOR ....54 2.1 CDP Installation... - Page 5 C O N T E N T S AWOS 3000 INSTALLATION AND CHECKOUT 15. FOLDOVER TOWER OPERATIONS ......93 15.1 Lowering the Tower 15.2 Raising the Tower APPENDIX A. DRAWINGS ..........94...
-
Page 6: Using This Manual
This manual details installation and checkout procedures for the All Weather, Inc. Automated Weather Observing System (AWOS) 3000. The AWOS 3000 is available in multiple configura- tions, with each AWOS configuration having a unique suite of sensors. This manual is organized around the individual sensors, with each sensor covered in its own chapter. -
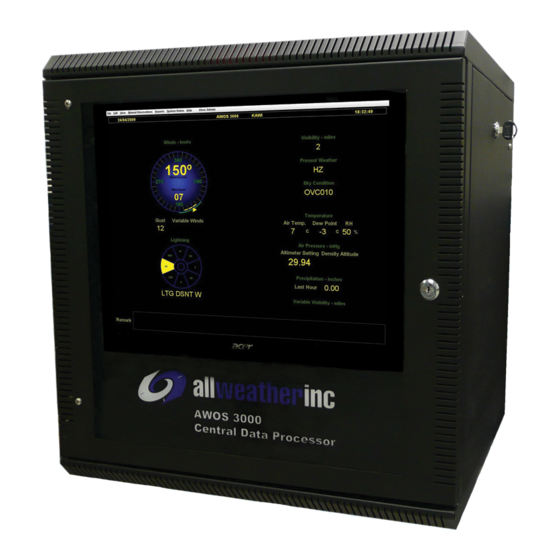
Page 7: Central Data Processor
The Central Data Processor (CDP) is mounted in an industrial-grade rack (Figure 1) along with an Uninterruptible Power Source (UPS), VHF ground-to-air radio, voice/RMM (Remote Main- tenance Monitoring)) modem, and any of the CDP options. The available options include UHF data link radio, AWOS Net, and AWOS/ATIS Interface. Figure 1. AWOS 3000 CDP Rack... -
Page 8: Cdp Installation
C E N T R A L D A T A P R O C E S S O R AWOS 3000 INSTALLATION AND CHECKOUT 2.1 CDP Installation The CDP is self-contained. It is installed indoors, at a location with access to AC power and any auxiliary communication and data lines required. - Page 9 D A T A P R O C E S S O R AWOS 3000 INSTALLATION AND CHECKOUT 2. Using a hacksaw, trim the radial length of the antenna (Part M489103) to the length specified. Cover the end of the radiator with the plastic end cap provided with the antenna.
-
Page 10: Cdp Rack Layout
D A T A P R O C E S S O R AWOS 3000 INSTALLATION AND CHECKOUT 2.1.4 Connecting Optional Printer A USB port is available on the CDP back panel for connection to a printer. Connect the printer as follows: 1. - Page 11 C E N T R A L D A T A P R O C E S S O R AWOS 3000 INSTALLATION AND CHECKOUT Figure 5. CDP Top-Shelf Components 2.3.1 Communications The communication options—RS-485 converter or UHF radio—mount to the CDP top shelf in front of the CPU Board assembly.
- Page 12 C E N T R A L D A T A P R O C E S S O R AWOS 3000 INSTALLATION AND CHECKOUT The following steps describe how to install the RS-485 converter kit. Figure 6 illustrates the connections.
- Page 13 C E N T R A L D A T A P R O C E S S O R AWOS 3000 INSTALLATION AND CHECKOUT Figure 6. RS-485 Landline Converter Installation...
- Page 14 D A T A P R O C E S S O R AWOS 3000 INSTALLATION AND CHECKOUT 2.3.1.2 UHF Radio Installation When a radio data link is used between the DCP and the CDP, a UHF radio is mounted to the inside of the front panel above the top shelf.
- Page 15 C E N T R A L D A T A P R O C E S S O R AWOS 3000 INSTALLATION AND CHECKOUT Figure 8. UHF Radio Installation...
- Page 16 C E N T R A L D A T A P R O C E S S O R AWOS 3000 INSTALLATION AND CHECKOUT Connecting the UHF Antenna When a UHF radio data link is used for communication between the DCP and CDP, the antenna and antenna cable must be installed.
-
Page 17: Cdp Bottom-Shelf Components
C E N T R A L D A T A P R O C E S S O R AWOS 3000 INSTALLATION AND CHECKOUT 2.4 CDP Bottom-Shelf Components The CDP rack’s bottom shelf (Figure 9) is fixed in place. Components are accessible through the rack’s front or side doors. -
Page 18: Gps Ntp Time Standard
Figure 2). 2.6 NADIN Interface Connection If a NADIN interface is used with the AWOS 3000, the NADIN serial cable is routed into the CDP and connected to the back panel as follows: 1. Route the NADIN cable to the CDP location. -
Page 19: Kvm Extender For Remote Operation
C E N T R A L D A T A P R O C E S S O R AWOS 3000 INSTALLATION AND CHECKOUT 2.7 KVM Extender for Remote Operation The KVM Extender Kit (M488342-00) is used to interface a remote operator terminal to the CDP using a CAT6 Ethernet cable between the local and remote KVM Extender units, with the Local Unit connected to the CDP. - Page 20 C E N T R A L D A T A P R O C E S S O R AWOS 3000 INSTALLATION AND CHECKOUT 6. Remote Operator Interface — Monitor, keyboard, mouse, speaker, and microphone. A customer-supplied standard CAT6 Ethernet cable built to standard TIA/EIA-568-B.2-2001 with RJ-45 connectors wired to the T568B scheme is used to connect the Remote Unit to the Local Unit.
- Page 21 D A T A P R O C E S S O R AWOS 3000 INSTALLATION AND CHECKOUT Figure 13 illustrates the connection of the KVM extender units using the Ethernet cable. Figure 13. Topology of Local and Remote KVM Extender...
- Page 22 C E N T R A L D A T A P R O C E S S O R AWOS 3000 INSTALLATION AND CHECKOUT 2.7.1 Local Unit Installation The Local Unit of the KVM extender is essentially installed between the computer in the CDP and the keyboard/mouse combination, microphone, and speakers.
- Page 23 C E N T R A L D A T A P R O C E S S O R AWOS 3000 INSTALLATION AND CHECKOUT Remove all the caps from the ends of the 3.5 mm mini stereo audio connectors on the KVM cable.
- Page 24 D A T A P R O C E S S O R AWOS 3000 INSTALLATION AND CHECKOUT Connect the remaining USB connector wired to the blue connector on the KVM cable to a USB port on the CPU board.
- Page 25 C E N T R A L D A T A P R O C E S S O R AWOS 3000 INSTALLATION AND CHECKOUT Plug the circular connector on the power supply provided with the KVM extender into the DC power jack on the back of the Local Unit.
- Page 26 C E N T R A L D A T A P R O C E S S O R AWOS 3000 INSTALLATION AND CHECKOUT 2.7.2 Remote Unit Installation The Remote Unit of the KVM extender is installed in the desired operational location for the user.
- Page 27 D A T A P R O C E S S O R AWOS 3000 INSTALLATION AND CHECKOUT Place the monitor, keyboard, mouse, and microphone in the desired locations. Connect the straight-through CAT6 Ethernet cable from the Local Unit to the REMOTE I/O connector on the back of the Remote Unit (Figure 13).
- Page 28 C E N T R A L D A T A P R O C E S S O R AWOS 3000 INSTALLATION AND CHECKOUT 2.7.3 KVM Extender Checkout 1. Perform a visual inspection once the Local Unit and Remote Unit connections have been completed to make sure they match the connections shown in Figure 14 and Figure 18.
-
Page 29: Awos/Atis Interface
LED and mode switch on the front of the enclosure, and so does not require the Remote Switch. The Remote Switch may still be used with this model if desired. If the remote switch is used, the 2942 should be installed inside the AWOS 3000 enclosure to prevent access to the mode switch. - Page 30 C E N T R A L D A T A P R O C E S S O R AWOS 3000 INSTALLATION AND CHECKOUT 2.8.1 ATIS Peripheral Interface Cable (M491838-00) The ATIS Peripheral Interface Cable is used to connect the AWOS/ATIS Interface assembly to the CDP Peripheral Interface PCB.
- Page 31 C E N T R A L D A T A P R O C E S S O R AWOS 3000 INSTALLATION AND CHECKOUT 2.8.2 AWOS/ATIS Remote Switch Assembly Mount the Model 2941 Remote Switch used with the Model 2940 AWOS/ATIS Interface at the location where the AWOS/ATIS Interface is controlled from.
- Page 32 C E N T R A L D A T A P R O C E S S O R AWOS 3000 INSTALLATION AND CHECKOUT Figure 22 shows the AWOS/ATIS Interface connections. Figure 22. AWOS/ATIS Interface Connections 1. If a Remote Switch is used, connect its Ethernet patch cord to the BLACK jack.
- Page 33 D A T A P R O C E S S O R AWOS 3000 INSTALLATION AND CHECKOUT 3. Connect the WHITE patch cords between the Interface assembly’s WHITE jack and the ATIS’s VHF PTT Keying output, VHF audio output, and Telco audio output. The polarity of these wires is not important.
-
Page 34: Cdp Checkout
C E N T R A L D A T A P R O C E S S O R AWOS 3000 INSTALLATION AND CHECKOUT 2.9 CDP Checkout 1. Check display operation. 2. Check that either the RS-485 converter or UHF radio connections are in place so that the CDP can display data from DCP. -
Page 35: Cdp Block Diagram
C E N T R A L D A T A P R O C E S S O R AWOS 3000 INSTALLATION AND CHECKOUT 2.10 CDP Block Diagram Figure 23 shows a block diagram of the CDP components and their connections. - Page 36 C E N T R A L D A T A P R O C E S S O R AWOS 3000 INSTALLATION AND CHECKOUT...
-
Page 37: Data Collection Platform
D A T A C O L L E C T I O N P L A T F O R M Chapter 3. Data Collection Platform AWOS AWOS AWOS AWOS AWOS AWOS AWOS AWOS AWOS IIIP IIIT IIIPT IIIPTZ ... -
Page 38: Auxiliary Sensor Wiring
C O L L E C T I O N P L A T F O R M AWOS 3000 INSTALLATION AND CHECKOUT 3.3 Auxiliary Sensor Wiring An auxiliary voltage output sensor (such as a solar radiation sensor) can be connected to the DCP via pins 5 and 6 of TB3. -
Page 39: Other Rs-485 Connections
C O L L E C T I O N P L A T F O R M AWOS 3000 INSTALLATION AND CHECKOUT 3.6.2 RS-485 Wiring When RS-485 communication is used to communicate with the CDP, pins 7, 9, and 10 of TB4 are used to make the connection. -
Page 40: Ac Power Wiring
C O L L E C T I O N P L A T F O R M AWOS 3000 INSTALLATION AND CHECKOUT 3.9 AC Power Wiring AC line power is input to the DCP via the AC Interface Board (M404802). Connect incoming AC power to TB1 on the AC Interface Board (not TB1 on the DCP backplane) as follows: 1. -
Page 41: Solar Power
C O L L E C T I O N P L A T F O R M AWOS 3000 INSTALLATION AND CHECKOUT 3.13 Solar Power Where conditions permit, the DCP can be powered by a solar power kit rather than by the AC Interface Board. -
Page 42: Dcp Checkout
C O L L E C T I O N P L A T F O R M AWOS 3000 INSTALLATION AND CHECKOUT Table 3 shows the setting combinations for DIP switch SW2. Table 3. DCP SW2 DIP Switch Settings... -
Page 43: Model 7150 Dual Digital Barometer
M O D E L 7 1 5 0 D U A L D I G I T A L B A R O M E T E R Chapter 4. Model 7150 Dual Digital Barometer AWOS AWOS AWOS AWOS AWOS AWOS AWOS... -
Page 44: Checkout
D U A L D I G I T A L B A R O M E T E R AWOS 3000 INSTALLATION AND CHECKOUT 4.1.1 Pressure Connections The barometer is equipped with standard Clippard 11752-1 barbed pressure fittings with 10-32 external thread installed in the barometer. - Page 45 D I G I T A L B A R O M E T E R AWOS 3000 INSTALLATION AND CHECKOUT Note the difference in readings for each pressure transducer from the pressure standard reading using in Hg units. The difference may be up to ±0.02 in Hg for the Digital Barometer to be within tolerance.
-
Page 46: Model 2020 Micro Response Wind Vane
Note that it might not be possible to completely comply with the minimum distance requirements from large obstructions when installing the wind vane in an oil rig or rooftop environment. Consult All Weather Inc. for guidance if this appears to be an issue. 5.1.1 Assembly With the exception of installing the tail and counterweight, the Model 2020 Micro Response Vane is ready for mounting. - Page 47 W I N D V A N E AWOS 3000 INSTALLATION AND CHECKOUT 3. Perform this step indoors where there is no air movement. Holding the sensor in a horizontal position, slide the vane shaft until it balances (the vane does not tip in either direction).
-
Page 48: Checkout
W I N D V A N E AWOS 3000 INSTALLATION AND CHECKOUT 9. When removing the wind vane for any reason in the future, do not loosen the mounting bolt on the sensor mount or remove the sensor mount from the crossarm. Remove the wind vane from the sensor mount by loosening the mounting bolt on the side of the sensor base. - Page 49 W I N D V A N E AWOS 3000 INSTALLATION AND CHECKOUT 2. With the sensor locked in position, stand at the direction benchmark and verify that the tail of the vane is aligned with the vane body. If the vane is not aligned, loosen the mounting screw located at the bottom of the Unistrut, align the sensor (and base) with the benchmark, and tighten the mounting bolt.
- Page 50 2 0 2 0 W I N D V A N E AWOS 3000 INSTALLATION AND CHECKOUT 4. Verify that the vane’s movement is free and smooth. If it is not, replace the bearings. The shaft should turn freely at all times.
-
Page 51: Model 2030 Anemometer
Note that it might not be possible to completely comply with the minimum distance requirements from large obstructions when installing the anemometer in an oil rig or rooftop environment. Consult All Weather Inc. for guidance if this appears to be an issue. 6.1.1 Assembly With the exception of installing the cup assembly, the Model 2030 Micro Response Anemometer is ready for mounting. - Page 52 M O D E L 2 0 3 0 A N E M O M E T E R AWOS 3000 INSTALLATION AND CHECKOUT 6.1.2 Mounting The Model 2030 Anemometer must be completely assembled (Section 6.1.1) before it is mounted on the tower.
-
Page 53: Checkout
M O D E L 2 0 3 0 A N E M O M E T E R AWOS 3000 INSTALLATION AND CHECKOUT 6.2 Checkout 1. Remove the anemometer cup assembly by loosening the two set screws on the cup assembly collar. -
Page 54: Model 2040 Ultrasonic Wind Sensor
M O D E L 2 0 4 0 U L T R A S O N I C W I N D S E N S O R Chapter 7. Model 2040 Ultrasonic Wind Sensor AWOS AWOS AWOS AWOS AWOS AWOS AWOS... - Page 55 W I N D S E N S O R AWOS 3000 INSTALLATION AND CHECKOUT red dot, which indicates the North side of the sensor. Mount the sensor to the crossarm while on the ground, before installing the crossarm on the tower.
-
Page 56: Wiring
U L T R A S O N I C W I N D S E N S O R AWOS 3000 INSTALLATION AND CHECKOUT 7.3 Wiring This section describes the wiring for the three Model 2040 Ultrasonic Wind sensors. Drawing... - Page 57 M O D E L 2 0 4 0 U L T R A S O N I C W I N D S E N S O R AWOS 3000 INSTALLATION AND CHECKOUT Figure 29. Ultrasonic Wind Sensor Heater Connections Inside DCP...
-
Page 58: Checkout
U L T R A S O N I C W I N D S E N S O R AWOS 3000 INSTALLATION AND CHECKOUT 7.3.3 Model 2040HH/2040HHC Wiring The signal wires from the sensor connect to the RS-422/RS-232 converter installed inside the DCP. -
Page 59: Model 5190 Temperature/Rh Sensor
M O D E L 5 1 9 0 T E M P E R A T U R E / R H S E N S O R Chapter 8. Model 5190 Temperature/RH Sensor AWOS AWOS AWOS AWOS AWOS AWOS AWOS AWOS... -
Page 60: Checkout
T E M P E R A T U R E / R H S E N S O R AWOS 3000 INSTALLATION AND CHECKOUT and the cable insulation could be destroyed. Use ultraviolet-resistant cable ties, tape, or metal strapping. Use caution to avoid damaging the outer jacket of the cable. - Page 61 T E M P E R A T U R E / R H S E N S O R AWOS 3000 INSTALLATION AND CHECKOUT The reference sensor can take up to ten minutes to stabilize, as the sensor body may have absorbed or lost heat from contact with your body or from storage conditions.
-
Page 62: Model 8190 Motor Aspirated Radiation Shield57
M O D E L 8 1 9 0 M A R S Chapter 9. Model 8190 Motor Aspirated Radiation Shield AWOS AWOS AWOS AWOS AWOS AWOS AWOS AWOS AWOS IIIP IIIT IIIPT IIIPTZ ... -
Page 63: Checkout
M O D E L 8 1 9 0 M A R S AWOS 3000 INSTALLATION AND CHECKOUT 9.3 Checkout 1. Apply power to the MARS and check to see that the fan is rotating. Check to ensure that all mounting hardware is securely fastened. Verify sensor operation. -
Page 64: Model 6021/6022 Tipping-Bucket Rain Gauges59
To mount the sensor to a pad, construct the pad using a Ready-Form tube, rebar, and foundation bolts as described in the AWOS 3000 Site Preparation Manual, then proceed as follows: 1. Remove the collection funnel and check the bubble level on the base assembly before bolting the gauge to the foundation. - Page 65 M O D E L 6 4 9 0 P R E S E N T W E A T H E R S E N S O R 2. (Model 6021 series) Connect the 60116 data cable’s two wires to the two binding posts that terminate the reed switch.
-
Page 66: Checkout
M O D E L 6 4 9 0 P R E S E N T W E A T H E R S E N S O R 8. (Model 6022 series) Cut off the required length of power wire for the 6022 rain gauges. Use the cable gland and wire ties included with the 6022 rain gauge to route the power wire through the cable gland and connect it to the heater wires. -
Page 67: Model 6498 Present Weather And Visibility Sensor
M O D E L 6 4 9 8 P R E S E N T W E A T H E R A N D V I S I B I L I T Y S E N S O R Chapter 11. -
Page 68: Sensor Installation
Note that it might not be possible to completely comply with the minimum distance requirements from large obstructions when installing the sensor in an oil rig or rooftop environment. Consult All Weather Inc. for guidance if this appears to be an issue. 11.2 Sensor Installation... -
Page 69: Electronics Enclosure Installation
8 3 6 4 - E V I S I B I L I T Y S E N S O R AWOS 3000 INSTALLATION AND CHECKOUT 11.3 Electronics Enclosure Installation The electronics enclosure mounts on the mast below the sensor. -
Page 70: Power Connection
V I S I B I L I T Y S E N S O R AWOS 3000 INSTALLATION AND CHECKOUT 7. Connect the sensor hood heater cable to the connection point in the electronics enclosure as shown in the drawing 6498-007 (P2 24 VAC OUT on the UPCM):... -
Page 71: Ground Cable Installation
V I S I B I L I T Y S E N S O R AWOS 3000 INSTALLATION AND CHECKOUT 11.5 Ground Cable Installation In order for the sensor’s built-in lightning protection to function properly, the sensor head and electronics enclosure must be grounded. -
Page 72: Dcp Signal Connections
8 3 6 4 - E V I S I B I L I T Y S E N S O R AWOS 3000 INSTALLATION AND CHECKOUT 11.6 DCP Signal Connections The Present Weather and Visibility sensor communicates with the DCP via an RS-485 serial connection. -
Page 73: Additional Kits
8 3 6 4 - E V I S I B I L I T Y S E N S O R AWOS 3000 INSTALLATION AND CHECKOUT 11.7 Additional Kits The following sections provide installation instructions for the additional kits available for the 6498. - Page 74 8 3 6 4 - E V I S I B I L I T Y S E N S O R AWOS 3000 INSTALLATION AND CHECKOUT CAUTION Be careful not to touch the battery leads together when connecting or handling the battery! Figure 34.
-
Page 75: Checkout
8 3 6 4 - E V I S I B I L I T Y S E N S O R AWOS 3000 INSTALLATION AND CHECKOUT 11.8 Checkout The sensor must be calibrated whenever a 6498 Visibility sensor is replaced. When calibrating, there must be at least 7 miles visibility, and winds should be calm. - Page 76 8 3 6 4 - E V I S I B I L I T Y S E N S O R AWOS 3000 INSTALLATION AND CHECKOUT 11.8.2 Visibility Calibration Procedure The calibration is performed using a laptop with an USB connection.
- Page 77 M O D E L 8 3 6 4 - E V I S I B I L I T Y S E N S O R AWOS 3000 INSTALLATION AND CHECKOUT Figure 35. 6498 Calibration Equipment CALIBRATION - MENU 3 Starting calibration.
- Page 78 V I S I B I L I T Y S E N S O R AWOS 3000 INSTALLATION AND CHECKOUT Figure 36. 6498 with the Calibration Bungs Installed 8. Press any key once the calibration bungs are in place.
- Page 79 V I S I B I L I T Y S E N S O R AWOS 3000 INSTALLATION AND CHECKOUT 10. Remove the calibration bungs and install the calibrator into the sampling volume by fastening it to the central mounting point as shown in Figure 37.
- Page 80 8 3 6 4 - E V I S I B I L I T Y S E N S O R AWOS 3000 INSTALLATION AND CHECKOUT 11.8.3 Day/Night Sensor Checkout Check the Day/Night sensor operation. 1. During daytime, set the DCP’s LCD display to show the Day/Night status.
- Page 81 8 3 6 4 - E V I S I B I L I T Y S E N S O R AWOS 3000 INSTALLATION AND CHECKOUT 11.8.4 Battery Backup Checkout Check the Battery Backup operation. 1. Turn the AC power switch off by pressing on the O side of the switch.
-
Page 82: Model 8339 Ceilometer
M O D E L 8 3 3 9 C E I L O M E T E R Chapter 12. Model 8339 Ceilometer AWOS AWOS AWOS AWOS AWOS AWOS AWOS AWOS AWOS IIIP IIIT IIIPT IIIPTZ Model 8339 ... -
Page 83: Installation
W E A T H E R A N D V I S I B I L I T Y AWOS 3000 INSTALLATION AND CHECKOUT S E N S O R 12.2 Installation The 8339 must be firmly mounted to a vertical 2½" mast for proper operation. Any movement of the 8339 arising from wind or other causes will reduce the accuracy of the Ceilometer. - Page 84 P R E S E N T W E A T H E R A N D V I S I B I L I T Y AWOS 3000 INSTALLATION AND CHECKOUT S E N S O R Figure 42. Ceilometer Installation 12.2.1.2 Ground Cable In order for the Ceilometer’s built-in lightning protection to function properly, the ceilometer...
- Page 85 A N D V I S I B I L I T Y AWOS 3000 INSTALLATION AND CHECKOUT S E N S O R 3. Install the blower hood onto the blower unit: The screws are already installed into the blower unit;...
- Page 86 W E A T H E R A N D V I S I B I L I T Y AWOS 3000 INSTALLATION AND CHECKOUT S E N S O R 12.2.3 Ceilometer Data Connection 1. Connect the M491894-00 cable from the Lightning Surge Suppressor (Figure 43) to the CEILOMETER DATA connector on the underside of the Ceilometer (see Figure 45).
- Page 87 W E A T H E R A N D V I S I B I L I T Y AWOS 3000 INSTALLATION AND CHECKOUT S E N S O R 12.2.3.1 Heater/Blower Power Connection Connect the Heater/Blower’s power cord to the HEATER/BLOWER POWER connector on the underside of the Ceilometer.
- Page 88 W E A T H E R A N D V I S I B I L I T Y AWOS 3000 INSTALLATION AND CHECKOUT S E N S O R 12.2.3.4 Final Steps 1. Ensure that the circuit breaker on the power supply is in the “ON” position.
- Page 89 P R E S E N T W E A T H E R A N D V I S I B I L I T Y AWOS 3000 INSTALLATION AND CHECKOUT S E N S O R 12.2.4 Ceilometer Power Connection WARNING Ensure that the circuit breaker for the Ceilometer in the main power distribution box is in the OFF position when making power connections.
-
Page 90: Checkout
W E A T H E R A N D V I S I B I L I T Y AWOS 3000 INSTALLATION AND CHECKOUT S E N S O R Figure 49. Ceilometer External AC Power Connections 12.3 Checkout 1. -
Page 91: Model 6500 Thunderstorm/Lightning Sensor86
6 5 0 0 T H U N D E R S T O R M / L I G H T N I N G S E N S O R AWOS 3000 INSTALLATION AND CHECKOUT Chapter 13. Model 6500 Thunderstorm/Lightning... -
Page 92: Sensor Installation
Note that it might not be possible to completely comply with the minimum distance requirements from significant RFI sources when installing the sensor in an oil rig or rooftop environment. Consult All Weather Inc. for guidance if this appears to be an issue. 13.3 Sensor Installation The Thunderstorm/Lightning sensor is mounted on a mast that was installed during site preparation. - Page 93 T H U N D E R S T O R M / L I G H T N I N G S E N S O R AWOS 3000 INSTALLATION AND CHECKOUT 6. Set the sensor package (antenna, ground plane, enclosure, and bracket) on the mast, and fasten loosely with two U-bolts, lock washers, and flat washers as shown in Figure 51.
- Page 94 T H U N D E R S T O R M / L I G H T N I N G S E N S O R AWOS 3000 INSTALLATION AND CHECKOUT 10. The sensor enclosure lid is equipped with hinged bolts (see Figure 53) to allow the box to be opened with the ground plane attached.
-
Page 95: Checkout
T H U N D E R S T O R M / L I G H T N I N G S E N S O R AWOS 3000 INSTALLATION AND CHECKOUT Table 4. Thunderstorm/Lightning Sensor Signal and Power Wiring... -
Page 96: Model 6495 Freezing Rain Sensor
M O D E L 6 4 9 5 F R E E Z I N G R A I N S E N S O R Chapter 14. Model 6495 Freezing Rain Sensor AWOS AWOS AWOS AWOS AWOS AWOS AWOS AWOS AWOS... -
Page 97: Power Connections
F R E E Z I N G R A I N S E N S O R AWOS 3000 INSTALLATION AND CHECKOUT 3. Install the second U-bolt through the bottom two mounting holes and fasten with flat washers, lock washers, and nuts. - Page 98 F O L D O V E R T O W E R O P T I O N S Chapter 15. Foldover Tower Operations 15.1 Lowering the Tower To lower the hinged section of the tower: 1. Remove and retain the four nuts from the bottom two U-bolt clamps. Remove the U-bolt clamps.
- Page 99 3000-019 AWOS 3000 CDP Wiring Diagram (Rev B) 1792 VHF 3000-019 AWOS 3000 CDP Wiring Diagram (Rev F) 1793 VHF...
- Page 104 allweatherinc...
- Page 120 REVISIONS DWG. ON. 6498-007 DESCRIPTION DATE APPROVED 4410 INITIAL RELEASE 01/10/2018 SLVS NOTES: UNLES OTHERWISE SPECIFIED 1. VERIFY THE MAST IS ASSEMBLED PER THE MAST INSTALLATION DETAIL. STEP 1 2. MOUNT ELECTRONICS ENCLOSURE ON THE MAST PER ELECTRONICS ENCLOSURE INSTALLATION DETAIL. MAST 3.
- Page 121 EXTERNAL SERIAL CONNECTION AC POWER SWITCH SENSOR HOOD HEATER CONNECTION AC POWER CONNECTION SENSOR POWER AND SENSOR GROUND DATA CONNECTION CONNECTION SENSOR HOOD HEATER CABLE SENSOR POWER AND DATA CABLE Sensor Hood Heater Cable Both Switches Set to RS485 Sensor Data and Power Cable AC Power Input...
- Page 122 1 ½” x 2' 1 ½”GALVANIZED GALVANIZED STEEL PIPE STEEL CAP 2 ½” to 1 ½” GALVANIZED STEEL REDUCER 2 ½” x 5' GALVANIZED Steel Pipe DRILL AND TAP 3/8"-16 HOLE FOR ISLCO MU-250 LUG OR EQUIVALENT TO BOND CABLE TO THE PIPE 2 ½”...
- Page 123 SENSOR ELECTROINCS ENCLOSURE WEATHER TIGHT JUNCTION BOXES APPLETON FDC-1-75 WITH WEATHER TIGHT COVER FSK-1B-C OR EQUIVALENT 2 REQUIRED. SIGNAL POWER DISTRIBUTION DISTRUBTION GROUND LEVEL SIGNALS FOUNDATION CONDUIT AC POWER CONDUIT EXCEPT AS MAY OTHERWISE BE SPECIFIES BY CONTRACT THIS DOCUMENT AND THE DATA DISCLOSED HEREIN AND DWG.
- Page 124 llwe therinc...
- Page 127 M488169-01-007 REVISIONS NOTES: UNLESS OTHERWISE SPECIFIED; USE WASHERS AS REQUIRED TO LEVEL RAINGAUGE REV ECNO DESCRIPTION DATE APPROVED WHEN USING MODEL 8518-A FOLDOVER TOWER, 1281 INITIAL RELEASE 10/25/07 MOUNT TO HINGED SIDE OF TOWER USING HOLES 4880 ADDED 6012 & 6022 09/04/19 SLVS SHOWN.
- Page 128 NOTES: UNLESS OTHERWISE SPECIFIED; USE WASHERS AS REQUIRED TO LEVEL RAINGAUGE. 3X, BOLT 3/8-16 X 1.5",SS NOTES: CONTINUED M012021-01 3. APPLY LOCTITE SILVER GRADE ANTI-SEIZE COMPOUND (M401065-00) WHEN USING MODEL 8518-A FOLDOVER TOWER, OR EQUIVALENT TO ALL EXTERNAL THREADED CONNECTIONS. MOUNT TO HINGED SIDE OF TOWER USING THE HOLES 6011/6021 SHOWN.
- Page 132 D R A W I N G S AWOS 3000 INSTALLATION AND CHECKOUT...
- Page 133 D R A W I N G S AWOS 3000 INSTALLATION AND CHECKOUT...
- Page 134 D R A W I N G S AWOS 3000 INSTALLATION AND CHECKOUT...
- Page 135 All Weather Inc. 1065 National Drive, Suite 1 Sacramento, CA 95818 3000-017 Fax: 916.928.1165 Revision P Phone: 916.928.1000 January, 2021 Toll Free: 800.824.5873...
Need help?
Do you have a question about the AWOS 3000 and is the answer not in the manual?
Questions and answers