Advertisement
Quick Links
LED Light Kit Installation Instructions
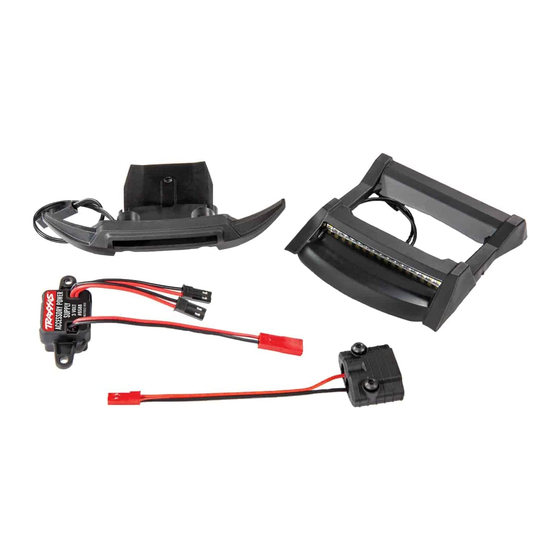
Kit contents:
• 3-volt accessory power supply
• Electronic speed control (ESC) power tap
• 3x10mm button-head cap screws (2)
• Roof skid plate with front and rear LED light bars
• Front bumper with LED light bar
• Body template
• Zip ties (3)
Tools needed:
• 2.0mm hex wrench
• 2.5 mm hex wrench
• Tapered body reamer (part #3433 or #3433X, sold separately)
• Body scissors (part #3431 or #3432, sold separately)
1
3x12mm CS
Remove the existing roof skid plate.
3
3x12mm CS
Install the new roof skid plate; feed the wire harness
connector through the hole in the roof.
4
4x16mm BCS
4x10mm CCS
Remove the existing front bumper.
Traxxas, 6250 Traxxas Way, McKinney, TX 75070, Phone: 972-549-3000, Fax: 972-549-3011, e-mail: support@Traxxas.com
CAUTION: RISK OF INJURY!
Use care with hobby knives, tapered reamers, and other cutting tools as
they are extremely sharp and can cause severe injury, deep cuts, and/or punctures.
CAUTION: RISK OF DAMAGE TO BATTERIES!
Do not attach the power tap to the battery connector. Attach to the
electronic speed control (ESC) connector only. Always disconnect the battery
from the ESC when not in use to prevent the possiblity of over-discharge.
2
12mm
12mm
0.5"
0.5"
Tapered Body Reamer
Diameter Measurements
Body modification:
Before installation of the new roof skid plate, the vehicle body will need modification.
Peel the backing from the included self-adhesive cutting template. Install the template on
the vehicle body, aligning the holes in the template with the front screw holes in the roof.
Using a tapered body reamer, carefully cut holes in the roof to the dotted lines on the
template (note the hole diameters indicated on the template and the corresponding
diameter measurements on the body reamer). Use body scissors to cut out the section
between the two holes as indicated.
5
4x16mm BCS
Install the new front bumper. See step 9 for wire routing.
TR AXXAS .co m
Visitez Traxxas.com/manuals pour télécharger
les instructions dans votre langue.
Visite la página Traxxas.com/manuals para
descargar el instrucciones en su idioma.
Auf Traxxas.com/manuals, können Sie
anleitung in Ihrer Sprache downloaden.
Covers Part #6795
4x10mm CCS
HKC19045-R04
Rev 201023
Advertisement

Related Manuals for Traxxas 6795


Summary of Contents for Traxxas 6795
- Page 1 Install the new roof skid plate; feed the wire harness connector through the hole in the roof. between the two holes as indicated. 4x16mm BCS 4x16mm BCS 4x10mm CCS 4x10mm CCS Remove the existing front bumper. Install the new front bumper. See step 9 for wire routing. TR AXXAS .co m Traxxas, 6250 Traxxas Way, McKinney, TX 75070, Phone: 972-549-3000, Fax: 972-549-3011, e-mail: support@Traxxas.com HKC19045-R04 Rev 201023...
- Page 2 Traxxas Lifetime Electronics Warranty Traxxas electronic components are warranted to be free from After the expiration date of the warranty period, Traxxas will repair defects in materials and workmanship for a period of 30 days from electronic components for a flat rate. Please visit Traxxas.com/ the date of purchase.
Need help?
Do you have a question about the 6795 and is the answer not in the manual?
Questions and answers