Advertisement
Quick Links
WARNING / DISCLAIMER
PLEASE READ THE FOLLOWING BEFORE PURCHASING OR BUILDING THIS PROJECT!
1. NO DIRECT TECHNICAL SUPPORT: This project has been verified to be working, and I have done my
best to provide extremely thorough documentation, including information to help you troubleshoot. But on a
project this size, I have to reiterate that Aion Electronics cannot provide direct technical support for this
project or others. I love helping people bring these circuits to life, but my availability is very limited. If you post
your question on one of the DIY forums and send me a link, I will do my best to chime in. Just know before
purchasing this PCB that there is no implied guarantee of the final product, because the biggest factor is
outside my control: you! Your experience and your attention to detail are the most important ingredients in
making sure this works. My role is to provide the recipe and some cooking utensils.
2. IT WILL TAKE AWHILE: Be prepared to invest some hours into putting this together. You'll want to be
doubly careful when populating the board since it'll be much more difficult to track down a problem if you were
to make even the most basic of mistakes (for instance, accidentally using a 10k resistor somewhere instead of
a 100k). You can't be too cautious. I'd recommend measuring each resistor with a multimeter before putting
it into place. Triple-check your wiring. The more time you spend on the initial build, the less time you'll have to
spend troubleshooting.
3. IT'S COMPLICATED: As of this writing, this is the largest PCB in the DIY guitar pedal scene. While it is not
a technologically complex circuit—no BBDs, clocks or LFOs like in vintage EHX modulation effects—there
are still a lot of things that can go wrong. Hopefully it goes without saying, but if you've never built a guitar
pedal before, this shouldn't be your first. If you haven't successfully built at least ten, including drilling the
enclosure accurately with a template, you may not be ready for this one yet.
4. YOU'VE GOT TO BUILD IT AS IT WAS INTENDED: I approached the project as though I was designing a
completed product for market. Everything has been designed to be built using methods you'd see in a high-end
pedal (for instance, PCB-mounted pots & switches and components with specific sizes and characteristics) and
a full bill of materials has been provided so it's very easy to order all the parts from Mouser. We all build pedals
in our own style, but with this one, if you try to "freestyle" by doing your own enclosure layout or using parts
other than the ones specified, you might back yourself into a corner. Please do things my way—you'll end up
with a very professional and durable end product and you might even learn a few things in the process!
5. IT'S NOT CHEAP: Between the PCB, enclosure, hardware, potentiometers, and the on-board components,
expect to spend a minimum of $100 USD and probably closer to $125. Please don't try to cut corners on the
parts selection by using poor-quality components or by substituting "close enough" components that you have
laying around. You're putting a lot of time and effort into this build, so it's worth a few extra dollars to use the
right parts. Expect to order from more than one web store to get everything you need.
6. IT USES A NON-STANDARD ADAPTER: This pedal requires an adapter that puts out 9V AC, not DC. This
is the same type of power supply used by Line 6 for their large digital modeling pedals such as the DL-4, and
they are readily available from Line 6 or from other manufacturers who advertise Line 6 compatibility. Just
know that this adapter will destroy any pedal that is not designed for AC power. By having an AC-output
adapter laying around, you run a very high risk of this adapter getting plugged into a non-AC pedal, either by
you or someone else, since it says on the label that it's a 9 volt adapter and the "AC" part is easy to overlook.
I recommend using some colored heat shrink or electrical tape near the barrel tip of the adapter as a reminder
that it's different.
Now that you've been properly warned: on to the fun stuff!
L5 PREAMP
1
Advertisement

Related Manuals for Aion Electronics L5 Preamp


Summary of Contents for Aion Electronics L5 Preamp
- Page 1 But on a project this size, I have to reiterate that Aion Electronics cannot provide direct technical support for this project or others. I love helping people bring these circuits to life, but my availability is very limited. If you post your question on one of the DIY forums and send me a link, I will do my best to chime in.
-
Page 2: Table Of Contents
The original amps had the preamp integrated with the power amp. By splitting out the preamp, we can use this either as a normal pedal in a chain (e.g. tuner → overdrive → L5 Preamp → modulation / delay → amp input) or as a true preamp by plugging its output straight into a power amp (either a dedicated power amp or the “return”... -
Page 3: Differences From Original Circuit
Everything over that level will be squashed back down. At higher threshold levels, it simulates light tube compression, but turn it down and you can get all of the higher- gain tones without the high volume. L5 PREAMP... - Page 4 • I double-checked the orientation of the LEDs before soldering them in place. • I compared my populated PCB with the photo on the project page (including jumpering CX1, the capacitor in the tone stack of channel 1). L5 PREAMP...
-
Page 5: Parts
2k7 1/2W 100k 270k 390R 680R 1/2W 300k 100k 430R 220pF MLCC 330n 240k 390R 100pF MLCC electro 300k 680R 1/2W 10uF electro 560R 680R 1/2W tantalum 100k 220k 100k electro 390R 100k 1M to 2M2 150k 300R L5 PREAMP... - Page 6 You might experiment with an OPA134, the single version of the OPA2134. Substitute dual op-amp: The RC4558 is a fine op amp, but again, there are much better ones available today. Tou could substitute it with a lower-noise dual op amp such as the NJM2068, NE5532 or OPA2134. L5 PREAMP...
-
Page 7: Adjustments & Calibration
1.17V AC. A note about the compressor trimmer: I found that when using the L5 preamp as a pedal, the minimum signal level to trigger the compressor was too high, even on the compressor’s lowest setting. I ended up dropping the compressor trimmer to zero to make the minimum setting as low as possible, and this felt much more usable to me. -
Page 8: Power Supply Design Notes
Anything above 600mA max ripple current should be fine, but higher is better. I found some that were 1600mA! Oftentimes these are categorized by the manufacturer as “low ESR” or “low impedance” capacitors. L5 PREAMP... -
Page 9: Schematic (Master Volume, Compressor, Psu)
Schematic (1/2) L5 PREAMP... - Page 10 Schematic (2/2) L5 PREAMP...
- Page 11 This shows the placement of the pots, switches, and other hardware inside the enclosure, looking in from the bottom. MASTER MULTI TREBLE2 VOL2 TREBLE1 VOL1 25kA 25kA 25kB 25kA 50kA 2.5kA LEVEL BASS2 MID2 FREQ BASS1 MID1 50kC 25kB 25kB 100kC 50kA 2.5kA DUAL 1590X 1790NS L5 PREAMP...
-
Page 12: Wiring Diagram
If using a painted or powdercoated enclosure, make sure both jacks have solid contact with bare aluminum for grounding purposes. You may need to sand off some of the paint or powdercoat on the inside in order to make this happen. L5 PREAMP... -
Page 13: Drill Template
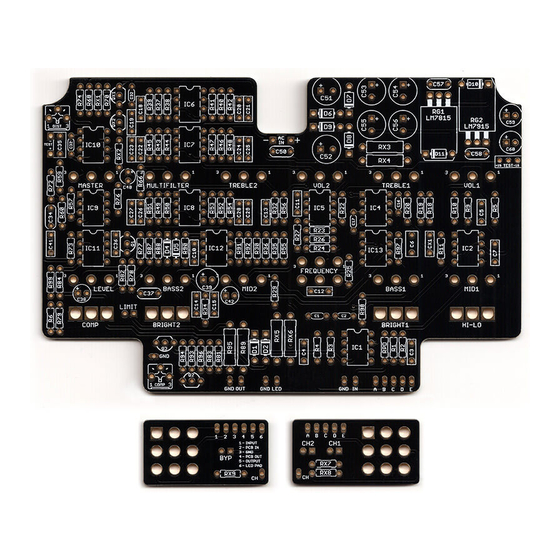
There are a lot of PCB-mounted pots and switches, so take your time and make sure to drill very accurately! L5 PREAMP... - Page 14 This is about 50% bigger than life size. The main PCB measures 5.35” x 3.5”. The smaller PCB on the left is the master bypass and the one on the right is the channel switching. These both inclode on-board LEDs. L5 PREAMP...
- Page 15 (In other words: you don’t have to go out of your way to advertise the fact that you use these PCBs, but please don’t go out of your way to hide it. The guitar effects pedal industry needs more transparency, not less!) L5 PREAMP...
Need help?
Do you have a question about the L5 Preamp and is the answer not in the manual?
Questions and answers