
Related Manuals for Helio MAP 50

Summary of Contents for Helio MAP 50
- Page 1 Helio MAP 50 Operating Manual www.helioGD.com HGD G4CH VER. 1.1 www.helioGD.com...
-
Page 2: Table Of Contents
Please read and understand the contents of this manual before commencing installation! Contents Important Remarks Page 4 Warranty Intended Use Technical Specifications Page 5 Environmental Specifications Electrical Specifications Sensor Specifications Internal Wiring Page 6 Start-up Page 6 Maintenance Page 7 Sensor Replacement Page 7 Detector Overview... - Page 3 Contents Analog Output Menu Simulate mA Page 15 Adjust mA Offset Page 16 Adjust mA Span Page 16 Alarm Level Menu Configure Channel Page 17 Alarm 1 Direction Page 17 Alarm 1 Level Page 18 Alarm 1 Reset Level Page 18 Alarm 2 Page 18 Relay Configuration Menu...
-
Page 4: Warranty
If this product is used in countries outside of the European Union, the standards and regulations valid in these countries must be observed. Warranty All Helio Gas Detection products carry a 12 month warranty. Damage caused to products by improper transportation, handling and / or installation are not subject to warranty. -
Page 5: Technical Specifications
Technical Specifications Environmental Specifications Technical Data Operating temperature -30 ºC to 50 ºC Pressure range 80 to 120 kPA Humidity range 15 to 90 % rh Electrical Specifications Supply voltage 24Vdc or 230Vac Power Consumption Max 10W Detector amount dependant Fuse 400mA PTC short circuit and overload protected... -
Page 6: Internal Wiring
Internal wiring Use ferrules if using stranded cables. PCB terminal blocks up to 1.0/1.5mm2. Use twisted pair cable with overall screen when connecting RS485 network. Start up When initially powered on, the gas detector should be allowed to warm up allowing the sensor to stabilise before calibration. -
Page 7: Maintenance
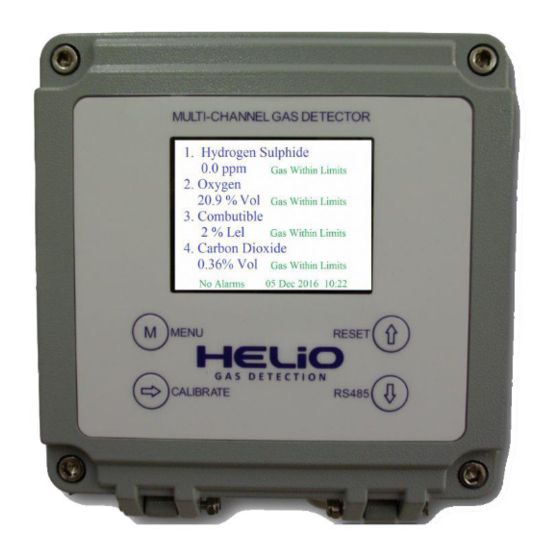
Helio Gas Detection systems must be inspected and serviced regularly by trained service personnel. We recommend that a service contract be obtained with a HELIO Gas Detection approved vendor and that all repairs also be carried out by them. Only authentic HELIO components may be used for maintenance purposes. - Page 8 Overview All HELIO gas detectors are provided with an TFT display, “ ” menu key " ” enter key and two scroll keys “ “ & “ “ to navigate through the program menus. During normal operation the TFT display shows the current gas concentration, alarm status and set-points.
- Page 9 TRUCTURE VERVIEW How to Navigate Menus Press the “ M ” key to continue, save changes and return to measure mode Use the ‘ ’ key to scroll through sub menus. Use the two scroll keys ‘ ’ and ‘ ‘...
- Page 10 OW TO ACCESS MENU SELECTION SCREEN From the normal operation screen: Ch Gas Reading Status Press M to view the menu select 1 Oxygen 20.9%Vol options No alarms Sun 12:00 01 Jan, 2017 Press to scroll to desired Menu Selection menu >>...
-
Page 11: General Settings
ENERAL ETTINGS Press to scroll to Set Time General Settings Internal Buzzer: menu >>Set Time: 12:00 01-Jan-2017 Press to select menu, Set RS485 Function: Modbus Press to change date & Set Password: time No of Detectors: Press again to advance cursor Isolate Detector: 0 0 0 0... -
Page 12: Set Channel Zone
ENERAL ETTINGS O OF ETECTORS Press to scroll to No of General Settings Internal Buzzer: Detectors menu Set Time: 12:00 01-Jan-2017 Press to select option Set RS485 Function: Modbus Press to set channel zone Set Password: Press to de-select menu >>No of Detectors: Isolate Detector:... - Page 13 ENERAL ETTINGS ERVICE Press to scroll to Service General Settings Internal Buzzer: Mode menu Set Time: 12:00 01-Jan-2017 Press to select option Set RS485 Function: Modbus Press to set channel zone Set Password: Press to de-select menu No of Detectors: Isolate Detector: 0 0 0 0...
- Page 14 ETECTORS Press to scroll to Analog Menu Selection Outputs menu -General Settings Press to enter menu >> -Read Detectors Press M to return to normal operation -Alarm Relays -Calibration Menu -Alarm History Up & down for Menu, -> Selects ...
-
Page 15: Choose Relay
ETUP LARM ELAYS Press to scroll to Analog Menu Selection Outputs menu -General Settings Press to enter menu -Read Detectors Press M to return to normal operation . >>-Alarm Relays -Calibration Menu -Alarm History Up & down for Menu, -> Selects HOOSE ELAY Setup Alarm Relays... -
Page 16: Test Relay
ATCHING Setup Alarm Relays Choose Relay: Press to select option Activate On: Any Alarm 1 Press to choose the relay >>Relay Latching: Press to go back N/Energised: Relay On Delay: If the relay is activated it will remain Test Relay 1: on until manually reset. -
Page 17: Calibration Menu
ALIBRATION Press to scroll to Analog Menu Selection Outputs menu -General Settings Press to enter menu -Read Detectors Press M to return to normal operation -Alarm Relays >>-Calibration Menu -Alarm History Up & down for Menu, -> Selects HOOSE ETECTOR Calibration Menu... - Page 18 ALIBRATION Calibration Menu Choose Detector: Press to select option Press to choose the relay Gas: Oxygen Press to go back Set Zero: >>Set Span: 1.00 Adjust the Span to the desired value Transmit: Complete After transmitting the value, the Reading: 20.9%Vol detector will save it and the reading...
-
Page 19: Historical Trends
LARM ISTORY Menu Selection Historical trends of all channels can be viewed from the Alarm History menu -General Settings Press to scroll to Alarm -Read Detectors History menu -Alarm Relays Press to enter menu -Calibration Menu Press M to go back >>-Alarm History Up &... - Page 20 HelioGD MAP50 VER. 1.0 For the latest documentation please visit www.HelioGd.com or email Sales@HelioGD.com...
- Page 21 HelioGD MAP50 VER. 1.0 For the latest documentation please visit www.HelioGd.com or email Sales@HelioGD.com...
-
Page 22: Contact Details
Contact Details Helio Gas Detection www.helioGD.com info@helioGD.com sales@helioGD.com 00353 (0) 21 242 9448 HelioGD MAP50 VER. 1.0 For the latest documentation please visit www.HelioGd.com or email Sales@HelioGD.com...
Need help?
Do you have a question about the MAP 50 and is the answer not in the manual?
Questions and answers