Table of Contents
Advertisement
Available languages
Available languages
Quick Links
Mi Motion-Activated Night Light 2 User Manual
Benutzerhandbuch für Mi Nachtlicht mit
Bewegungssensor 2
Mode d'emploi de Mi Motion-Activated
Night Light 2
Manual del usuario de Mi Motion-Activated
Night Light 2
Manuale utente Mi Motion-Activated Night Light 2
Руководство пользователя ночника с
датчиком движения Mi 2
Mi 센서등2 사용 설명서
Mi
米家感應夜燈 2 使用說明書
2
01
09
17
25
33
41
49
56
63
Advertisement
Table of Contents

Related Manuals for Mi 2


Summary of Contents for Mi 2
- Page 1 Mi Motion-Activated Night Light 2 User Manual Benutzerhandbuch für Mi Nachtlicht mit Bewegungssensor 2 Mode d’emploi de Mi Motion-Activated Night Light 2 Manual del usuario de Mi Motion-Activated Night Light 2 Manuale utente Mi Motion-Activated Night Light 2 Руководство пользователя ночника с...
-
Page 2: Product Overview
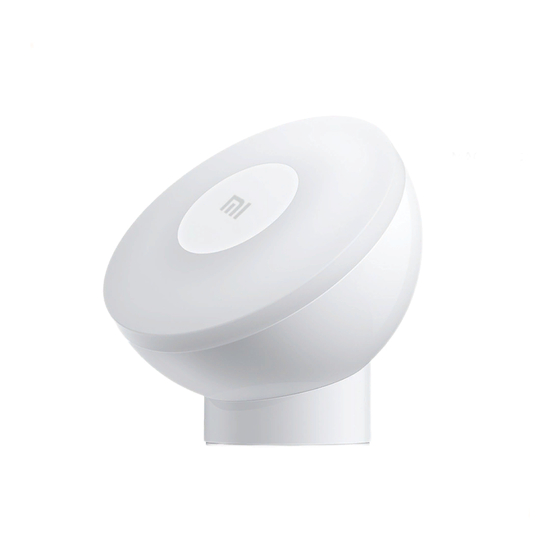
Product Overview Read this manual carefully before use, and retain it for future reference. Light Area Sensor Area Magnetic Base Adhesive Sticker Front The Night Light can rotate 360 degrees Brightness Switch Ba ery Cover Ba ery Compartment Interior Illustrations of product, accessories, and user interface in the user manual are for reference purposes only. -
Page 3: How To Use
Turn the front cover counterclockwise to unscrew it from its hemispherical housing. Open the ba ery cover and install three AA ba eries in the ba ery compartment. 2. Toggle the brightness switch to the desired brightness level before screwing the lamp back into its hemispherical housing. - Page 4 3. Mounting the light Select a flat and dry mounting surface, wipe the surface clean first, and then peel off the release liner from the base. Stick the base in the desired location and press it down firmly to make sure it is properly secured. Finally, a ach the light to the magnetic base and adjust it to a suitable angle.
- Page 5 Note: The detection area is a 120° area directly at the center in front of the night light. The detection area covers 0–6 m in front of the light, and 0–2.5 m to the sides. The detection effect depends on the angle of the light, ambient temperature, body size, and moving...
-
Page 6: Specifications
Specifications Model: MJYD02YL Luminous Flux: 3 lm, 25 lm Rated Voltage: 4.5 V Rated Power: 0.34 W Operating Temperature: -10°C to 40°C Item Dimensions:φ80 mm × 62 mm Net Weight: Approx. 121 g... - Page 7 Nor install the light near sources of humidity such as humidifiers or water heaters. Make sure the Mi logo is upright at all times when installing and using the night light. When the brightness of the night light is reduced a er a period of normal use, the ba ery level may be insufficient.
- Page 8 Please pay a ention to the positive (+) and negative (-) poles when installing the ba eries. A er non-rechargeable ba eries are depleted, they cannot be charged. Different types of ba eries, and old and new ba eries should not be mixed. The ba eries must be removed from the night light when it is not used for a long time, or when the night light is being disposed of.
- Page 9 Directives and European Norms, and amendments. The full text of the EU declaration of conformity is available at the following internet address: h p://www.mi.com/global/service/support/declaration.html WEEE Disposal and Recycling All products bearing this symbol are waste electrical and electronic equipment (WEEE as in directive 2012/19/EU) which should not be mixed with unsorted household waste.
- Page 10 Produktübersicht Lesen Sie dieses Handbuch vor der Verwendung sorgfältig durch, und bewahren Sie es für die spätere Verwendung auf. Beleuchtungsbereich Sensorbereich Magnetische Basis Selbstklebender Au leber Vorderseite Die Lampe kann um 360 Grad gedreht werden Helligkeitsschalter Ba erieabdeckung Ba eriefach Innenraum Abbildungen des Produkts, des Zubehörs und der Benutzeroberfläche in der Bedienungsanleitung dienen nur als Referenz.
- Page 11 Drehen Sie die Lampe gegen den Uhrzeigersinn, um sie aus ihrem halbkugelförmigen Gehäuse herauszuschrauben. Legen Sie drei AA-Ba erien ein. 2. Drücken Sie den Helligkeitsschalter auf die gewünschte Helligkeitsstufe, bevor Sie die Lampe wieder in ihr halbkugelförmiges Gehäuse einschrauben. 3 lm 25 lm Orte, die sich für die...
- Page 12 3. Befestigung des Lichts Wählen Sie eine flache und trockene Befestigungsfläche, wischen Sie die Oberfläche zuerst sauber und ziehen Sie dann die Trennschicht von der Unterseite ab. Kleben Sie das Unterteil an die gewünschte Stelle und drücken Sie es fest nach unten, um eine ordnungsgemäße Befestigung zu gewährleisten.
- Page 13 Erfassungsbereich Hinweis: Der Erfassungsbereich ist ein 120°-Bereich direkt in der Mi e vor dem Nachtlicht. Der Erfassungsbereich umfasst 0–6 m vor dem Licht und 0–2,5 m seitwärts. Die Wirkung der Erfassung hängt vom Lichtwinkel, der Umgebungstemperatur, der Körpergröße und der Bewegungsgeschwindigkeit ab. Der dargestellte Erfassungsbereich bezieht sich auf...
-
Page 14: Technische Daten
Technische Daten Modell: MJYD02YL Lichtstrom: 3 lm, 25 lm Nennspannung: 4,5 V Nennleistung: 0,34 W Betriebstemperatur: -10°C ~ 40°C Gerätemaße:φ80 mm × 62 mm Ne ogewicht: Ca. 121 g Vorsichtsmaßnahmen Decken Sie den Erfassungsbereich des Lichts nicht ab. Zur Reinigung der Lichtoberfläche wischen Sie diese mit einem weichen Baumwolltuch ab und verwenden Sie keine korrosiven Lösungsmi el. - Page 15 Achten Sie bei der Montage und Verwendung des Nachtlichts darauf, dass das Mi-Logo immer aufrecht steht. Wenn sich die Helligkeit des Nachtlichts nach einer gewissen Zeit des normalen Gebrauchs verringert, kann der Ladezustand der Ba erie unzureichend sein. Bi e ersetzen Sie die Ba erien durch neue und entsorgen Sie die alten Ba erien ordnungsgemäß, um...
-
Page 16: Eu-Konformitätserklärung
EU-Konformitätserklärung Wir, Qingdao Yeelink Information Technology Co., Ltd., bestätigen hiermit, dass dieses Gerät mit den geltenden Verordnungen und europäischen Normen sowie etwaigen Ergänzungen in Einklang steht. Der vollständige Wortlaut der EU-Konformitätserklärung ist unter der folgenden Internetadresse abru ar: h p://www.mi.com/global/service/support/declaration.html... - Page 17 WEEE-Informationen zu Entsorgung und Recycling Alle mit diesem Symbol gekennzeichneten Produkte sind Elektroschro und Elektrogeräte (WEEE entsprechend EU-Richtlinie 2012/19/EU) und dürfen nicht mit unsortiertem Haushaltsmüll vermischt werden. Schützen Sie sta dessen Ihre Mitmenschen und die Umwelt, indem Sie Ihre zu entsorgenden Geräte an eine dafür vorgesehene, von der Regierung oder einer lokalen Behörde eingerichtete Sammelstelle zum Recycling von Elektroschro und Elektrogeräten bringen.
-
Page 18: Présentation Du Produit
Présentation du Produit Lisez a entivement ce manuel avant toute utilisation et conservez-le pour pouvoir le consulter ultérieurement. Zone d’éclairage Zone du capteur Base magnétique Bande collante Avant La lampe peut roter à 360 degrés Commutateur de luminosité Couvercle des piles Compartiment de ba erie Intérieur Les illustrations du produit, les accessoires et l’interface utilisateur présents dans le... -
Page 19: Mode D'utilisation
Tournez la lampe dans le sens contraire des aiguilles d’une montre pour la dévisser de son boîtier hémisphérique. Insérez les trois piles AA. 2. Basculez le commutateur de luminosité au niveau de luminosité souhaité avant de revisser la lampe dans son boîtier hémisphérique. - Page 20 3. Montage de l’ampoule Sélectionnez une surface de montage plane et sèche, ne oyez la surface d’abord, puis détachez la gaine de sortie de la base. Collez la base dans l’emplacement souhaité et appuyez-le fermement vers le bas pour garantir qu’elle est correctement placée.
- Page 21 Note : La zone de détection couvre 120° directement au centre et en face de la veilleuse. La zone de détection s’étend de 0 à 6 m en face de l’ampoule, et de 0 à 2,5 m sur les côtés.
-
Page 22: Spécifications
Spécifications Modèle : MJYD02YL Flux lumineux : 3 lm, 25 lm Tension nominale : 4,5 V Puissance nominale : 0,34 W Température de Fonctionnement : -10°C à 40°C Dimensions :φ80 mm × 62 mm Poids net : environ 121 g... - Page 23 Rassurez-vous que le logo Mi est bien placé à chaque fois que vous installez et utilisez la veilleuse. Lorsque la luminosité de la veilleuse se réduit au bout d’une période d’utilisation normale, cela peut traduire la baisse du niveau de la pile.
- Page 24 Lors de l'installation des ba eries, veillez à respecter les pôles positifs (+) et négatif (-). Une fois les ba eries non rechargeables déchargées, elles ne peuvent plus être rechargées. Ne pas mélanger les différents types de ba eries: les ba eries neuves avec les ba eries usagées. Remplacez les ba eries usagées par des neuves et jetez les ba eries usagées conformément à...
- Page 25 équipement est conforme aux directives et normes européennes applicables, ainsi qu’à leurs amendements. L’intégralité de la déclaration de conformité pour l’UE est disponible à l’adresse suivante : h p://www.mi.com/global/service/support/declaration.html Réglementation DEEE et informations sur la mise au rebut et le recyclage Tous les produits portant ce symbole deviennent des déchets d’équipements...
-
Page 26: Descripción General Del Producto
Descripción General del Producto Lea detenidamente este manual antes de usar el producto y consérvelo para futuras consultas. Área de la Luz Área del Sensor Base Magnética Pegatina Adhesiva Parte delantera La lámpara puede rotar 360 grados Interruptor del brillo Tapa de la batería Compartimento de la batería Interior... -
Page 27: Modo De Uso
Gire la lámpara en sentido antihorario para removerla de su carcasa hemisférica. Inserte tres baterías AA. 2. Regule el interruptor de brillo para alcanzar el nivel de brillo deseado, antes de volver a introducir la lámpara a su carcasa hemisférica. - Page 28 3. Montaje de la luz Para el montaje, elija una superficie plana y seca, límpiela, y luego retire el forro de la base. Pegue la base en la ubicación elegida, y presione firmemente hasta que haya sido asegurada de forma adecuada. Por último, coloque la luz en la base magnética y ajústela según el ángulo que considere apropiado.
- Page 29 Nota: El área de detección cubre los 120° desde el centro frontal de la luz nocturna. La detección cubre 0–6 m en frente de la luz, y 0–2,5 m hacia los costados. La detección dependerá del ángulo de la luz, la temperatura ambiente, el tamaño del cuerpo, y la velocidad de movimiento.
-
Page 30: Especificaciones
Especificaciones Modelo: MJYD02YL Flujo luminoso: 3 lm, 25 lm Tensión nominal: 4,5 V Potencia nominal: 0,34 W Temperatura de Funcionamiento: -10°C a 40°C Dimensiones del artículo:φ80 mm × 62 mm Peso neto: 121 g aproximadamente... - Page 31 Tampoco instale cerca de las fuentes de humedad, tales como humidificadores o cafeteras. Asegúrese de que el logo Mi esté derecho en todo momento durante la instalación y de que uso la luz nocturna. Cuando el brillo de la luz nocturna se vea reducido luego de un periodo de uso normal, el nivel de la batería será...
- Page 32 Al instalar las baterías preste atención a los polos positivo (+) y negativo (-). Cuando las baterías no recargables se agoten, no se pueden volver a cargar. No se deben mezclar diferentes tipos de baterías ni mezclar baterías viejas y nuevas. Reemplace las baterías por unas nuevas y deseche las baterías usadas, de acuerdo con las normas y reglamentos locales para evitar la contaminación ambiental.
- Page 33 Europeas aplicables y las enmiendas. Encontrará el texto completo de la declaración de conformidad de la UE en esta dirección de Internet: h p://www.mi.com/global/service/support/declaration.html Directiva RAEE de información de eliminación y reciclaje Todos los productos que llevan este símbolo son residuos de aparatos eléctricos y electrónicos (RAEE según la directiva 2012/19/UE) que no...
- Page 34 Panoramica sul Prodo o Leggere a entamente il presente manuale prima dell’uso del dispositivo e conservarlo per ogni riferimento futuro. Area di luce Area del sensore Base magnetica Adesivo Parte frontale La lampada può ruotare di 360 gradi Interru ore di luminosità Coperchio della ba eria Vano ba eria Interno...
- Page 35 1. Installazione della ba eria Girare la lampada in senso antiorario per svitarla dal suo alloggiamento semisferico. Inserire tre ba erie AA. 2. Spostare l'interru ore di luminosità sul livello di luminosità desiderato prima di riavvitare la lampada nella sua sede emisferica. 3 lm...
- Page 36 3. Montaggio della luce Selezionare una superficie di montaggio piana e asciu a, pulire prima la superficie, quindi staccare la pellicola di protezione dalla base. A accare la base nella posizione desiderata e premerla saldamente per assicurarsi che sia fissata corre amente. Infine, a accare la luce alla base magnetica e regolarla su un'angolazione adeguata.
- Page 37 Nota: l'area di rilevamento è larga 120° dire amente al centro davanti alla luce no urna. L'area di rilevamento copre 0-6 m davanti alla luce e 0-2,5 m ai lati. L'effe o di rilevamento dipende dall'angolo della luce, dalla temperatura ambiente, dalle dimensioni del corpo e dalla velocità...
-
Page 38: Specifiche Tecniche
Specifiche tecniche Modello: MJYD02YL Flusso luminoso: 3 lm, 25 lm Tensione nominale: 4,5 V Potenza nominale: 0,34 W Temperatura di funzionamento: da -10°C a 40°C Dimensioni articolo:φ80 mm × 62 mm Peso ne o: circa 121 g... - Page 39 Né installare la luce vicino a fonti di umidità come umidificatori o cucine ad acqua. Assicurarsi che il Mi logo sia sempre in posizione verticale durante l'installazione e l'uso della luce no urna.
- Page 40 Prestare a enzione ai poli positivo (+) e negativo (-) durante l'installazione delle ba erie. Dopo che le ba erie non ricaricabili sono esaurite, non possono essere caricate. Diversi tipi di ba erie e ba erie vecchie e nuove non devono essere mescolate.
- Page 41 Il testo completo della dichiarazione di conformità UE è disponibile al seguente indirizzo Internet: h p://www.mi.com/global/service/support/declaration.html Informazioni sullo smaltimento e sul riciclaggio dei RAEE Tu i i prodo i contrassegnati da questo simbolo sono rifiuti di apparecchiature ele riche ed ele roniche (RAEE in base alla dire iva 2012/19/UE) che non devono essere smaltiti assieme a rifiuti domestici non...
-
Page 42: Обзор Устройства
Обзор устройства Перед использованием внимательно изучите это руководство. Сохраните его, оно может понадобиться вам в дальнейшем. Освещенная область Область датчика Магнитное основание Наклейка Передняя панель Лампа может поворачиваться на 360 градусов Переключатель яркости Крышка батарейного отсека Батарейный отсек Внутренняя часть Изображения... - Page 43 1. Установка батареек Поворачивайте лампу против часовой стрелки, чтобы вывинтить ее из полукруглого корпуса. Вставьте три батарейки АА. 2. Переведите переключатель яркости до достижения желаемого уровня яркости перед тем, как снова ввинтить лампу в полукруглый корпус. 3 lm 25 lm Места, подходящие...
- Page 44 3. Монтаж светильника Выберите плоскую и сухую монтажную поверхность, сначала протрите поверхность, затем снимите адгезионный материал с основания. Приклейте основание в желаемом месте и плотно прижмите, чтобы убедиться в том, что светильник установлен надежно. Затем прикрепите светильник к магнитному основанию и отрегулируйте подходящий угол наклона. Примечание: Чтобы...
- Page 45 Примечание: областью обнаружения является зона 120° непосредственно в центре перед ночником. Область обнаружения охватывает 0–6 м перед светильником и 0–2,5 м по бокам. Эффект обнаружения зависит от угла наклона лампы, температуры окружающей среды, размеров тела и скорости движения. Область обнаружения на...
-
Page 46: Технические Характеристики
Технические характеристики Модель: MJYD02YL Световой поток: 3 лм, 25 лм Номинальное напряжение: 4,5 В Номинальная мощность: 0,34 Вт Рабочая температура: от -10°C до 40°C Размеры изделия: φ80 mm × 62 mm Вес-нетто: приблизительно 121 г Меры безопасности Не покрывайте область обнаружения светильника. При... - Page 47 воздуха или электрические чайники. Убедитесь в том, что логотип Mi всегда расположен вертикально при установке и использовании ночника. При понижении яркости ночника после определенного периода нормальной эксплуатации, уровень заряда батареек может быть недостаточным. Замените батарейки новыми и надлежащим образом утилизируйте старые батарейки, чтобы не допустить загрязнения...
-
Page 48: Декларация О Соответствии Нормам Ес
Мы, компания Qingdao Yeelink Information Technology Co., Ltd., настоящим заявляем, что данное оборудование соответствует требованиям всех действующих директив ЕС и европейских стандартов с изменениями и дополнениями. Полный текст декларации о соответствии нормативным требованиям ЕС доступен по следующему адресу: h p://www.mi.com/global/service/support/declaration.html... - Page 49 Информация об утилизации и переработке отходов электрического и электронного оборудования Все изделия, обозначенные символом раздельного сбора отработанного электрического и электронного оборудования (WEEE, директива 2012/19/EU), следует утилизировать отдельно от несортируемых бытовых отходов. С целью охраны здоровья и защиты окружающей среды такое оборудование...
- Page 50 제품 소개 제품 사용 전에 본 설명서를 자세히 읽고 잘 보관하세요. 발광 영역 감지 영역 마그네틱베이스 접착제 램프 본체 전면 램프 본체가 360도 회전합니다. 밝기 조정 버튼 배터리 커버 배터리 케이스 램프 본체 내부 참고: 설명서의 제품, 액세서리, 사용자 인터페이스 등의 그림은 참고용입니다.제품 업데이트...
- Page 51 사용 1. 배터리 장착 램프 본체 조명 부품을 돌려, 램프 조명 부품과 반구형 후방 케이스로부터 분리할 수 있습니다.AA건전지 3 개를 넣으십시오. 2. 기어 버튼을 조작하여 적절한 밝기로 조정하고 램프 본체 조명 부품과 반구형 후면 케이스를 조입니다. 3 lm 25 lm 야간...
- Page 52 3. 야간 조명 고정 평평하고 건조한 부착 위치를 선택하고 먼저 접착면을 닦은 다음 베이스의 접착제를 떼어냅니다.베이스를 올바른 위치에 고정시키고 단단히 눌러 베이스 스틱을 단단하게 만듭니다.마지막으로 램프 본체를 베이스 마그네트 표면에 놓고 램프 본체를 적당한 각도로 조정하십시오. 참고: 실수로 떨어질 위험이 있으므로 설치 중에 마그네트 흡착이 단단히 고정되어 있는지 확인하십시오.
- Page 53 감지 범위 안내도 참고: 야간 조명의 인체 감지 범위는 감지 구역의 중심을 기준으로, 본체 전방의 120° 부채꼴 범위입니다.감지 거리는 정면 0-6m, 측면 0-2.5m입니다.감지 효과는 램프 본체의 각도, 주변 온도, 체형 및 이동 속도와 관련이 있습니다.그림으로 설명한 감지 범위는 로고를 중심으로 한 방향 테스트 입니다.
- Page 54 기본 정보 제품 모델: MJYD02YL 광속: 3lm, 25lm 정격 전압: 4.5V 정격 출력: 0.34W 작동 온도: -10℃ ~ 40℃ 제품 크기:φ80 mm × 62 mm 제품 순중량: 약 121g...
- Page 55 마십시오. 가습기와 같은 습도 변화가 많은 장소에 설치하지 마십시오, 직사광선이 비추어지는 장소에 설치하지 마십시오. 설치 및 사용할 때 램프 본체의 Mi 브랜드 로고가 항상 전면에 위치해 있는 지 확인하십시오. 정상적인 사용 후 야간 조명의 밝기가 낮아 지거나 작동 상태가 이상한...
- Page 56 비충전식 배터리는 배터리가 소진 된 후에는 충전 할 수 없으며, 다른 배터리 모델 또는 기존에 사용하던 배터리와 새 배터리를 함께 사용할 수 없습니다. 제품을 장시간 사용하지 않거나 야간 조명을 사용하지 않을 때는 배터리를 제거해야 합니다. 배터리가 누출되면 환경 오염을 피하기 위해 제품에서 배터리를 제거하고 현지...
- Page 58 3 lm 25 lm...
- Page 59 1.5–0.5...
- Page 60 0-2.5m 0-6m 2.5 – 0 6–0...
- Page 61 MJYD02YL : 0.34 : 4.5 : 40~10- : 62 × 80 : 121 :...
- Page 63 Yeelink Information Technology Co , Ltd h p://www.mi.com/global/service/support/declaration.html ) EEEW WEEE) (EU/2012/19...
- Page 64 產品介紹 使用產品前請仔細閱讀本指南,並妥善保管。 發光區 感應區 磁吸底座 背膠 燈體正面 燈體 360 度任意旋轉 亮度檔位調整鍵 電池蓋 電池艙 燈體內部 提示:說明書中的產品、配件、使用者介面等插圖均為示意圖,僅供參考。由於產品的更新 與升級,產品實物與示意圖可能略有差異,請以實物為準。...
- Page 65 使用 1. 安裝電池 旋轉燈體發光元件,使燈體發光元件與半球型後殼分離。開啟電池蓋,裝入三顆 3 號(AA)電池。 2. 撥動檔位鍵以調節到合適亮度,並將燈體發光元件與半球型後殼扣合轉緊。 3 lm 25 lm 適合用做夜燈: 適合用於輔助照明: 洗手間、走廊、 門口、玄關、衣櫃、 臥室、兒童房 壁燈、陽台...
- Page 66 3. 固定夜燈 選擇平整並乾燥的黏貼位置,先把黏貼面擦拭乾淨,然後撕開底座上的背膠。 將底座黏貼在合適的位置,用力按壓,使底座黏貼更牢固。 最後將燈體放在底座磁吸面上,並將燈體調節到合適角度。 安裝時請確保磁吸牢固到位,避免意外掉落風險。 提示:為了準確感應,底座黏貼的高度高於 1.9 公尺時,燈體的角度建議朝下。底座黏貼的 高度低於 0.5 公尺時,燈體角度建議朝上。 燈體朝下 黏貼角度高於 1.9 公尺以上 黏貼角度 0.5 公尺至 1.5 公尺 燈體平放...
- Page 67 黏貼角度低於 0.5 公尺 燈體朝上 提示:若是其他安裝高度,建議基於使用者身高和使用場景來調整燈體朝向,以達到最優 效果。 4. 在黑暗的環境下,若偵測到人體活動,感應夜燈會自動亮起,並在感應不 到人體活動 15 秒後自動熄滅。 0-2.5m 0-6m 感應範圍示意圖 提示:夜燈的人體感應範圍,是以感應區中心為圓心,在燈體正前方展開的 120° 扇形區域。 感應距離為正前方 0-6 公尺,側方 0-2.5 公尺;感應效果與燈體的角度、環境問題、人體 體型、移動速度有關。圖示感應範圍是基於圖示標誌放置的方向測試所得。...
- Page 68 基本規格 產品型號:MJYD02YL 光通量:低檔 3lm、高檔 25lm 額定電壓:4.5V 額定功率:0.34W 工作溫度:-10℃ ~ 40℃ 產品尺寸:φ80 mm × 62 mm 產品淨重:約 121g...
- Page 69 注意事項 產品表面感應區不得有其他物品覆蓋; 清潔產品表面時,需要用柔軟的棉布擦拭,不得使用含有腐蝕性的溶劑 清洗; 避免安裝在熱源附近,例如空調出風口、暖氣出風口燈等;避免安裝在加 濕器等濕度變化劇烈的位置;避免安裝在強光直射的位置; 安裝使用時,請確保燈體上的米家品牌標誌始終保持正向; 正常使用一段時間之後,若發現夜燈亮度降低或者工作狀態異常,可能是 電池電量不足,請更換新的電池,並將廢舊電池按照當地法規安全處理, 避免環境污染; 此燈具內的光源應由製造商或其服務代理商或擁有類似資格的人員來更換; 僅限室內使用; 安裝電池時請注意正負極“+”“-”; 不可充電電池電量耗盡後,不能自行充電;不同型號電池或新舊電池不能 混用; 產品長期不使用時,或夜燈廢棄不用時,電池必須從燈具中取出; 電池已漏液時,請從產品中取出電池並按照當地法規安全處理,避免環境 污染。...
- Page 70 Xiaomi Communications Co , Ltd : Qingdao Yeenlik Information Technology Co , Ltd : (Mi Ecosystem 1#Keyuanweiyi Rd , Laoshan, Qingdao, 266101, Shandong, China : F10-B4, Bldg.B, International Innovation Park, www.mi.com 委託方:小米通訊技術有限公司 製造商:青島億聯客信息技術有限公司 (小米生態鏈企業) 製造商地址:青島市嶗山區科苑緯一路1號青島國際創新園B座10層B4 製造商電話:+86 400 619 7969 產地:中國...
- Page 71 (una società Mi Ecosystem) Indirizzo: F10-B4, Bldg. B, International Innovation Park, 1# Keyuanweiyi Rd., Laoshan District, Qingdao, 266101, Shandong, Cina Per ulteriori informazioni, visitare il sito www.mi.com 상품업체: Xiaomi Communications Co., Ltd. 제조업체: Qingdao Yeelink Information Technology Co., Ltd. (Mi 에코시스템 컴퍼니) 주소: F10-B4, Bldg.
- Page 72 Address: 10F-B4, Building B, Qingdao International Innovation Park, No.1 Keyuan Weiyi Road, Laoshan District, Qingdao City, Shandong Province, P.R.China For further information, please go to www.mi.com Hergestellt für: Xiaomi Communications Co., Ltd. Hergestellt von: Qingdao Yeelink Information Technology Co., Ltd.
Need help?
Do you have a question about the 2 and is the answer not in the manual?
Questions and answers