
Related Manuals for Petsafe Happy Ride


Summary of Contents for Petsafe Happy Ride
- Page 2 Happy Ride METAL DOG BARRIER ™ Sometimes your lap dog needs a little help holding back his love.
-
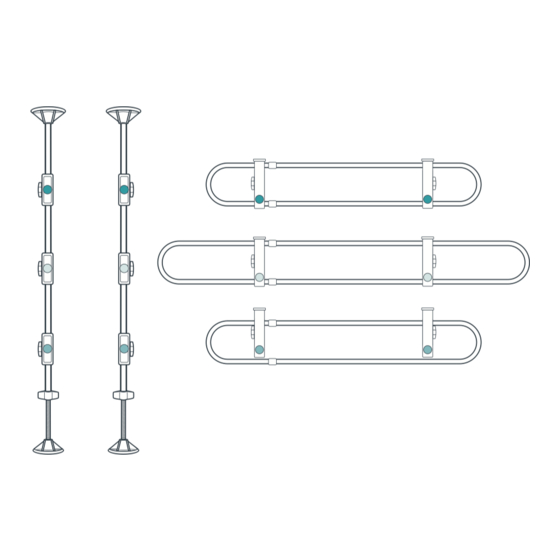
Page 3: What You Have
What you have... - Page 4 Remove the threaded rod and short, black plastic spacer from inside each of the two straight tubes. Discard the two plastic spacers.
- Page 5 Push an oval cap firmly onto one end of each straight tube. Slip three mounting brackets onto one straight tube with the hexagonal holes all facing the same side. Slip three mounting brackets onto the other straight tube with the hexagonal holes all facing the opposite side, so the two tubes mirror each other.
- Page 6 Insert a short bolt through each mounting bracket, fitting the bolt head into the hexagonal hole. Screw a small wingnut onto each bolt. Leave these loose for now; you’ll adjust them soon.
- Page 7 Screw a large wingnut onto the uncapped end of each threaded rod. Twist a round cap tightly onto the same end of each threaded rod.
- Page 8 Insert a long bolt through each of the clamp halves with blue buttons, fitting the bolt head into the hexagonal hole. Position two of these clamp halves with the blue buttons facing the same direction, then set an extendable oval tube across them. Make sure one clamp half is on the extendable (thinner) section of the oval tube.
- Page 9 Set the other half of each clamp over the bolt and secure it with a small wingnut. Leave these loose for now; you’ll adjust them soon. Repeat these steps with the remaining oval tubes and clamps.
- Page 10 Insert a threaded rod into each hollow tube to form a pair of upright supports. Stand them up with the round bottom caps on the floor, spaced evenly across the width of your vehicle. Rotate each large wingnut to adjust the height until each oval top cap is pressed firmly into the ceiling.
- Page 11 Mount each oval tube onto the upright supports. To snap each pair of clamps into place, press and hold the blue buttons, slide the clamps down onto the rectangular slots on the mounting brackets and release the blue buttons.
- Page 12 Now you’re ready to adjust your barrier for a perfect fit! You can slide each oval tube up or down to fit your vehicle. Loosen the wingnuts on the mounting brackets to slide each oval tube up or down on the upright supports. When each oval tube is at the height you want, tighten the wingnuts on the mounting brackets.
- Page 13 You can extend each tube to the left, to the right, or to both sides to fit your vehicle. Loosen the wingnuts on the clamps to extend or shorten each oval tube. When each oval tube is the width you want, tighten the wingnuts on the clamps.
- Page 14 You can use the included stickers to color-code the pieces to make setup quick and easy each time. Match each pair of oval tube clamps with the corresponding pair of mounting brackets.
- Page 15 To store your barrier, simply press the blue buttons on each pair of clamps to remove the oval tubes from the upright supports. Twist the large wingnut on each support to release the tension holding the support in place. Remove the threaded rod from each hollow tube. Store these pieces in the included storage pouch until you’re ready to use your barrier again.
- Page 16 Let us help! For questions or additional tips: +1 (800) 732-2677 petsafe.com 1-Year Warranty ©2019 Radio Systems Corporation Model: 62409 | 400-2281 For important safety information, please see the customer care guide.
Need help?
Do you have a question about the Happy Ride and is the answer not in the manual?
Questions and answers