Advertisement
Quick Links
Special Vehicle Series : 05
Articulated Ladder Truck
Tools
Scissors
Ruler, set square
Glue (Wood glue or craft glue recommend)
Exhausted ballpoint pen (out of ink)
Toothpicks (for use in applying glue)
Tweezers (useful for handling small parts)
Pencil
Pattern
Dotted line
Dashed and
dotted line
Solid line
Solid blue line
Diagonal
grey lines
Glue, scissors and other tools may be dangerous to young children
so be sure to keep them out of the reach of young children.
Assembly Instructions: Nine A4 sheets (No. 1 to No. 9)
Build this model with careful reference to the Assembly Instructions.
Mountain fold
Fold so that the printed
pattern faces outside.
Valley fold
Fold so that the printed
pattern faces inside.
Cut parts out
along this line.
Cut a notch
along this line.
Cut these areas
out.
Assembly
Instructions
Write the number of each part on the reverse side of the part in pencil
upon cutting it out, to be sure you can tell which part is which later.
Before gluing, crease the paper along
mountain and valley fold lines. Trace along
the folds with a ruler and an exhausted
ballpoint pen (out of ink) to get a sharper fold.
Make sure rounded sections are nice and stiff.
Key to symbols
Key to symbols
The dots show where to glue
the pieces together. Glue the
pieces together as shown in the
following examples.
Some parts must be glued
together along the cut surfaces.
Red dot
Glue parts with the same
number together. (Numbers are
not printed on very small parts.)
Green dot
Glue areas within the same
part together.
Blue dot
Glue to the reverse side of the
specified part.
©
© Keisuke Saka+Kohei Masukawa
Canon Inc.
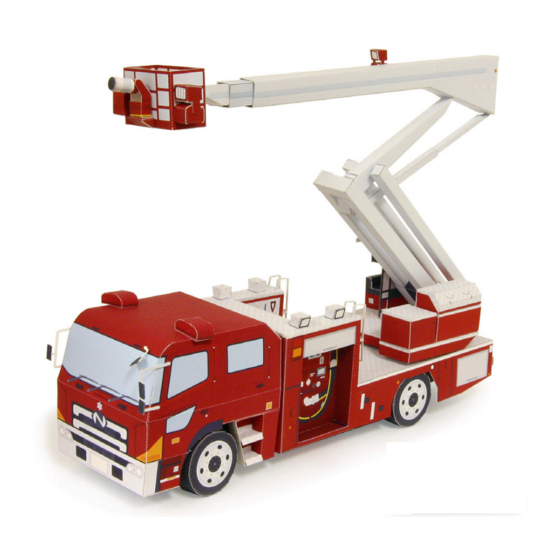
View of completed model
* This model was designed for
Papercraft and may differ from
the original in some respects.
Assembly tip
Assembly instructions
Red arrow
Blue arrow
Light blue
Light grey
Glue
Insert
(without gluing)
Glue tab
Reverse side of
paper
Movable part
This denotes a part
that must be able to
move after the model
is completed.Be sure
to crease these parts
sufficiently.
Advertisement

Related Manuals for Canon Creative Park Articulated Ladder Truck


Summary of Contents for Canon Creative Park Articulated Ladder Truck
- Page 1 Special Vehicle Series : 05 © © Keisuke Saka+Kohei Masukawa Canon Inc. Articulated Ladder Truck Assembly Instructions View of completed model * This model was designed for Papercraft and may differ from the original in some respects. Tools Assembly tip...
- Page 2 Articulated Ladder Truck Instructions © © Keisuke Saka+Kohei Masukawa Canon Inc. Assemble the cab. Glue flaps a, b, c, and d in order. Attach parts 5 & 6 to part 4, and parts 8 & 9 to part 7, and assemble.
- Page 3 Assembly Articulated Ladder Truck Instructions © © Keisuke Saka+Kohei Masukawa Canon Inc. Assemble part 13, glue to and fold sections a, b, and c in order. Glue flaps a, b, c, and d in order. Glue the reverse surfaces together.
- Page 4 Articulated Ladder Truck Instructions © © Keisuke Saka+Kohei Masukawa Canon Inc. Insert part 40 into , sandwich between parts 31 and 32, then glue with part 39, confirming the width as you fix the parts in place. Insert part 33 into part 34;...
- Page 5 Assembly Articulated Ladder Truck Instructions © © Keisuke Saka+Kohei Masukawa Canon Inc. Assemble parts and insert in order. Don't forget to cut the slit and hole for the telescopic stopper. With the blue lines to right and left, insert the stopper...
- Page 6 Assembly Articulated Ladder Truck Instructions © © Keisuke Saka+Kohei Masukawa Canon Inc. Assemble part 50 with the patterned surface to the inside, and insert into part 49. Glue parts with no glue tabs to the areas cut out of the paper parts.
- Page 7 Assembly Articulated Ladder Truck Instructions © © Keisuke Saka+Kohei Masukawa Canon Inc. Assemble front tires. Assemble outer rear tires. Assemble inner rear tires. Attach the tires according to the diagram below. Front Rear...
- Page 8 Assembly Articulated Ladder Truck Instructions © © Keisuke Saka+Kohei Masukawa Canon Inc. Align the holes and glue carefully, checking to ensure left and right sides do not warp. Glue to the underside. Don't forget to glue opposite piece too.
- Page 9 Assembly Articulated Ladder Truck Instructions © © Keisuke Saka+Kohei Masukawa Canon Inc. Insert the ladder assembly into the hole but do not glue. The ladder should revolve freely. Refer to the finished photo and attach small parts. Finished! Last, assemble the nameplate and...
Need help?
Do you have a question about the Creative Park Articulated Ladder Truck and is the answer not in the manual?
Questions and answers