Table of Contents
Advertisement
Quick Links
Advertisement
Table of Contents

Related Manuals for Spectur STA6


Summary of Contents for Spectur STA6
- Page 1 STA6 Installation Guide 1300 802 960 | www.spectur.com.au...
-
Page 2: Table Of Contents
A Message From the CEO: Gerard Dyson ..................... 4 Getting Started ..........................5 What you need ..........................5 Installing a SIM card in the Spectur Modem ................5 Step 1: ............................5 Step 2: ............................6 Step 3: ............................6 Step 4: ............................ - Page 3 Spectur Guide for STA6 Installation Step 3: ............................15 Step 4: ............................16 Step 5: ............................16 Outboard battery box ........................ 17 Step 1: ............................17 Step 2: ............................17 Step 3: ............................18 Step 4: ............................18 Other Base Options ........................19 Mobile Base installation ......................
-
Page 4: A Message From The Ceo: Gerard Dyson
A Message From the CEO: Gerard Dyson Hi, I am Gerard Dyson, the CEO of Specur Ltd. Congratulations on your purchase of one of our Spectur Systems. Please read the installation manual fully prior to conducting an installation. We strongly recommend the use of PPE throughout the installation and a site-specific job hazard assessment. -
Page 5: Getting Started
○ Battery ○ Mounting screw ○ Sim pin Installing a SIM card in the Spectur Modem Commented [GP1]: This I different for 3 & 4 camera systems as the DLINK ethernet switch will need to be removed to give access. -
Page 6: Step 2
Remove the black glass and the blue panel above it. Step 3: If the STA6 system contains less than 3 cameras skip this step and proceed to step 4. Unscrew the screws at the below the D-link. Shift it to the side to reveal the modem. -
Page 7: Step 4
Spectur Guide for STA6 Installation Step 4: Use a SIM Pin to remove the sim tray from the modem. Then proceed to place the Sim in the tray and insert it in the modem. Note how the Sim is oriented as shown below. -
Page 8: Assembling The Solar Panel
Spectur Guide for STA6 Installation Assembling the solar panel What you need: ○ 12 x M6x20 bolts ○ 6 x M6 Spring washers ○ 12 x M6 Washers ○ 6 x M6 Nuts ○ Socket set Step 1: Lay out the parts above as shown in the image below. -
Page 9: Step 3
Spectur Guide for STA6 Installation Step 3: Attach the bracket plate to the brackets from step 2. The bolts screw in from below with a washer on top. With the completion of this step, the panel is ready to be used in the next steps. -
Page 10: Pole Installation
• Not pointed at areas that may lead to privacy breaches. In-ground Commented [GP4]: Apply same comments as HD5. But obviously tailor for anything STA6 specific. What you need: ○ Post-hole digger ○ 2 x kwikset concrete ○ Spirit level ○... -
Page 11: Step 1
Spectur Guide for STA6 Installation Step 1: Using a post-hole digger, dig a 700 mm deep hole then round the top of the hole. Step 2: Check that the front of the pole is facing in the direction of the area you wish to monitor. -
Page 12: Completing The Installation
Spectur Guide for STA6 Installation Completing the installation What you need ○ 5 x M15x235 bolts ○ 1 x Tilt pole bracket ○ 5 x M15 Nuts ○ Winch ○ 3 x M15 Washers ○ 1 x White power cable ○... -
Page 13: Step 2
Spectur Guide for STA6 Installation Step 2: Slide the tilt pole onto the bracket and line up the tilt pole bracket hole with the respective hole in the pole. Ensure that the battery box is on the side where you want the camera to be viewing. -
Page 14: Step 4
Spectur Guide for STA6 Installation Step 4: Slide the STA6 system over the tilting pole and secure with an M10x140 bolt, with an M10 washer then an M10 spring washer, followed by an M10 nut on the other side of the pole. This should be firmly tightened. -
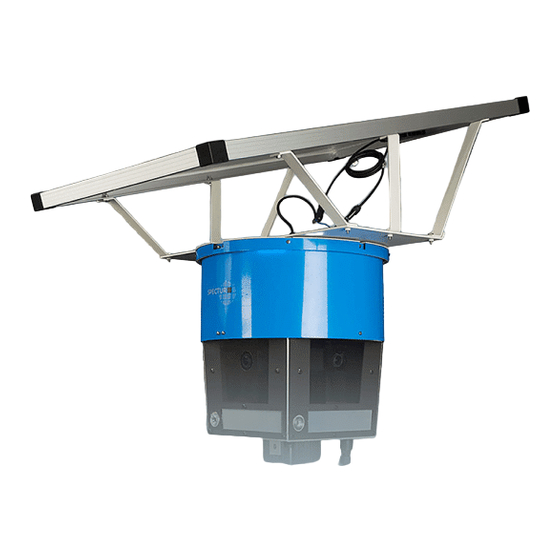
Page 15: Attaching The Panel
Spectur Guide for STA6 Installation Attaching the panel Commented [GP6]: Most pics and instructions are old (pre-yellow dual panel connectors). This may be confusing. Will need to update this section. Step 1: Remove the M30 nut and M30 washer from the top of the STA6 system. -
Page 16: Step 4
Connect the solar panels cables to the cables attached to the STA6 system. “Solar one” cables from the STA6 will be connected to the “Solare one” cables on the extension cable, the “solar one cables at the end of the extension will be plugged into the panel. With the completion of this step the solar panel is now ready to go. -
Page 17: Outboard Battery Box
Spectur Guide for STA6 Installation Outboard battery box Step 1: Before the battery box can be accessed the system has to be raised into position. To do this wind up the winch and secure the main pole by threading two bolts through the two poles, with a washer on each side. -
Page 18: Step 3
If there are no issues, then remove the tilt pole bracket and the winch from the system. With the completion of this step the STA6 system is ready to protect the area. 1300 802 960 | www.spectur.com.au... -
Page 19: Other Base Options
Spectur Guide for STA6 Installation Other Base Options Mobile Base installation Commented [GP8]: Put these sections below winch section. That is, finish one compete install and then talk about other base options What you need: ○ 2 x sheet metal covers. -
Page 20: Step 2
Spectur Guide for STA6 Installation Step 2: Load 20 bags of sand into the frame, this will provide an additional 400 kg of mass to keep the base stable. Step 3: Cover the inside of the base with the two sheet metal covers provided, ensure that the holes on the corners of the sheet line up with the holes on the frame’s corners. -
Page 21: Step 4
Spectur Guide for STA6 Installation Step 4: Commented [GP12]: Maybe some circled elements in photo with notes Using 4 M15 washers and 4 M15x30 bolts (blue), secure the frame at each corner as shown below. Secure the two pole supports with 2 M15x25 bolts and 2 M15 nuts. -
Page 22: Trailer Installation
Spectur Guide for STA6 Installation Trailer installation Step 1: Commented [GP13]: Add marked up Pictures When in the desired location, lower legs on the trailer by pulling the blue handle towards yourself. Once in position push the handle back into place. Proceed to conduct the mobile base installation. -
Page 23: Non-Standard Installation
HD5. Suggest add this to HD5 manual as well Step 1: Using a phone or computer login into the Spectur admin portal (Installer) or into the web interface or app (customer, refer to web or app guide). For the installer search for the camera by typing in its MAC number in the search bar. -
Page 24: Leaving Sites Orderly
Spectur Guide for STA6 Installation Leaving sites orderly Step 1: When removing a system from site, completely fill in the hole and smooth out any mounds. If doing an install, shovel dug up dirt on top of the concrete and then flatten the mound. -
Page 25: How To Ensure Customers Know How To Use Services And Get Assistance
Spectur Guide for STA6 Installation How to ensure customers know how to use services and get assistance Step 1: Go through with the customer how to use the app and web interface. Information regarding the use of these platforms can be found in the user manuals of each respective platform.
Need help?
Do you have a question about the STA6 and is the answer not in the manual?
Questions and answers