Advertisement
Quick Links
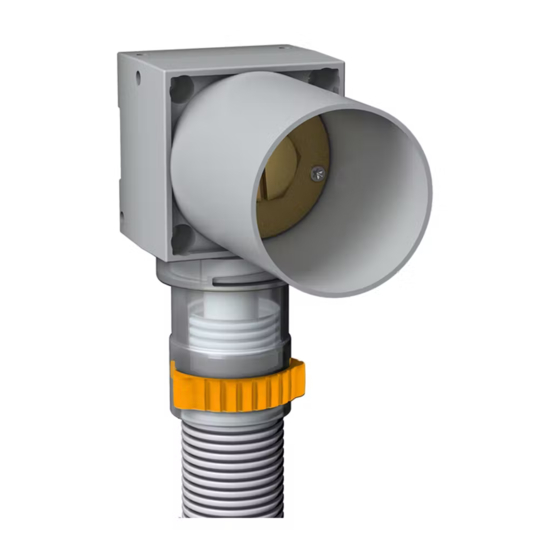
LK Wallbox UNI Push AX16 V2 and AX20
Intended for LK PE-X and PAL Universal Pipe with
premounted insert.
https://www.lksystems.se/en/products/lk-
universal/products/pipes/pe-x/
https://www.lksystems.se/en/products/lk-
universal/products/pipes/pal/
PE-X pipe-in-pipe system, including components
according to Installation solutions NT VVS 129,
is tested and approved according to NT VVS 129
and Sintef Test Method for conduits. Read more:
https://www.lksystems.se/en/support/documentation/
documentation-lk-universal/
LK Systems recommends that the wall box
should be connected with PE-X pipe. Please note
that connection with LK PAL Universal Pipe di-
mensions 16 and 20 and LK PE-X Universal Pipe
dimension 20 does not meet the requirements in
BBR for hidden positioned / inspectable joint
without service hatch.
Pressure class PN10
Assembly
LK Wallbox UNI Push can, due to its unique de-
sign, be assembled on a wall with at least 45 mm
studs, both in the back and the front edge of the
wall, depending on the method of construction.
The wallbox can also be assembled on the side of
a stud. Screws for mounting is included.
There are several accessories to get the correct c/c
distance between two wall boxes and mounting
them in different building materials.
1 (8)
Assembly instructions | LK Wallbox UNI Push AX16 V2 and AX20
TABLE OF CONTENTS
LK Wallbox UNI Push AX16 V2
Article no. 188 25 12
LK Wallbox UNI Push AX20
Article no. 188 25 22
See page 2
LK Wall Support Wallbox UNI
Push, c/c 160 and 150
Article no.188 07 42 and 188 07 43
See page 5.
LK Wall Support Flex Wallbox
UNI Push
Article no. 188 22 03
See page 6.
LK Wall Support Wallbox UNI
Push 150 N5
Article no. 188 22 95
See page 7.
LK Wallbox UNI Push Clamp
Article no. 188 11 04
See page 7.
LK Connection couplings
Article no. 188 18 45, 188 18 48
See page 8.
LK Potable Water System is
approved according to the
Nordtest method NT VVS 129.
EN.29.C.46.20200318
Advertisement

Summary of Contents for LK Systems Wallbox UNI Push AX16 V2
- Page 1 Assembly instructions | LK Wallbox UNI Push AX16 V2 and AX20 LK Wallbox UNI Push AX16 V2 and AX20 Intended for LK PE-X and PAL Universal Pipe with TABLE OF CONTENTS premounted insert. https://www.lksystems.se/en/products/lk- universal/products/pipes/pe-x/ LK Wallbox UNI Push AX16 V2 https://www.lksystems.se/en/products/lk-...
- Page 2 Assembly instructions | LK Wallbox UNI Push AX16 V2 and AX20 LK Wallbox UNI Push AX 1.3. There are two different ways to mount the wall- box on, select 1.3.1 or 1.3.2. Always try to assemble 1.1. Check that all the parts on the wallbox are the wallbox so that the shank is as short as possible, whole prior to assembly.
- Page 3 Assembly instructions | LK Wallbox UNI Push AX16 V2 and AX20 1.6. Mark the insertion depth on the pipe. The insertion depth should be 20 mm on the 16 mm pipe and 23 mm on 20 mm pipe. The yardstick at LK Smart Tool Push AX (RSK 188 25 49) will facilitate it.
- Page 4 Assembly instructions | LK Wallbox UNI Push AX16 V2 and AX20 1.13. In cases where the wall box is connected with LK PAL Universal Pipe dimensions 16 and 20 and LK PE-X Universal Pipe dimension 20, the wall box 1.10. Install the conduit clip in the 16 mm wall box must be screwed from the back side in a beam so sleeve coupling.
- Page 5 Assembly instructions | LK Wallbox UNI Push AX16 V2 and AX20 Disassembling the PushFit coupling In the event of disassembly, LK Disassembly Tool 2.2. Mount the wall boxes on the plate using the (Article no. 188 06 45 for 16 mm) or 188 06 46 for screw included as in the picture above.
- Page 6 Assembly instructions | LK Wallbox UNI Push AX16 V2 and AX20 LK Wall Support Flex Wallbox UNI Push When two wallboxes are to be installed on a wood- en stud, then a LK Wall Support Flex Wallbox UNI Push (Article no. 188 22 03) can be used. LK Wall Support fixes the wallboxes and provides a flexible c/c distance between them.
- Page 7 Assembly instructions | LK Wallbox UNI Push AX16 V2 and AX20 4.3. Attach the plate to the stud using the four countersunk wood screws included. 3.5. Attach the bracket to the plate with the screws included. 4.4. Continue to mount the wallbox according to step 1.4.
- Page 8 Assembly instructions | LK Wallbox UNI Push AX16 V2 and AX20 After wall covering 7.1.2 For assembly of tap mixer in accordance with international standards, LK Connection coupling ¾”/ ½” (Article no. 188 18 48) should be assembled. The length of the connection coupling should be adjusted so that approximately 10 mm of the ¾”...