Table of Contents
Advertisement
Quick Links
Necesary tools:
Bradawl
Round nose pliers
Insulated pliers
Screwdrivers ( Slot /cross)
Scissors
Sellotape
PARTS LIST
MDF-base
Alu-Wire
Battery holder
Mini buzzer 2-5 Volt
connector block
Insulated wire
Cable
Screws
Screws
Screws
E111563#2
111.563
G a m e o f s k i l l
H o t w i r e
The OPITEC range of projects is not intended as play toys
for young children.They are teaching aids for young peop-
le learning the skills of Craft, Design and Technolo- gy.
These projects should only be undertaken and tested with
the guidance of a fully qualified adult. The finished pro-
jects are not suitable to give to children under 3 years old.
Some parts can be swallowed. Dan- ger of suffocation!
Size (mm)
Quantity
1
1
1
1
1
1
1
2
3
2
Please Note
Description
Part-Nr.
180x90 Base
500x1,6 Wire frame
Power source
Alarm
Joiner
150x2,6 Guide loop
500 Joining
3x12 Fixing
3x16 Fixing
2,2x9,5 Fixing
1
2
3
4
5
6
7
8
9
10
1
Advertisement
Table of Contents

Subscribe to Our Youtube Channel
Related Manuals for Opitec 111.563

Summary of Contents for Opitec 111.563
- Page 1 G a m e o f s k i l l H o t w i r e Necesary tools: Please Note The OPITEC range of projects is not intended as play toys Bradawl for young children.They are teaching aids for young peop- Round nose pliers le learning the skills of Craft, Design and Technolo- gy.
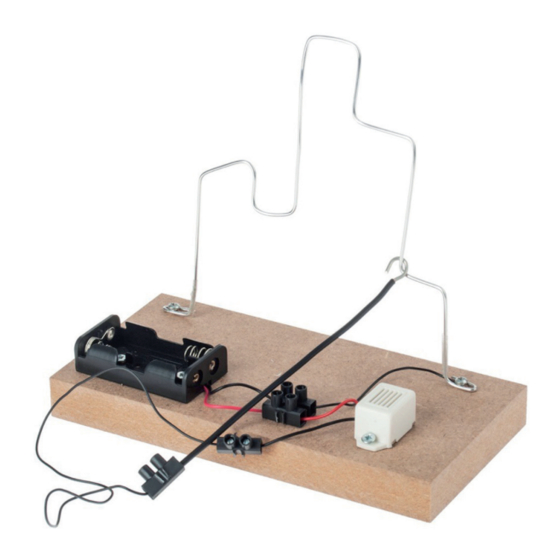
- Page 2 INSTRUCTIONS Description of the parts: Base (MDF) Alu wire for the frame Battery holder Buzzer for alarm Cable connector Wire for the guide arm cables Screws for fixing (Battery holder) Screws for fixing (Framework, connector) Screws for fixing (Buzzer) Preparing the cables: Step 1: Dia.
- Page 3 INSTRUCTIONS Step 3 Cut out the drilling pattern ( page 5) and stick it on the base(1) with sellotape Step 7 Note: Press hard so that the holes show Use a bradawl/ hole maker on the marked holes as shown ( diagram 7 ) Fixing the parts Step 4 Dia.
- Page 4 INSTRUCTIONS Dia. 19 Dia. 18 Dia. 17 Join the red cable from the Funktion desciption Using the last piece of the Take the other end of the buzzer (4) with the free red connetor block join the the wire (7) and connect the cable on the connector (s.
- Page 5 INSTRUCTIONS Bending pattern ( Side view) Scale 1:1 Wire shape insulation insulation Wire plan view Drilling pattern M 1:1 Hole postions for the fixings Holes for con- Holes nector block Holes for the buzzer battery holder E111563#2...
Need help?
Do you have a question about the 111.563 and is the answer not in the manual?
Questions and answers