Table of Contents
Advertisement
Quick Links
Advertisement
Table of Contents

Related Manuals for TECHWOOD TCO-6025


Summary of Contents for TECHWOOD TCO-6025
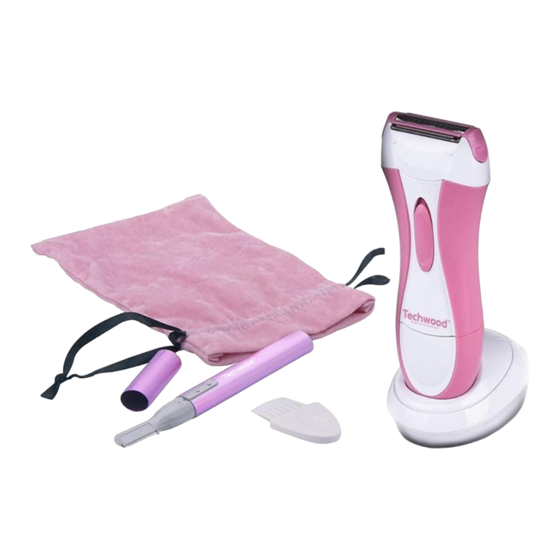
- Page 1 “WET & DRY” RECHARGEABLE RAZOR + small Trimmer + Pouch INSTRUCTION MANUAL ...
-
Page 2: Important Safeguards
IMPORTANT SAFEGUARDS The appliance is only to be used with the power supply unit ❑ provided with the appliance. Please read these instructions carefully before use. ❑ Keep present instructions for future references. ❑ Check that your mains voltage corresponds to that stated on ❑... - Page 3 The appliance can be used by children aged from 3 years ❑ under supervision. This appliance can be used by children aged from 8 years and ❑ above and persons with reduced physical, sensory or mental capabilities, or lack of experience and knowledge if they have been given supervision or instruction concerning use of the appliance in a safe way and understand the hazards involved.
- Page 4 Never move the appliance by pulling the cord. Make sure the ❑ cord cannot get caught in any way. Never wind the cord around the appliance and do not bend it ❑ Ensure that the power cord does not come into contact with hot ❑...
-
Page 5: General Information
The appliance must be used and rested on a table or flat & ❑ stable surface. The item must not be left unattended when it is connected to ❑ main supply. The item is not to be used, if it has been dropped or if there are ❑... - Page 6 protection against flames PBB and PBDE, the peak concentration is equal to or less than 0.1% of the weight of homogeneous material, and 0.01% for the 6th • cadmium. The symbol "III" means that the equipment concerned is designed to be supplied at a voltage of not more than 50 volts AC or 120 volts DC.
- Page 7 • Do not use this product while taking a shower or bath. • Always unplug the unit itself between two closely spaced uses. • For example: Stop the machine and unplug it if you drop it while you dry. ● Unroll the power cord completely for charging. ●...
-
Page 8: Cleaning And Maintenance
1. Place the trimmer and the shaving foil gently on the skin. 2. Move the lady shave slowly and with light pressure over the skin. 3. For best results direct the shaver head against the direction of the hair growth. After use 1. - Page 9 Note: It is not necessary to disassemble the head after each use. Only shake the razor, blow and brush the remaining hairs. 5. Clean the outside of the appliance with a sponge or slightly damp cloth. Twice a year, drop a drop of oil (Oil for sewing machine or oil for hair clipper) on the razor's head and the precision mower.
- Page 10 replacement. The services within the framework of the guarantee do not involve any extension of the warranty period and does not give right to a new guarantee ! In the event of recourse to the guarantee, bring back the complete apparatus to your retailer, in its original packing, accompanied by the proofs of purchase.
-
Page 11: Specifications
a Put the appliance in the charging unit in such a way that you hear a click (to indicatethat the shaver has been placed properly in the charging unit) and the red pilot lightgoes on (to indicate that the appliance in charging) Cause 3: The red pilot light in on, but the appliance in still not charging. - Page 12 CAUTION: In order to minimize the risks of electric shock, In the event of breakdown, not to open the case but to call upon a qualified technician for repairs. This device complies with EC directives, it was controlled according to all current European directives, applicable such as: electromagnetic compatibility (EMC) and low voltage (LVD).
-
Page 13: Care And Maintenance
I. Turn unit on by pushing the ON/OFF switch upward in the direction of arrow 2. Gently, Place the head against the hair to be removed. 3. Move in an upward direction against the growth ofhair to be removed. Note: Use for all designated areasof the body Attaching Eyebrow Trimming Guard Note: Try long side first to determineappropriate side of attachment. - Page 14 4. Pull head down and remove frommain unit 5. Remove hairs with cleaning brush 6. Replace head by inserting theprotruding edge into the opening on the top of the head Note: Do not force head into place. 7. Snap into place and secure by pushing the lock button up until it clicks and lockshead in place.
Need help?
Do you have a question about the TCO-6025 and is the answer not in the manual?
Questions and answers