Table of Contents
Advertisement
Available languages
Available languages
Quick Links
Advertisement
Table of Contents

Related Manuals for SOUNDMASTER UR200SI


Summary of Contents for SOUNDMASTER UR200SI
- Page 1 DEUTSCH NEDERLANDS ENGLISH ITALANIO FRANÇAIS Hersteller Wörlein GmbH Tel.: +49 9103/71670 Gewerbestrasse 12 Fax.: +49 9103/716712 D 90556 Cadolzburg Email. info@woerlein.com GERMANY Web: www.woerlein.com UR200SI / UR200WE...
- Page 2 Dieses Symbol zeigt an, dass im Inneren des Gerätes gefährliche Spannungen vorhanden sind, und einen Stromschlag verursachen können. Dieses Symbol weist auf wichtige Bedienungs- und Wartungsanweisungen bezüglich des Geräts hin. Sicherheits- / Umwelt- / Aufstellhinweise Das Gerät ausnahmslos nur in trockenen Innenräumen betreiben. •...
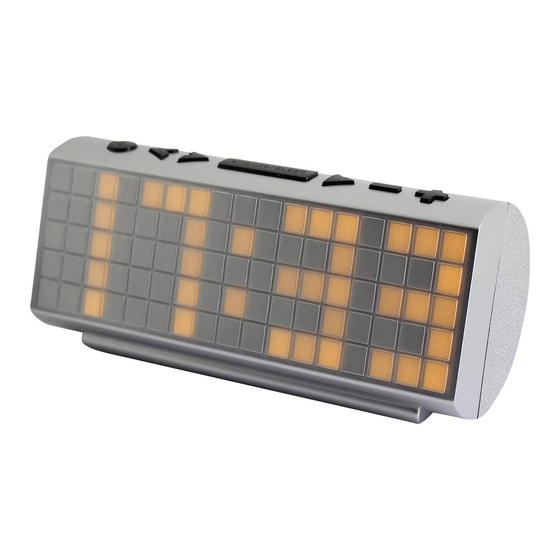
- Page 3 BEDIENELEMENTE EIN-AUS / ALARM AUS << / TUNE - / JAHR/MONAT-TAG / TEMPERATUR / ZURÜCK-TASTE >> / TUNE + / VOR-TASTE SNOOZE / SLEEP / DIMMER / ENERGIESPARFUNKTION ZEITEINSTELLUNG / SPEICHER ALARM 1 EIN – AUS EINSTELLUNG / LAUTSTÄRKE LEISE ALARM 2 EIN –...
-
Page 4: Erste Schritte
LED DISPLAY ANZEIGE Zeit Alarm 1 PM Anzeige Alarm 2 Temperatur Anzeige MONAT ERSTE SCHRITTE Wählen Sie einen geeigneten Platz für das Gerät wie einem trockenen, gut Sichtbaren Platz, wo Sie das Gerät leicht bedienen können. Einlegen der Batterien. ... -
Page 5: Gerät Ein/Aus-Schalten
WICHTIG: Achten Sie darauf, dass die Batterie richtig eingesetzt ist. Eine Falsche Polarität kann das Gerät beschädigen und die Garantie wäre somit ungültig. Für eine optimale Leistung und längere Betriebszeit, empfehlen wir die Verwendung von Batterien mit guter Quallität. Stromanschluss Stecken Sie das Netzkabel in eine Netzsteckdose. -
Page 6: Manueller Sendersuchlauf
DIMMERSTEUERUNG Drücken Sie im Ausgeschalteten Zustand die Dimmer-Taste (4) um die Helligkeit der LED-Anzeige auf High oder Low zu setzen. 1. Die LED-Anzeige ist Standardmäßig auf Low Eingestellt. 2. Das Gerät hat einen höheren Stromverbrauch, wenn Sie den Dimmer auf High einstellen. - Page 7 SPEICHERN UND ABRUFEN GESPEICHERTER RADIOSENDER 1. Schalten Sie das Gerät ein, und drücken Sie die Taste (2) und (3) um ihren Gewünschten Radiosender zu wählen. 2. Drücken und Halten Sie die Taste (5), wird die nächste verfügbare Vorwahlspeichernummer auf dem LED-Display Angezeigt. (Hinweis: Im Display sehen Sie “P01“, wenn Sie das Gerät zum ersten mal Programmieren) 3.
- Page 8 Hinweis: Wenn Sie “Radio” als Alarmquelle auswählen möchten, müssen Sie einen gewünschten Sender im Radio-Modus einstellen. Nach der Auswahl des Radios als Alarmquelle während der Alarmeinstellung, wählen Sie die gewünschte Alarmlautstärke (bis maximal 15). Wenn das Radio eingeschaltet ist “On“, zur voreingestellten Weckzeit wird das Radio beginnen bei geringer Lautstärke zu Klingeln, und nach und nach auf den voreingestellten Lautstärkepegel erhöht.
- Page 9 EINSCHLAF FUNKTION Die Einschlaffunktion erlaubtes ihnen das Gerät zu benutzen, bevor ein voreingestellter Timer das Gerät ausschaltet. 1. Wenn Sie sich im Radiomodus befinden, drücken Sie die SLEEP-Taste, (90) (Minuten) wird im Display Angezeigt. 2. Drücken Sie wiederholt die SLEEP-Taste um zwischen folgenden Zeiten zu wählen: 90, 60, 30 oder 15 Minuten.
-
Page 10: Technische Daten
Temperatursensor Bereich: 32 °F bis 122 °F (0°C bis +50°C) Speicherbatterie: 3V (CR2032 Flat Lithium battery x 1) Stromversorgung : AC230V 50Hz Copyright von Wörlein GmbH, D 90556 Cadolzburg – soundmaster® Technische Daten, Änderungen und Irrtümer sind ohne Vorankündigung vorbehalten... - Page 11 ENVIRONMENTAL PROTECTION Do not dispose of this product with the normal household waste at the end of its life cycle. Return it to a collection point for the recycling of electrical and electronic devices. This is indicated by the symbol on the product, user manual or packaging.
- Page 12 FUNCTION AND CONTROLS ON –OFF / ALARM OFF << / TUNE - / YEAR/MONTH-DAY / TEMPERATURE / C-F / BETWEEN DISPLAY CONTENTS ON-OFF/ SKIP BACK BUTTON >> / TUNE + / SKIP FORWARD / NAP / DST SNOOZE / SLEEP / DIMMER / POWER SAVING TIME SET / MEMORY / MEMORY+ ALARM 1 ON - OFF SET / VOLUME DOWN ALARM 2 ON - OFF SET / VOLUME UP...
-
Page 13: Led Display Mode
LED DISPLAY MODE GET STARTED Select a proper place for the device such as a dry, and even non slip area where you can easily operate the device. Inserting the Battery (Backup) INSTALLING/REPLACING THE BACK-UP BATTERY This unit is equipped with a battery back-up system, requiring one DC3V CR2032 lithium battery (not included) to maintain the time/calendar settings and radio presets during AC power outage. -
Page 14: Ac Power Connection
IMPORTANT: Be sure that the battery is installed correctly. Wrong polarity may damage the unit and void the warranty. For best performance and longer operating time, we recommend the use of good quality alkaline battery. AC POWER CONNECTION Plug the AC power cord into a household outlet AC source. SETTING THE CALENDAR AND TIME 1. - Page 15 DIMMER CONTROL In radio off mode, press the DIMMER button (4) allows you to set the brightness of the LED display to high, low 2 levels. 1. The clock display with dimmer low is the default setting. 2. It will consume more power if you set the clock display with dimmer higher. TOGGLE TEMPERATURE DISPLAY BETWEEN °C (CELSIUS) AND °F (FAHRENHEIT) 1.
- Page 16 TO SET/RECALL RADIO STATION PRESETS 1. Press the unit button (2) and (3) select the desired radio station. 2. Press and hold the unit button (5) the next available preset memory number will flash on the LED display. (Note: “P01” will flash in the display if you are programming presets for the first time.) 3.
- Page 17 SETTING THE ALARM 2 (RADIO) Normal Time → AL 2 Hour → AL 2 Minute → AL 2 weekday → AL 2 beeper → AL 2 radio → AL 2 final radio volume → Normal Time. 1. In standby mode, tap the AL1 (or AL2) button to show the preset alarm time. 2.
-
Page 18: Turning Off The Alarm
TURNING OFF THE ALARM When the preset alarm time is reached, the AL1 (or AL2) INDICATOR will flash on the LED DISPLAY and the beeper alarm or radio will sound for 30 minutes unless interrupted by pressing SNOOZE. To stop the alarm immediately, tap the corresponding AL1 (or AL2) button or POWER ON/OFF button. - Page 19 DAYLIGHT SAVING TIME (DST) MODE If daylight saving time (DST) is available in the summer time in your State, you may use this option to adjust to the correct time easily. 1. In standby mode, press and hold the unit DST button (3) for 2 seconds to advance the displayed time by one hour.
-
Page 20: Specifications
RESETTING If the system does not respond or exhibits erratic or intermittent operation, you may have experienced an electrostatic discharge (ESD) or a power surge that triggered the internal microcontroller to shut down automatically. If this occurs, simply disconnect the ac power cord and remove the system backup battery, wait for at least 3 minutes and then setup the unit again as if it is a brand new unit. - Page 21 PROTECTION DE L’ENVIRONNEMENT Ne jetez pas ce produit avec les ordures ménagères lorsqu’il est usagé. Retournez-le à un point de collecte pour le recyclage des appareils électriques et électroniques. Cette recommandation est indiquée par le symbole sur le produit, le mode d’emploi ou l’emballage. Les composants sont réutilisables en fonction de leur marquage.
- Page 22 FONCTIONS ET COMMANDES MARCHE-ARRÊT / ARRÊT ALARME << / SYNTONISER - / ANNÉE/MOIS-JOUR / TEMPÉRATURETEMPÉRATURE / C-F / MARCHE-ARRÊT ENTRE AFFICHAGE A L’ÉCRAN/ BOUTON SAUT ARRIERE >> / SYNTONISER + / SAUT AVANT / SIESTE / DST SNOOZE / SLEEP / VARIATEUR / BASSE CONSOMMATION RÉGLAGE D’HEURE / MÉMOIRE / MÉMOIRE+ RÉGLAGE MARCHE-ARRÊT ALARME 1 / VOLUME BAS RÉGLAGE MARCHE-ARRÊT ALARME 2 / VOLUME HAUT...
- Page 23 MODE D’AFFICHAGE DEL Voyant d’HEURE Voyant ALARME 1 Voyant ‘Après-midi’ Voyant ALARME 2 Voyant MOIS Voyant TEMPÉRATURE Voyant JOUR COMMENCEZ Choisissez un endroit convenable pour l’appareil tel une surface sèche, et plate non glissante sur laquelle l’utilisation de l’appareil vous sera facile. Insérez la pile (de Secours) ...
-
Page 24: Marche/Arrêt De L'appareil
IMPORTANT : Veillez à ce que la pile soit correctement installée. La mauvaise polarité peut endommager l’appareil et rendre la garantie caduque. Pour une meilleure performance et une plus longue durée opérationnelle, il vous est recommandé d’utiliser une pile alcaline de bonne qualité. BRANCHEMENT AU SECTEUR CA Branchez le cordon d’alimentation CA dans une prise domestique de source CA. - Page 25 BOUTON VARIATEUR En mode radio arrêtée, appuyez sur le bouton VARIATEUR (4) pour vous permettre de régler la luminosité de l’écran DEL sur haut, bas – 2 niveaux. 1. L’affichage de l’heure avec le variateur sur bas est le réglage par défaut. 2.
- Page 26 RÉGLAGE/RAPPEL DES STATIONS RADIO PREREGLEES 1. Appuyez sur les boutons (2) et (3) pour sélectionner la station radio désirée. 2. Maintenez le bouton (5) de l’appareil enfoncé, le numéro suivant disponible préréglé en mémoire clignotera sur l’écran DEL. (NB : “P01” clignotera à l’écran si les préréglages sont programmés pour la première fois.) 3.
- Page 27 RÉGLAGE DE L’ALARME 2 (RADIO) Heure normale → Heure AL 2 → Minute AL 2 → Jour de la semaine AL 2 → Bip AL 2 → Radio AL 2 → Volume final de radio AL 2 → Heure normale. 1.
-
Page 28: Arrêter L'alarme
ARRÊTER L’ALARME Lorsque l’heure de l’alarme préréglée est atteinte, le VOYANT AL1 (ou AL2) clignote sur l’ÉCRAN DEL et l’alarme bip ou radio sonnera pendant 30 minutes à moins d’être interrompu en appuyant sur SNOOZE. Pour arrêter immédiatement l’alarme, appuyez sur le bouton AL1 (ou AL2) correspondant ou sur le bouton MARCHE/ARRÊT. - Page 29 (arrêt) par incrément de 10 minutes. Après que l’heure sélectionnée se soit écoulée, un bip croissant rapidement sera émis. Utilisez le bouton (1) de l’appareil pour arrêter le bip. MODE HEURE AVANCEE (DST) Si ‘l’heure avancée’ est disponible en été dans votre région, cette option peut être utilisée pour facilement régler l'heure exacte.
- Page 30 REINITIALISATION Si le système ne répond pas ou présente un fonctionnement erratique ou intermittent, une décharge électrostatique (ESD) ou une pointe de puissance peut s’être produite qui a provoqué le microcontrôleur interne à automatiquement s’arrêter. Si cela se produit, débranchez simplement le cordon d’alimentation CA et retirez la pile de secours du système, attendez pendant au moins 3 minutes et puis réinstallez à...
- Page 31 MILIEUBESCHERMING Gooi dit product niet weg bij het huishoudafval aan het einde van de levensduur ervan. Breng het product terug naar een inzamelingspunt voor hergebruik van electrische en electronische apparatuur. Dit wordt aangegeven door dit symbool op het product, in de gebruiksaanwijzing of op de verpakking.
- Page 32 FUNCTIES EN BEDIENINGSELEMENTEN AAN-UIT / ALARM UIT << / AFSTEMMEN - / JAAR/MAAND-DAG / TEMPERATUUR / C-F / TUSSEN SCHERMINHOUD AAN-UIT/ TERUG KNOP >> / AFSTEMMEN + / VOORUIT / SLUIMER / DST SNOOZE / SLEEP / DIMMER / STROOMBESPARING TIJD INSTELLEN / GEHEUGEN / GEHEUGEN+ ALARM 1 AAN - UIT / VOLUME OMLAAG ALARM 2 AAN - UIT / VOLUME OMHOOG...
-
Page 33: Aan De Slag
LED WEERGAVEMODE TIJD Indicator ALARM 1 Indicator PM Indicator ALARM 2 Indicator MAAND Indicator DAG Indicator TEMPERATUUR Indicator AAN DE SLAG Kies een geschikte locatie voor het apparaat, zoals een droge, vlakke en slipvrije ondergrond, waar u eenvoudig het apparaat kunt bedienen. Plaatsen van de Batterij (Noodstroom) ... -
Page 34: Het Apparaat In/Uitschakelen
BELANGRIJK: Zorg ervoor dat de batterij juist geplaatst is. Een verkeerde polariteit kan het apparaat beschadigen en de garantie doen vervallen. Voor de beste prestaties en de langste gebruiksduur raden we het gebruik van alkalinebatterijen van een goede kwaliteit aan. VOEDINGSAANSLUITING Sluit het netsnoer aan op een normaal huishoudelijk stopcontact. - Page 35 DIMBEDIENING Als de radio uitstaat, druk dan op de DIMMER knop (4) om de helderhed van het LED scherm in te stellen op hoog of 2 niveau's laag. 1. De klokweergave in dimstand laag is de standaardinstelling. 2. Er wordt meer stroom verbruikt als u de klokweergave instelt op dimmer hoog.
- Page 36 RADIO VOORKEUZEZENDERS INSTELLEN/OPVRAGEN 1. Druk op de apparaatknop (2) en (3) om de gewenste radiozender in te stellen. 2. Druk op de apparaatknop (5) en houd deze vast , het volgende vrije voorkeuzenummer gaat op het LED scherm knipperen. (Opmerking: “P01“...
- Page 37 INSTELLEN VAN ALARM 2 (RADIO) Normale Tijd→ AL 2 Uur → AL 2 Min → AL 2 weekdagen Alarm → AL 2 pieper →AL 2 radio → AL 2 radio eindvolume → Normale Tijd. 1. Druk in standby-mode op de AL1 (of AL2) knop om de ingestelde alarmtijd te zien.
- Page 38 HET ALARM UITSCHAKELEN Als de vooringestelde alarmtijd is bereikt, dan gaat de AL1 (of AL2) INDICATOR knipperen op het LED SCHERM en het piep- of radioalarm klinkt 30 minuten tenzij het onderbroken wordt door een druk op SNOOZE. Om het alarm direct te stoppen drukt u op de desbetreffende AL1 (of AL2) knop of the POWER ON/OFF knop.
- Page 39 Druk op de apparaatknop (1) om de pieptoon te stoppen. ZOMERTIJD (DST) MODUS Als in uw regio de zomertijd (DST) gehanteerd wordt, dan kunt u deze optie gebruiken om de juiste tijd eenvoudig in te stellen. 1. In standby-mode drukt u op de DST knop (3) en houdt deze 2 seconden vast om uur voor uur door de getoonde tijd te bladeren.
- Page 40 RESETTEN Als het systeem niet meer reageert of vreemd of onderbroken gedrag vertoont, dan kan het zijn dat u last heeft gehad van een elektrostatische ontlading (ESD), of een plotselinge stroompiek die ervoor gezorgd heeft dat de interne chip automatisch is uitgeschakeld. Als dit gebeurt, trek dan gewoon de stekker uit het stopcontact en verwijder de batterij uit het apparaat, wacht tenminste 3 minuten en stel het apparaat dan in alsof het nieuw en nog nooit gebruikt is.
- Page 41 PROTECÇÃO AMBIENTAL Não junte este aparelho juntamente com os resíduos domésticos no final do seu ciclo de vida útil. Coloque-o num ponto de recolha para reciclagem de aparelhos eléctricos e electrónicos. Isto é indicado pelo símbolo no aparelho, manual do utilizador ou na embalagem. Os materiais são reutilizáveis de acordo com as marcas respectivas.
- Page 42 FUNÇÃO E CONTROLOS LIGAR –DESLIGAR / DESLIGAR ALARME << / SINTONIZAR - / ANO/MÊS-DIA / TEMPERATURA / ºC-ºF / ENTRE CONTEÚDOS DO VISOR LIGAR-DESLIGAR/ BOTÃO RETROCEDER >> / SINTONIZAR + / AVANÇAR / DORMITAR / HORÁRIO DE VERÃO SNOOZE / SLEEP / OBSCURECER / POUPANÇA DE ENERGIA DEFINIR HORA / MEMÓRIA / MEMÓRIA+ ALARME 1 DEFINIR LIGAR - DESLIGAR / DIMINUIR VOLUME ALARME 2 DEFINIR LIGAR - DESLIGAR / AUMENTAR VOLUME...
- Page 43 MODO DE VISOR LED Indicador de HORA Indicador de ALARME 1 Indicador PM Indicador de ALARME 2 Indicador de MÊS Indicador de TEMPERATURA Indicador de DIA PREPARAÇÃO Selecione um local apropriado para o dispositivo como uma área seca, plana, não escorregadia, onde possa facilmente operar o aparelho. Insira a Bateria (de Reserva) ...
-
Page 44: Ligação À Rede Elétrica
IMPORTANTE: Certifique-se de que a bateria está corretamente instalada. Se a polaridade estiver invertida pode danificar o aparelho e anular a garantia. Para melhores prestações e um período de funcionamento mais longo, recomendamos a utilização de pilhas alcalinas de boa qualidade. LIGAÇÃO À... - Page 45 CONTROLO DE LUMINOSIDADE DO VISOR No modo de rádio desligado, prima o botão OBSCURECER (4) que permite aumentar ou diminuir 2 níveis de luminosidade do visor LED. 1. O visor do relógio com baixa luminosidade é a configuração predefinida. 2. Haverá um maior gasto de energia se aumentar a luminosidade do visor do relógio.
- Page 46 DEFINIR/SELECIONAR AS ESTAÇÕES DE RÁDIO PREDEFINIDAS 1. Prima os botões (2) e (3) da unidade para selecionar a estação de rádio desejada. 2. Prima e mantenha premido o botão (5) da unidade, o próximo número de memória predefinida disponível piscará no visor LED. (Nota: “P01” irá piscar no visor se estiver a programar as estações predefinidas pela primeira vez) 3.
- Page 47 1. No modo de standby, toque no botão AL1 (ou AL2) para visualizar a hora de alarme predefinida. 2. Prima e mantenha premido novamente o botão AL1 (ou AL2) durante cerca de 2 segundos até que o Indicador de Hora comece a piscar no VISOR LED. Prima os botões (2) ou (3) para obter a Hora de Alarme desejada.
-
Page 48: Desligar O Alarme
DESLIGAR O ALARME Quando a hora de alarme predefinida é alcançada, o INDICADOR AL1 (ou AL2) piscará no VISOR LED e o alarme de sinal sonoro ou o rádio soarão durante 30 minutos se não forem interrompidos pelo toque em SNOOZE. Para parar imediatamente o alarme, toque no botão AL1 (ou AL2) correspondente ou no botão LIGAR/DESLIGAR. - Page 49 dispositivo irá soar. Selecione entre 90 a 10 minutos ou OFF em intervalos de 10 minutos. Depois do tempo selecionado ter passado, irá soar um bip progressivamente mais rápido. Utilize o botão (1) da unidade para desligar o bip. MODO DE HORÁRIO DE VERÃO Se o horário de verão estiver disponível na hora de verão do seu país, pode utilizar esta opção para ajustar facilmente a hora correta.
- Page 50 REDEFINIÇÃO Se o sistema não responder ou mostrar uma operação intermitente ou errática, pode ter sofrido uma descarga eletrostática ou um pico de corrente que desencadeou o fecho automático do microprocessador interno. Se isto ocorrer, simplesmente desligue o cabo de alimentação e remova a bateria de reserva. Espere pelo menos 3 minutos e depois configure novamente a unidade, como se fosse uma unidade totalmente nova.
- Page 51 AVVERTENZA PERICOLO DI SCOSSE ELETTRICHE, NON APRIRE ATTENZIONE: AL FINE DI RIDURRE IL PERICOLO DI SCOSSE ELETTRICHE, NON RIMUOVERE IL COPERCHIO (O LA PARTE POSTERIORE). NON CI SONO PARTI RIPARABILI DALL 'UTENTE ALL'INTERNO. PER ASSISTENZA RIVOLGERSI A PERSONALE DI ASSISTENZA QUALIFICATO. Il simbolo del lampo con la freccia, all'interno di un triangolo equilatero, serve ad avvisare l'utente della presenza di “tensione pericolosa”...
- Page 52 Questa apparecchiatura e un elettrodomestico di Classe II o a doppio isolamento. E' stata progettata in modo tale da non richiedere un collegamento di sicurezza alla terra. Attenzione: • La batteria (batteria o pacco batterie) non devono essere esposti a calore eccessivo come luce solare, fuoco o simili.
- Page 53 FUNZIONI E COMANDI ACCENSIONE-SPEGNIMENTO / SVEGLIA SPENTA << / SINT. - / ANNO/MESE-GIORNO / TEMPERATURA / C-F / SCORRIMENTO CONTENUTI DISPLAY ACCENSIONE-SPEGNIMENTO / PULSANTE INDIETRO >> / SINT + / PULSANTE AVANTI / NAP / DST SNOOZE / SLEEP / DIMMER / RISPARMIO ENERGETICO IMPOSTA ORA / MEMORIA / MEMORIA+ SVEGLIA 1 ACCENSIONE - SPEGNIMENTO IMPOSTA / VOLUME - SVEGLIA 2 ACCENSIONE - SPEGNIMENTO IMPOSTA / VOLUME +...
-
Page 54: Per Iniziare
MODALITÀ DISPLAY A LED INDICATORE ORA INDICATORE SVEGLIA 1 INDICATORE INDICATORE SVEGLIA 2 INDICATORE TEMPERATURA INDICATORE MESE INDICATORE GIORNO PER INIZIARE Scegliere un luogo adeguato per istallare il dispositivo, come una zona asciutta e non scivolosa in cui sia facile utilizzare il dispositivo. Inserire la batteria (batteria tampone) ... -
Page 55: Impostare Data E Ora
IMPORTANTE: Assicurarsi che la batteria sia installata correttamente. L’errata polarità può danneggiare l’unità ed annullare la garanzia. Per ottenere migliori prestazioni ed estendere il tempo di funzionamento, si consiglia di utilizzare batterie alcaline di buona qualità. COLLEGAMENTO ALIMENTAZIONE CA Collegare il cavo di alimentazione CA in una presa di corrente. IMPOSTARE DATA E ORA 1. - Page 56 CONTROLLO DIMMER In modalità Radio spenta, premere il pulsante DIMMER (4) che permette di regolare la luminosità del display a LED tra alta e bassa in 2 livelli. 1. La visualizzazione dell’orologio con luminosità bassa è l’impostazione predefinita. 2. Impostare il display dell’orologio con un’illuminazione maggiore consumerà più...
- Page 57 SUGGERIMENTI PER UNA MIGLIORE RICEZIONE Per garantire una migliore ricezione della radio FM, svolgere ed estendere completamente IL FILO DELL’ANTENNA ESTERNA FM per una migliore ricezione della radio FM. PER IMPOSTARE/RICHIAMARE STAZIONI RADIO MEMORIZZATE 1. Premere i pulsanti (2) e (3) dell’unità, selezionare la stazione radio desiderata.
- Page 58 IMPOSTARE SVEGLIA 2 (RADIO) Ora normale → AL 2 Ora → AL 2 Minuti → AL 2 settimanale → AL 2 segnale acustico → AL 2 radio → AL 2 volume radio finale → Ora normale. 1. In modalità standby, premere il pulsante AL1 (o AL2) per visualizzare l’ora della sveglia preimpostata.
-
Page 59: Spegnere La Sveglia
SPEGNERE LA SVEGLIA Raggiunta l’ora preimpostata L’INDICATORE AL1 (o AL2) lampeggia sul DISPLAY A LED ed il segnale acustico o la radio suoneranno per 30 minuti a meno che non vengano interrotti premendo il pulsante SNOOZE. Per spegnere la sveglia immediatamente, premere il pulsante corrispondente AL1 (o AL2) o il pulsante di ACCENSIONE/SPEGNIMENTO. - Page 60 dispositivo suonerà. Selezionare da 90 e 10 minuti o OFF (spento) in passi di 10 minuti. Una volta trascorso il tempo selezionatoo, un segnale acustico sempre più veloce suonerà. Utilizzare il pulsante (1) dell’unità per disattivare il segnale acustico. MODALITÀ...
- Page 61 RESET Se il sistema non risponde o mostra un funzionamento errato o intermittente, potrebbe trattarsi di una scarica elettrostatica (ESD) o di uno sbalzo di attenzione che ha attivato il micro-controllore interno per lo spegnimento automatico. Se questo avviene, scollegare semplicemente il cavo di alimentazione CA e rimuovere la batteria a tampone del sistema;...
Need help?
Do you have a question about the UR200SI and is the answer not in the manual?
Questions and answers