Table of Contents
Advertisement
Quick Links
Advertisement
Table of Contents

Related Manuals for uhlmann & zacher CX6172


Summary of Contents for uhlmann & zacher CX6172
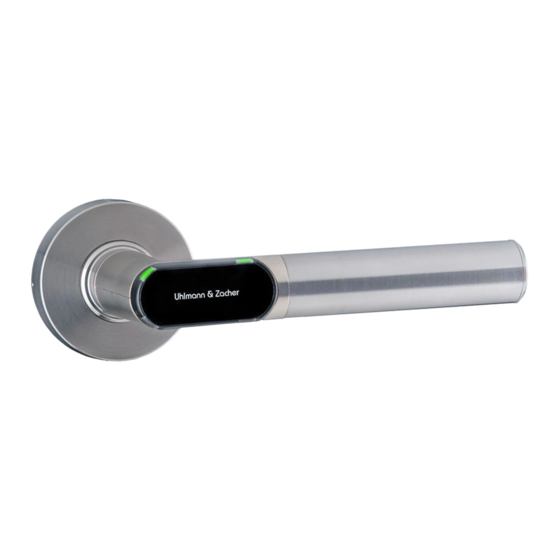
- Page 1 CX6172/4 Clex prime Electronic door handle Operating and assembly manual...
- Page 2 CX6172/4 ABLE OF CONTENTS Imprint Operating and assembly manual Electronic door handle CX6172/4 Document number: 073F Version: 1.43 Status: 28.01.2021 Manufacturer Uhlmann & Zacher GmbH Gutenbergstr. 2–4 97297 Waldbuettelbrunn Germany Tel.: +49 931 40672-0 E-Mail: contact@UundZ.de http://www.UundZ.com This operating and assembly manual is copyright protected. The information contained this manual should not be reproduced, distributed or used for competitive purposes or shared with third parties.
-
Page 3: Table Of Contents
CX6172/4 ABLE OF CONTENTS Table of contents 1 About this document ................5 Warnings .................... 5 Symbols ....................5 Security ..................6 Proper use ..................6 Improper use ..................6 General safety instructions ..............6 Product description ................7 Functional description ................7 Design .................... - Page 4 CX6172/4 ABLE OF CONTENTS Glossary..................46...
-
Page 5: About This Document
1 About this document This operating and assembly manual describes the Clex prime electronic door handle (in short: CX6172) and the electronic door fitting (in short: CX6174). It is part of the product and contains important information that is necessary for proper operation and maintenance. -
Page 6: Security
Changes or retrofits to the product are not allowed. The knob module should not be used outside the given specifications. The CX6172/4 should not be used in doors that do not open freely or in doors or lock cases that are damaged. The product should not be used as a stopper against obstacles. -
Page 7: Product Description
ABLE OF CONTENTS Product description Functional description The electronic door handle CX6172/4 is a product in the Clex prime system. The reading unit, the communication electronics, the mechanical system and power supply, are integrated within the door handle. Different transponder carriers can be used as key in the CX6172/4, for example, ISO card or key fob. - Page 8 3.1.4 Radio network If a corresponding radio network is installed in the building, then the door handle CX6172/4 can be integrated with this network. The following functions can be then be executed via radio: Programming access rights ...
- Page 9 3.1.6 Battery management The electronic door handle CX6172/4 comes with a battery management system, which indicates the need for battery replacement by means of a visible and audio signal, when the battery power reduces (capacity loss) during the final 1,000 operations of the battery (see chapter 7.2.17.2.1 Battery Replacement).
- Page 10 CX6172/4 ABLE OF CONTENTS 3.1.7 Event log The last 512 events of the door handle are stored in the event log. The following events are logged: Unauthorised Authorised Service opening Timer circuit open Timer circuit closed ...
-
Page 11: Design
CX6172/4 ABLE OF CONTENTS Design 3.2.1 One-sided electronic authorization Circular rosette 7 8 9 10 11 Oval rosette 7 8 9 10 Mechanical door handle Reading unit Locking screw Electronic door handle Mounting screw Battery compartment Opener holder (with bayonet... - Page 12 CX6172/4 ABLE OF CONTENTS Long narrow plate Long wide plate 3 4 5 8 9 10 11 Mounting screws Electronic door handle Washers Battery Locking screws Plate cover Base plate Gripping sleeve Adapter sleeve (only for 7 mm Grub screw for gripping sleeve...
- Page 13 CX6172/4 ABLE OF CONTENTS Short plate Mounting screws Locking screw Mechanical door handle Threaded sleeve Grub screw for gripping sleeve Electronic door handle Locking screw Battery Square pin with spiral Plate cover clamping Adapter sleeve (only for 7 mm Gripping sleeve...
-
Page 14: Versions
CX6172/4 ABLE OF CONTENTS 3.2.2 Two-sided electronic authorization Two-sided electronic authorization is possible only in certain combinations of the variants round rosette, oval rosette, long plate narrow and long plate wide. Reading unit Rosette cover Electronic door handle Electronic door handle (inside) -
Page 15: Technical Data
CX6172/4 ABLE OF CONTENTS Technical data 3.4.1 General technical data Name Value Minimum backset Round rosette: 28 mm Oval rosette: 18 mm Long plate narrow: 22 mm Long plate wide: 33 mm Door thickness 30 mm to 110 mm Maximum door weight... - Page 16 CX6172/4 ABLE OF CONTENTS 3.4.3 Dimensions Circular rosette electronics side and handle versions Circular rosette mechanical side and handle versions Oval rosette electronics side Oval rosette mechanical side...
- Page 17 CX6172/4 ABLE OF CONTENTS Long narrow plate electronics side Long narrow plate mechanical side 14,7...
- Page 18 CX6172/4 ABLE OF CONTENTS Long wide plate electronics side 14,7 Long wide plate mechanical side 14,7...
-
Page 19: Standards
CX6172/4 ABLE OF CONTENTS Short plate electronics side Short plate mechanical side Standards The electronic door handle CX6172/4 meets the following standards: EN 16867:2020, classification 47-B11D00 (version for indoor use) 47-B11D40 (version for outdoor use) EN 1906:2012... -
Page 20: Management Accessories
CX6172/4 ABLE OF CONTENTS Management accessories The components of the Clex prime system described below are used to manage a Clex prime locking system. 3.6.1 CX6530 Keyvi management software The locking system can be managed centrally and conveniently from the PC using the Keyvi management software for Clex prime. -
Page 21: Assembly
4.1.1 General assembly instructions Check the approval when installing the CX6172/4 door handle in a fire / smoke resistant door or in an escape door. If a cylinder holder is present in the door, then it should be sealed properly, for e.g. -
Page 22: Assembly
CX6172/4 ABLE OF CONTENTS Assembly 4.2.1 Assembling the square pin The square pin has to be assembled before installation on the electronic door handle (outside). This applies to all the versions and is shown here using an example of the circular rosette version. - Page 23 CX6172/4 ABLE OF CONTENTS 4.2.2 One-sided electronic authorization Circular rosette Insert the square pin of the electronic door handle into the square nut of the lock. Place the drilling template on the square pin, align horizontally and centre punch the hole markings.
- Page 24 CX6172/4 ABLE OF CONTENTS Insert the holder of the mechanical door handle from the other side and screw it along with the electronic door handle through the door panel. Use the supplied mounting screws. Insert the mechanical door handle keeping it in a horizontal position. For ...
- Page 25 CX6172/4 ABLE OF CONTENTS Oval rosette The oval rosette version is mostly used for tubular frame doors. These doors often have pressed threaded bushes, such that the base plate has to just be screwed onto the door. Other types of attachment depend on the various door designs and are not explained here.
- Page 26 CX6172/4 ABLE OF CONTENTS Long narrow plate The long plate narrow version is mostly used for tubular frame doors. These doors often have pressed threaded bushes, such that the base plate has to just be screwed onto the door. Other types of attachment depend on the various door designs and are not explained here.
- Page 27 CX6172/4 ABLE OF CONTENTS Place the plate cover of both the door handles on the base plate and unscrew the locking screw at the bottom of the plate such that the plate sits firmly. Insert the locking screw from the bottom of the handle and tighten it.
- Page 28 CX6172/4 ABLE OF CONTENTS Drill holes of diameter 8 - 8.5 mm at the marked positions. Do not drill into or through the lock casing. Insert the square pin of the electronic door handle once again into the square ...
- Page 29 CX6172/4 ABLE OF CONTENTS Short plate The short plate is mostly used in steel doors, where the two standardised holes for a short plate fitting are often already present. The holes have to be drilled in the door subsequently if required, as described below.
- Page 30 CX6172/4 ABLE OF CONTENTS Insert the base plate of the mechanical door handle from the other side and screw it along with the electronic door handle through the door panel. Use the mounting screws and threaded bolts provided. Place the plate cover of both the door handles on the base plate and ...
- Page 31 CX6172/4 ABLE OF CONTENTS 4.2.3 Two-sided electronic authorization Two-sided electronic authorization is possible in the versions of circular rosette, oval rosette, long narrow plate and long wide plate. The square has to be shortened for this purpose. The assembly is shown here using the example of the circular rosette.
- Page 32 CX6172/4 ABLE OF CONTENTS Retract the rosette cover of the inner electronic door handle to the maximum extent and screw both the electronic door handles together through the door panel. Use the supplied mounting screws. Place the rosette cover.
- Page 33 CX6172/4 ABLE OF CONTENTS 4.2.4 Assembling the key rosette Place the drilling template, align horizontally and center punch the hole marks. Drill holes of diameter 7 - 7.5 mm at the marked positions. Do not drill into or through the lock casing.
-
Page 34: Commissioning
CX6172/4 ABLE OF CONTENTS Commissioning Managing the locking system The locking system can be managed using the Keyvi management software. Before a locking system can be used, it has to be personalized and the settings have to be customized. 5.1.1... -
Page 35: Operation
CX6172/4 ABLE OF CONTENTS Operation The electronic door handle operates only the latch. Hence it should be ensured that the locking cylinder of the door is unlocked or the door is not locked in some other manner. Otherwise, the door cannot be opened even after holding up an authorized key. - Page 36 CX6172/4 ABLE OF CONTENTS Depending on the initial state, the door handle either engages or disengages permanently.
-
Page 37: Signals
CX6172/4 ABLE OF CONTENTS Signals Function Signal (audible and visible) and explanation Rest mode No audible or visible signal ● Begin Service mode ● Two beeps of increasing intensity but equal length ● End Service mode ● Two audible signals of decreasing intensity but equal length... -
Page 38: Cleaning And Maintenance
CX6172/4 ABLE OF CONTENTS Cleaning and maintenance Cleaning Clean the door handle with a slightly damp cloth. Use only commercially available household cleaners. Do not use any abrasive or caustic cleaning agents. Maintenance 7.2.1 Replacing the battery CAUTION Danger of injury caused by improper use Do not charge, open or heat the battery. - Page 39 CX6172/4 ABLE OF CONTENTS Unscrew the screw on the inside of the door handle till the stop, such that the gripping sleeve cannot be removed. Check the time on the door handle using the CX6510 service device or the CX6522 ClexTouch and adjust it if necessary (see chapter 5.1.2 Changing the...
- Page 40 CX6172/4 ABLE OF CONTENTS 7.2.2.2 Replace the sealing ring with grub screw Unscrew the screw on the inside of the door handle in the direction of "1" completely and replace it with the new grub screw from the set. Insert the...
-
Page 41: Faults During Operation
CX6172/4 ABLE OF CONTENTS Faults during operation Fault indications Function Audible signal Explanation Memory fault / 5 long beeps, ▬ ▬ ▬ ▬ ▬ ● configuration fault 1 short beep Coupling error 5 long beeps, ▬ ▬ ▬ ▬ ▬ ● ●... -
Page 42: Disassembly And Disposal
CX6172/4 ABLE OF CONTENTS Disassembly and Disposal Disassembly 9.1.1 One-sided electronic authorization Unscrew the locking screw at the bottom of the rosette. Loosen the bajonet lock. To do this, tighten the rosette to the left for door handles pointing to the right and remove the mechanical door handle from the square pin. - Page 43 CX6172/4 ABLE OF CONTENTS 9.1.2 Two-sided electronic authorization Two-sided electronic authorization is possible in the versions of circular rosette, oval rosette, long narrow plate and long wide plate. Lift the rosette cover on the inner electronic door handle using a small screwdriver and pull it back as far as possible.
-
Page 44: Disposal
CX6172/4 ABLE OF CONTENTS 9.1.3 Removing the square pin For shortening the square or if the length of the square does not match the lock, it may be necessary to remove the square. Electronic door handle Spiral clamping pin Square... -
Page 45: Faq
CX6172/4 ABLE OF CONTENTS 10.1 Door handle does not come to rest position If the electronic door handle does not come to horizontal resting position by itself after being assembled, it may be due to the fact that the lock is not aligned properly. - Page 46 CX6172/4 ABLE OF CONTENTS Glossary Definition Description ClexTouch Software for Windows handheld computer for configuring a locking system Intrusion Detection System (IDS) HITAG 1 Technology for contactless transfer of identification data Keyvi Software for managing a locking system LEGIC ®...
Need help?
Do you have a question about the CX6172 and is the answer not in the manual?
Questions and answers