Table of Contents
Advertisement
Available languages
Available languages
Quick Links
Advertisement
Chapters
Table of Contents

Subscribe to Our Youtube Channel
Related Manuals for La Boite Concept LX PLATINE


Summary of Contents for La Boite Concept LX PLATINE
- Page 1 P L A T I N E T U R N T A B L E NO TICE / US E R M AN UAL...
- Page 3 FRANÇA IS 4 À 45 ENGLI SH...
-
Page 5: Table Of Contents
T A B L E D E S M A T I È R E S 1 . V o t R E E N C E I N t E L X C O N T E N U D E S B O I T E S 2 . - Page 6 / Une alimentation platine / Un mode d’emploi et garantie / Un adaptateur type IEC C14 universel / Un carton contenant l’enceinte LX Platine sur ses pieds / Un carton contenant la platine Elipson® installée sur son plateau et son couvercle acrylique...
-
Page 7: C O N S I G N E S D E S É C U R I T É
11. Utilisez uniquement des fixations et accessoires recommandés par le fabricant. 12. Utilisez le LX Platine uniquement sur son piétement d’origine. 13. Débranchez l’appareil en cas d’orage ou si vous ne l’utilisez pas pendant une longue période. - Page 8 à l’assemblage avant de l’assembler ou demander à un représentant de la marque en cas de question. CCLAB La Boite concept et ses revendeurs ne peuvent pas être tenus pour responsables en cas de chute du produit dû à un assemblage qui n’a pas respecté les étapes...
- Page 9 Pour garantir une conformité prolongée, être mis au rebut dans votre poubelle seuls les accessoires de La Boite concept habituelle qui ne fait pas l’objet du tri devraient être utilisés avec ce produit et sélectif.
- Page 10 (2) Cet appareil doit accepter toutes les interférences reçues, y compris celles pouvant entraîner un fonctionnement indésirable. Les équipements sélectionnés par La Boite concept ont été créés et testés pour être conformes aux limites des appareils numériques de classe B, conformément à la partie 15 des règles FCC. Ces limites ont été...
- Page 11 Ne pas placer l’équipement dans une pièce entièrement fermée ou dans un casier ne disposant pas d’une aération suffisante. Vérifier qu’aucun petit objet ne peut passer à travers le LX Platine. Si cela se produit, éteindre immédiatement l’appareil, le débrancher de la prise électrique et contacter votre revendeur pour obtenir de l’aide et des conseils.
- Page 12 S U RC HA RGE Éviter de surcharger les installations électriques murales, ou les rallonges, car cela pourrait provoquer un risque d’incendie ou de décharge électrique. Les installations en courant continu surchargées, les rallonges, les câbles d’alimentation abîmés, une isolation endommagée ou craquelée, des prises cassées, constituent des dangers.
-
Page 14: G A R A N T I E L I M I T É E D E L A B O I T E C O N C E P T
Ce produit a été conçu et fabriqué en vertu des normes de qualité les plus rigoureuses. Toutefois, en cas de problème, La Boite concept et ses distributeurs nationaux garantissent une main d’œuvre (exclusions possibles) et des pièces de rechange gratuites dans tout pays desservi par un distributeur agréé... - Page 15 La Boite concept qui a vendu l’équipement. Si l’équipement est utilisé dans un pays autre que le pays d’achat, veuillez contacter le distributeur national La Boite concept du pays de résidence, qui vous indiquera où vous pouvez faire réparer l’équipement. Vous pouvez contacter La Boite concept en France ou consulter notre site internet afin obtenir le numéro...
-
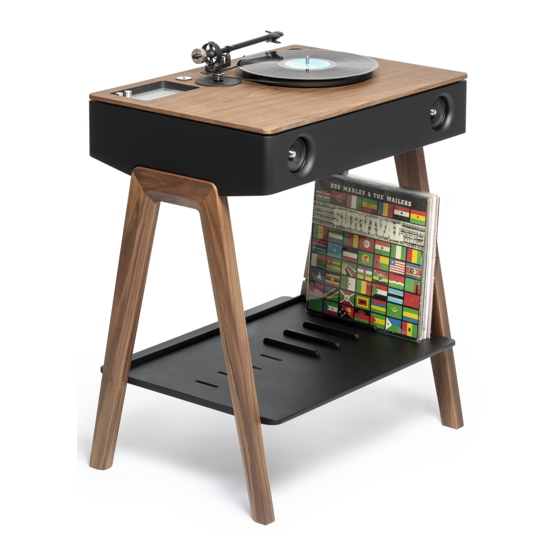
Page 16: D E S C R I P T I O N G É N É R A L E
4 . D E S C R I P T I O N G É N É R A L E B OUT O N S ET P A NNEAU DE CO NTRÔLE PA N N E AU D E C O M M A ND E Voyants LED Bouton de réglage Bouton de réglage... - Page 17 PA N N E AU D E S O U RC E Bouton sélection Prise Entrée RCA / Terre Phono Entrée Entrée Entrée Entrée 3,5 Aux Optique USB DAC USB-A...
- Page 18 DE S SU S DE V O T R E LX P L A TI NE Bouton sélection vitesse platine Courroie Courroie Tourne Disque Bras...
- Page 19 A RR IÈR E DE V O TR E L X P L A TI NE Sortie des Crochet câbles Serre-câble Prise d’alimentation 150W Bouton principal 100/240 V MARCHE / ARRÊT 50/60 Hz...
-
Page 20: O U V E R T U R E E T M O N T A G E D U L X P L A T I N E
/ Un câble d’alimentation pour la platine / Un adaptateur universel (IEC C14) / Un manuel d’utilisation Besoin d’aide pour monter votre LX Platine ? Veuillez consulter notre vidéo de montage du LX Platine sur YouTube ou via ce QR code :... -
Page 21: M O N Ta Ge De Votre Lx Plati Ne
2 . M O N TA GE DE VOTRE LX PLATI NE CAR toN 1/2 1. Sortir les pieds ainsi que leurs mousses de protection. 2. A deux personnes : À travers les encoches dans la mousse, saisir l’ensemble et le sortir. - Page 22 3. Retirez la mousse supérieure. À deux personnes, soulever l’enceinte pour en retirer le cache. Redéposez par la suite l’enceinte dans sa mousse respective. 4. En faisant correspondre les indications “LEFT” et “RIGHT” sur l’enceinte et les pieds, vissez les pieds sur l’enceinte.
- Page 23 Vis à tête plate Vis à tête plate Vis à grosse tête...
- Page 24 5. A deux personnes : Retournez l’enceinte et retirez la mousse protectrice. CA Rt oN 2/2 6. Ouvrez le carton 2/2 contenant l’ensemble platine + l’étagère. Pour une écoute optimale, le bras Elipson doit être pré-ré- glé par vos soins. Veuillez lire les instructions mentionnées dans le flyer présent dans le carton 2/2.
- Page 25 7.1 Pour connecter la platine à l’enceinte : Au niveau du plateau 1. Branchez le câble RCA fourni avec votre enceinte. 2. Connectez la prise Terre. La prise Terre est assemblée au câble RCA. 3. Branchez le câble d’alimentation de la platine fourni avec votre enceinte.
- Page 26 Veuillez bien placer et insérer les câbles afin 7.2 Pour connecter la de ne pas créer de contact entre l’enceinte et platine à l’enceinte : la platine vinyle. Les amortisseurs permettent une isolation de la platine pour une restitution Au niveau de la source sonore optimale mais pour cela il faut posi- 1.
- Page 27 9. L’étagère est prémontée avec des pièces de métal en L. Coïncidez ces pièces avec les perçages prévus à cet effet sur les pieds. 4 vis à tête plate seront utiles au maintien de cette étagère. 1 . Bras 6 . Porte cellule 2 .
- Page 28 10. Mise en place de la courroie : / De la main gauche, maintenir doucement la courroie dans la rainure de la poulie prévue à cet effet / Avec la main droite, tendre la courroie de la poulie vers le plateau en évitant de l’étirer. / Enrouler délicatement la courroie autour du plateau sans faire de plis.
- Page 29 Besoin d’aide pour monter votre LX Platine ? Veuillez consulter notre vidéo de montage du LX Platine sur Youtube ou via ce QR code :...
-
Page 30: D É M A R R A G E R A P I D E
Les enceintes acoustiques traditionnelles ont un champ d’écoute idéal restreint, aussi bien sur un plan latéral que longitudinal. Le LX Platine, de par son filtrage, la configuration de ses déflecteurs acoustiques et le positionnement de ses haut-parleurs arrière, permet une écoute optimale en toutes circonstances. - Page 31 S P AT IAL I SATIO N D U SON DU LX PLATINE...
-
Page 32: M A Rch E / A Rrêt
MARCHE / ARRÊT situé à l’arrière du haut-parleur. (cf illustration p. 19) 5. Dans un second temps, tournez le bouton volume dans le sens des aiguilles d’une montre pour allumer le système d’enceinte LX Platine. Le voyant LED du Bluetooth s’allume. - Page 33 3 . C HO IX DE VOTRE SOURCE Sur votre LX Platine, le choix de la source sonore s’effectue au niveau du panneau de contrôle en appuyant sur l’un des boutons de 1 à 7, après que vous ayez effectué vos branchements sur le panneau de sources.
- Page 34 / Sélection de la source correspond à (5) l’entrée pour le câble Optique. / Sélection de la source correspond à (6) l’entrée pour le câble USB DAC. / Sélection de la source correspond à (7) la sortie casque audio / écou- teurs.
-
Page 35: U Tili S Atio N De La Plati Ne
5. U TILI S ATIO N DE LA PLATI NE / Sur le panneau source, déplacer le curseur sur PHONO, pour utiliser l’enceinte LX Platine en mode “Platine vinyle”. / Sélectionner le bouton RCA / Phono sur le panneau de commande. -
Page 36: A Nti -S Kat Ing (Ou Anti - Déra Pag E)
(33 tours ou 45 tours). Des gabarits de réglage sont disponibles auprès des fabricants spécialisés. Besoin d’aide pour régler votre bras platine ? Veuillez consulter notre vidéo du LX Platine sur le site web sur Youtube ou via ce QR code :... -
Page 38: C On Nexi On Bluetooth
Vous devez juste appairer une seule fois votre tablette ou smartphone avec votre LX, l’appareil est ensuite inclus dans la liste de vos appareils Bluetooth®. Lorsque vous appairez un nouvel appareil, appuyez à nouveau sur le bouton et répétez les étapes ci-dessus. Votre LX Platine est capable de stocker 6 appareils dans sa mémoire. -
Page 39: C Hargeme Nt Pa R Prise D 'Alim Entat Ion
3 . C HARGEME NT PA R PRISE D ’ALIM ENTAT ION Votre LX Platine est muni d’une prise IEC intégrée située sur le côté dans la trappe. Muni de l’adaptateur C14 IEC universel fourni avec le LX Platine, vous pouvez ainsi brancher et alimenter tous vos périphériques, même si le haut-parleur est en mode veille. - Page 40 Pour utiliser cette connexion, vous devez simplement : 1. Branchez le câble fourni à votre LX Platine (prise RCA et stéréo) et à la sortie audio de votre appareil de musique (source). 2. Commutez le bouton sur votre panneau source sur RCA.
-
Page 42: Q U E F A I R E
N’utilisez ni alcool de nettoyage, ni solvant pour nettoyer la surface de l’appareil car ils pourraient tous les deux endommager la laque et provoquer des pannes électriques et un incendie s’ils pénétraient dans l’électronique de l’appareil. Ne tentez pas de nettoyer l’intérieur de votre LX Platine. 2 . P A S D’ ALI MENTATION Assurez-vous que le câble IEC est solidement connecté. -
Page 43: P R O T Ectio N Thermique D E L'amplificateur
Vous entendez un court signal sonore une fois que votre appareil se connecte. Si vous n’entendez aucun son, veillez à ce que le LX Platine ne soit pas en mode veille et augmentez le volume. Il est possible que votre appareil perde la connexion si vous quittez la page Bluetooth®... -
Page 44: R É S U M É T E C H N I Q U E
9 . R É S U M É T E C H N I Q U E SOURCES Bluetooth® AptX AUX : Prise stéréo 3.5 mm Entrée Phono avec Terre Entrée RCA Optique : Entrée numérique optique audio DAC Wolfson 24 bits CHARGEURS USB 2 X USB-A (connexion permanente, charge jusqu’à... - Page 47 T A B L E O F C O N T E N T S 1 . Y o U R L X S p E A K E R B O X E S C O N T E N T S 2 .
-
Page 48: Y O U R L X S P E A K E R
1 . Y O U R L X S P E A K E R B OXE S C O NTENTS LA NOTICE / 3 power cords (C7 connector to EU plug, US plug, UK plug) / Audio cord (RCA to 3,5mm stereo jack) / RCA cable + ground wire / Power source adaptor / 4 shock absorbers for the vinyl turntable... -
Page 49: S A F E T Y I N F O R M A T I O N
2 . S A F E T Y I N F O R M A T I O N Read these instructions. Keep these instructions. Heed all warnings. Follow all instructions. Do not use this apparatus near water. Clean only with a dry cloth. Do not block any ventilation openings. - Page 50 WARNINGS To reduce the risk of fire or electrical discharge, do not expose the unit to rain or wet sources. The unit is class 1 classified, and it must be connected to the electrical wall power socket with an earth plug. The unit must be installed so that it can be removed from the electrical network by means of the earth plug (or with an adapted connector located on the rear side of the unit).
- Page 51 AT TE N TI O N D A N G ER O U S V O L T A G E The purpose of the exclamation The luminous indicator with the “arch point in equilateral triangle is to in an equilateral triangle” symbol inform the user of the presence of is intended to warn the user of the important instructions in this manual...
- Page 52 TV ; / Contact the dealer or an experienced TV/radio technician for assistance. The equipments recommended by La Boite concept complies with FCC exposure guidelines and are approved as part of an uncontrolled environment. These equipments have been designed so that are installed and used from a minimum distance of 20 cm between the transmitter equipment and the user(s).
- Page 53 F C C C AU TIO N Any changes or modifications to this unit not expressly approved by the party responsible for compliance could void the user’s authority to operate the equipment. A ERATI O N / I MPORTANT The unit may heat when used. Never operate the central part without its side bases. Do not place the equipment in a completely closed room or in a compartment insufficiently ventilated.
- Page 54 OVE RL O AD Avoid overloading the wall-mounted electrical installations or the extension cords because this could cause a fire or an electrical discharge. Overloaded DC installations, extension cords, damaged power cables, a damaged or cracked insulation and broken plugs are dangerous. They could cause a discharge or a fire.
-
Page 56: L A B O I T E C O N C E P T L I M I T E D W A R R A N T Y
This product was designed and manufactured in accordance with the most rigorous quality standards. However, in case of a problem, La Boite concept, and their national distributors, guarantee labour (exclusions possible) and spare parts free in all countries served by a La Boite concept approved distributor. - Page 57 Deteriorations resulting from a defective or unsuitable auxiliary equipment. d. Deteriorations resulting from : accidents, lightning, water, heat, war, breaches of public order, or other causes outside of the reasonable control La Boite concept or its approved distributors. e. Products with serial numbers modified, erased, eliminated or rendered unreadable.
-
Page 58: G E N E R A L D E S C R I P T I O N
4 . G E N E R A L D E S C R I P T I O N K N OB S A ND C ONTROL PANEL CO N T R OL PA N EL Volume Bass control knob control knob LED light ON / OFF... - Page 59 INP UT PAN E L RCA or Phono Phono selection grounding Entrée button post Optical USB DAC USB-A AUX 3.5 input input input input...
- Page 60 T OP OF YOUR LX TUR NTAB LE Turntable speed Pulley Belt Turntable button...
- Page 61 B AC K OF YO UR L X TU RNTA B L E Cable Cable guide clamp Power socket 150W Master ON/OFF 100/240 V button 50/60 Hz...
-
Page 62: L X T U R N T A B L E O P E N I N G A N D A S S E M B L I N G
5 . L X T U R N T A B L E O P E N I N G A N D A S S E M B L I N G 1 . B O XES C O NTENTS Don’t forget that the LX is heavy;... -
Page 63: A Ssem B Lin G Your Lx Turntabl E
2 . A SSEM B LIN G YOUR LX TURNTABL E 1. Remove the stands and protective foams. 2. With the help of somebody : using the notches on the side of the foam, grab the entire unit and pull it out. - Page 64 3. Remove the upper protective foam. With the help of somebody, lift the loudspeaker to remove the front cover. Then, replace the loudspeaker back into its protective foam respectively. 4. Use the “LEFT” and “ RIGHT” indications to match the stands and the loudspeaker and screw the stands on the loudspeaker.
- Page 65 Flat head screws Flat head screws Rounded head screws...
- Page 66 5. With the help of somebody, flip the LX to standing position and remove the protective foam. CARt oN Bo X 2/2 6. Open the carton box 2/2 containing the turntable and the shelf. For optimal use, the Elipson arm must be preset by your self.
- Page 67 7.1 To connect the turntable to the loudspeaker : On the blotter 1. Plug the RCA cable provided. 2. Connect the turntable’s ground wire. 3. Plug the power cord provided.
- Page 68 Please make sure to place all cables, as shown 7.2 To connect the turnta- below in order to avoid any contact between ble to the loudspeaker : the loudspeaker and the turntable. The shock absorbers isolate the turntable from any un- On the source panel wanted vibrations and interferences produced 1.
- Page 69 9. The shelf is pre-assem- bled with L-shaped metal pieces. Match them with the holes provided for the screws on the stands. Use the four flat head screws provided. 1 . Arm 6 . Cartridge holder 2 . Anti-skating trackwell 7 .
- Page 70 10. Setting up the belt : / With the left hand, gently hold the belt in the slot of the pulley. / With the right hand, tension the belt from the pulley to the plate avoiding stretching. / Carefully wrap the belt around the plate avoiding folds. 11.
- Page 71 Need help to assemble your LX Turntable ? Please visit our instruction video about the LX Turntable on YouTube or through this QC code :...
-
Page 72: Q U I C K S T A R T
FILLING YOUR ROOM WITH SOUND The spatialization of the “Wide Stereo Sound 3.0®” (patented by La Boite concept) is the result of research aimed to obtain stereophonic sound renderings and homogeneous quality under all circumstances, whether the listener is alone or in a group, seated or standing, close to the speaker or further away. - Page 73 S PA TIA LIZ ATI ON OF THE SOU ND OF T H E L X T UR N -...
-
Page 74: T Urn Ing The Power O N/O Ff
2. T URN ING THE POWER O N/O FF 1. Insert the power cord into the power cable plug located under your LX (please refer to the drawing on page 61). 2 . Place the power cord into the groove on the stands provided for this purpose. 3 . -
Page 75: C Ho O Si Ng Your Sourc E
6. The LX will automatically go into standby mode if you leave your device without signal for 30 minutes. The standby LED light will turn red. To wake up the device, press the control knob or play music from either sources. 7. - Page 76 / Selecting the source corresponds to (5) the input for the Optical cable (no latency between the sound and the image). / Selecting the source corresponds to (6) the input for the USB DAC cable. / Selecting the source corresponds to (7) the headphone / earphone output.
-
Page 77: T U Rn T A Bl E Use
5 . T U RN T A BL E USE / Swap to PHONO source by switching the button on the input panel. You are now in “Turnta- ble mode” / Switch on the loudspeaker (please refer to the page 74) / Click on the RCA/Phono button on the control panel (please refer to the page 58) Refer... -
Page 78: A N Ti- Ska T Ing
5 . 1 A N TI- SKA T ING When the turntable is operating, the friction of the diamond in the vinyl furrow creates a force that pulls the tonearm towards the center of the turntable. The anti-skating compensates this attraction to reduce the distortion generated. -
Page 80: U S I N G Y O U R L X W I T H Y O U R D E V I C E S
Your LX is equipped with Wireless Bluetooth®. This technology allows you to send your music wire- lessly from your computer, tablet or smart-phone to your La Boite concept speaker. The Bluetooth® receiver allows you to listen high definition music wirelessly. To use this connection, you have to : To use this connection, you need to : 1. -
Page 81: Cha Rg Ing T Hr O U G H T He I E C P O Wer S O C K E T
On Mac On Windows 3 . CH ARGIN G THROUGH THE IEC POWER SOCKET The LX is equipped with an integrated IEC power socket located in the trap door, on the right hand. Thanks to the C14 IEC universal adaptor provided, you will be able to plug in and charge all your devices even when the LX is asleep. - Page 82 RCA ANALOGUE INPUT Use the RCA input for connecting your LX to audio sources such as your mobile phone, music player or tablet. To use this connection, you need to : 1. Connect the audio cable provided to your LX and to the audio output of your music device (source).
-
Page 84: T O C L E A N Y O U R L X
8 . W H A T T O D O ? 1 . T O CL EAN YOUR LX TURNTABLE Before cleaning the device, unplug your LX from the power socket. Clean the device only with a dry cloth. Do not use cleaning alcohol or solvents to clean the device’s surface because these could damage the painting and cause electrical failures or fire if they penetrate the device’s electronics. -
Page 85: T H E R M A L P R O T E C T I O N O F T H E P O W E
6 . THERM AL P ROTECTION OF THE POWER AMPLIFIER In case of high level extended uses, a rising temperature can alter the performance of the amplifier. Above 110 degrees, the highest level allowed for safe optimal listening conditions must be lowered until the am- plifier cools down. -
Page 86: E C H N I C A L S U M M A R Y
9 . T E C H N I C A L S U M M A R Y SOURCES Bluetooth® AptX AUX : stereo jack 3.5mm Phono input with ground RCA input Optical: optical digital audio input DAC Wolfsond 24 bits USB USB CHARGERS 2 x USB-A (permanent connection, charging up to 2,4 A) DIMENSIONS &... - Page 88 269 Chemin De Mentaberrikoborda, 64480 USTARIZ - 05 64 11 54 15 41 Rue Sedaine, 75011 PARIS - 01 43 72 53 24 info@laboiteconcept.com www.laboiteconcept.com...
Need help?
Do you have a question about the LX PLATINE and is the answer not in the manual?
Questions and answers