Table of Contents
Advertisement
Quick Links
Advertisement
Table of Contents

Subscribe to Our Youtube Channel
Related Manuals for midiplus ED9pro


Summary of Contents for midiplus ED9pro
- Page 1 MIDIPLUS Co, Ltd. http://www.midiplus.com.tw...
-
Page 2: Table Of Contents
CONTENTS Preface..............................1 What’s in the Box? ..........................1 ED9pro Overview ..........................1 Caution ..............................1 Chapter1. Setup ..........................2 1.1. Quick Start ........................2 1.1.1. Choosing Drum Sounds ..................2 1.1.2. Playing Along with a Song or MP3 ............... 2 1.1.3. - Page 3 5.1.3. Demo setting ...................... 11 5.1.4. Advanced setting ....................12 5.2. Specification ....................... 12 5.3. Drum Voice List ......................13 Chapter6. Appendix ........................16 6.1. Drum kit assembly ...................... 17 6.2. Control box assembly ....................21 MIDIPLUS Co, Ltd. http://www.midiplus.com.tw...
-
Page 4: Preface
Preface Thank you for buying a ED9pro electronic drums, MIDIPLUS company with the most simple and convenient setting operation mode to make it easier for beginners handy target, please read the instruction manual before use. What’s in the Box? One (1) e-drum control Box (Z12K) ... -
Page 5: Setup
Snare Rim shot/Cross stick 1. Press the [Kit] button. Press the [Mute] button to display the top right corner of the screen displays the CS (cross stick). 2. Then click the [Mute] button, CS disappear (rim shot). MIDIPLUS Co, Ltd. http://www.midiplus.com.tw... -
Page 6: Overview
1.2. Overview 1.2.1. Front Panel LCD Display VOLUME Edit button RECORD Data Dial Play button Decrease values Increase values Click button Mute button Snare Rim shot/Cross stick Start/Stop button Song button Kit button MIDIPLUS Co, Ltd. http://www.midiplus.com.tw... -
Page 7: Rear Panel
1.2.2. Rear Panel DB25:KICK, SNARE, TOM1~3、 CRASH, RIDE, HI-HAT, HH-CTRL. CRASH 3 CRASH TOM 4 Right sound channel output /MONO Left sound channel output USB disk HEADPHONE DC 9V POWER ON/OFF MIDIPLUS Co, Ltd. http://www.midiplus.com.tw... -
Page 8: Basic Settings
2. The basic rhythm set to restore factory default settings. Before turning to hold down [Kit], and then turn on the power switch. 3. Advanced Drum Set restores factory default setting. Before turning to hold down [Mute], then turn on the power switch. MIDIPLUS Co, Ltd. http://www.midiplus.com.tw... -
Page 9: Basic Skills
2. Turn the [value knob] or [+], [-] button to select the playback. 3. Press the Start / Stop button [ ] to play or stop demo. 4. If there is no press Stop, you can continue to single loop playback. MIDIPLUS Co, Ltd. http://www.midiplus.com.tw... -
Page 10: Play Music With Usb Disk (Usb Memory)
All Stop:After all the songs are played, stop playing. 2.3.5. Selection music mode 1. Press [EDIT] button, then press [SONG] , LCD display[MP3 EQ mode:] ,[Normal]. 2. Rotation [knob] or [+], [-] button, choose Normal, POP, Rock, Jazz, Classic. MIDIPLUS Co, Ltd. http://www.midiplus.com.tw... -
Page 11: Using The Metronome
2. Percussion Drum group began recording. 3. Press [Rec] button, lights off, it stops recording. 2.5.2. Playing 1. Press the [Play] button lights. 2. Started playing percussion drum set. 3. Press the [Play] button, lights off, it stops recording MIDIPLUS Co, Ltd. http://www.midiplus.com.tw... -
Page 12: Drum Group Editor
Curve/X-talk/Hi-hat splash/Reverb) Press [ ] button lights. Screen: Are you sure to Store advance? Press [ ] button lights out. Press [Edit] button, the lamp is off, to complete the setting. MIDIPLUS Co, Ltd. http://www.midiplus.com.tw... -
Page 13: Sensitive
4.7. Reverb on/off All drums echo control master switch. 4.8. X-talk Noise interference when the X-talk larger the value, the better to prevent crosstalk. 4.9. Surround on/off All drums surround effect switch. MIDIPLUS Co, Ltd. http://www.midiplus.com.tw... -
Page 14: Reference
Press Click Button - 1 Click Volume 0~100 Press Click Button - 2 Click Tempo 30~250 5.1.3. Demo setting Edit+ Song(Cycle selection) Display Range Press Song Button - 1 Snog Volume 0~100 Press Song Button - 2 Snog Tempo 30~250 MIDIPLUS Co, Ltd. http://www.midiplus.com.tw... -
Page 15: Advanced Setting
Song format MIDI Number USB Disk Format .MP3 .WAV Tempo 30-250 Metronome Time signatures Audio files Sampling format 44.1Khz/16bit PCM Display 16x2 LCD Other items Line out, head phone, USB, DB25, Tom4, Crash2, Crush3, Connectors USB Memory MIDIPLUS Co, Ltd. http://www.midiplus.com.tw... -
Page 16: Drum Voice List
Tom-Rock1-EQ-4-Rim Tom-Rock1-EQ-3-Rim Tom-Rock1-EQ-2-Rim Tom-Rock1-EQ-1-Rim Tom-Vintage1-4 Tom-Vintage1-3 Tom-Vintage1-2 Tom-Vintage1-1 Tom-Vintage1-4-Rim Tom-Vintage1-3-Rim Tom-Vintage1-2-Rim Tom-Vintage1-1-Rim Tom-Metal2-4-XL Tom-Metal2-3-XL Tom-Metal2-2-XL Tom-Metal2-1-XL Tom-Metal2-4-Rim Tom-Metal2-3-Rim Tom-Metal2-2-Rim Tom-Metal2-1-Rim Tom-Jungle1-4 Tom-Jungle1-3 Tom-Jungle1-2 Tom-Jungle1-1 Tom-Jungle1-4-Rim Tom-Jungle1-3-Rim Tom-Jungle1-2-Rim Tom-Jungle1-1-Rim IndieTom4 IndieTom3 IndieTom2 IndieTom1 IndieTom4_rim IndieTom3_rim IndieTom2_rim IndieTom1_rim MIDIPLUS Co, Ltd. http://www.midiplus.com.tw... - Page 17 Crash-Vintage-2-edge Crash-Vintage-3-edge FunkCrash1 01 FunkCrash1 02 FunkCrash2 01 FunkCrash2 02 IndieCrash1 01 IndieCrash1 02 IndieCrash2 01 IndieCrash2 02 JazzCrash2 Top JazzSplash 01 JazzSplash 02 RockChina PopChina PopCrash RockCrash1 Top RockCrash2 Edge RockCrash1 Edge Ride PC:105 Total=34 MIDIPLUS Co, Ltd. http://www.midiplus.com.tw...
- Page 18 Perc PC:106 Total=33 ma808 mcg808 Std54d Std56d Std58d Std60d Std61d Std62d Std63d Std64d Std65d Std66d Std67d Std68d Std69d Std70d Std71d Std72d Std73d Std74d Std75d Std76d Std77d Std78new Std79new Std80d Std81d Std82d Std83d Std84d Std85d Std86d Std87d MIDIPLUS Co, Ltd. http://www.midiplus.com.tw...
-
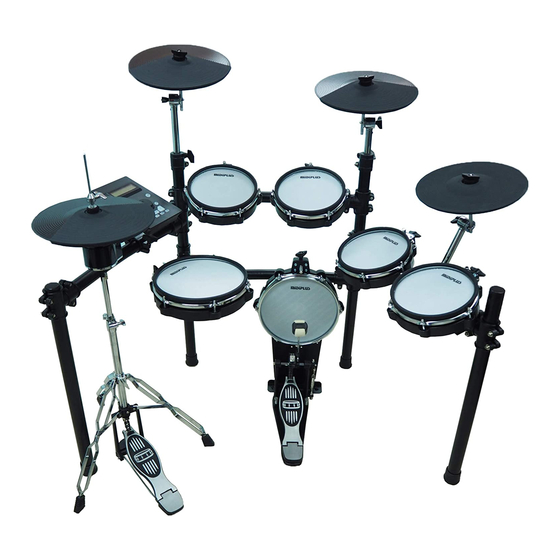
Page 19: Chapter6
Chapter6. Appendix Crash Crash 2 Z12K Tom 1 Tom 2 Ride Hi-Hat Tom 3 Snare Tom 4 Kick H.H-Ctrl MIDIPLUS Co, Ltd. http://www.midiplus.com.tw... -
Page 20: Drum Kit Assembly
6.1. Drum kit assembly kick rod x1 Cymbal mounts x4 KICK RIDE snare rod x1 MIDIPLUS Co, Ltd. http://www.midiplus.com.tw... - Page 21 1. Install Kick drum pedal and step on the hammer. 2. L-strut insert drum plate bracket deck. 3. Finally, the Cha piece strut stent insertion clips Use black nut to adjust the position. Strut toward the direction of the player. http://www.midiplus.com.tw MIDIPLUS Co, Ltd.
- Page 22 KICK bolt bolt CYMBAL/RIDE bolt bolt Adjustable SNARE http://www.midiplus.com.tw MIDIPLUS Co, Ltd.
- Page 23 H.H.-CTRL http://www.midiplus.com.tw MIDIPLUS Co, Ltd.
-
Page 24: Control Box Assembly
SSEMBLY The back of the control box has three screw holes aligned holes lever control box, screw lock Control box assembly to the bracket, lock can be fixed, then the audio cable into the corresponding socket. http://www.midiplus.com.tw MIDIPLUS Co, Ltd.
Need help?
Do you have a question about the ED9pro and is the answer not in the manual?
Questions and answers