Advertisement
Quick Links
Please make sure to read the enclosed Ninja
NUTRI NINJA
®
1. Connect Nutri
Ninja base to power.
NOTE: Lights will
NOT illuminate until
the cup is engaged
on base and the
POWER button has
been pressed.
WARNING: Handle the Pro Extractor Blades Assembly with care, as the blades are sharp.
BLENDER PITCHER
1. Connect Nutri
Ninja base to power.
NOTE: Lights will
NOT illuminate until
the cup is engaged
on base and the
POWER button has
been pressed.
BLEND & PREP BOWL
1. Connect Nutri
Ninja base to power.
NOTE: Lights will
NOT illuminate until
the cup is engaged
on base and the
POWER button has
been pressed.
WARNING: Blade Assemblies are sharp and not locked in place. Make sure lid is locked onto the bowl
before pouring. If pouring without lid, carefully remove Blade Assembly first. Failure to do so will result
in a risk of laceration. Refer to the Ninja Owner's Guide for additional information.
®
CUPS
QUESTIONS? We're here to help. Visit us at www.ninjakitchen.eu
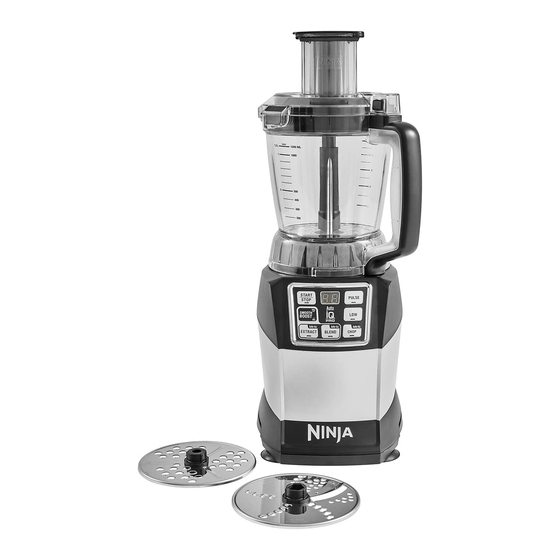
Owner's Guide prior to using your unit.
®
COMPACT BLENDER DUO
QUICK ASSEMBLY
2. Fill the cup with desired
contents and screw on
blade assembly clockwise
until you have a tight seal.
3. Turn the cup upside
down and lower it onto
the base.
2. Holding the stacked
blade assembly by the
top of the shaft, insert it
into the pitcher.
3. Fill pitcher with
desired contents, then
place on base and turn
clockwise to lock in
place.
2. Holding the desired
blade assembly by the
top of the shaft, insert it
into the bowl.
3. Fill bowl with desired
contents, then place on
base and turn clockwise
to lock in place.
BL490EU2_QSG_160909
4. Turn the cup
clockwise to lock into
place.
NOTE: Once cup is
correctly locked onto
base and power button
has been pressed,
program buttons will
illuminate and the Nutri
Ninja is ready for use.
3. Align the arrows on
the lid and handle, then
lower handle to lock in
place.
NOTE: Once pitcher is
correctly locked onto
base and POWER
button has been pressed,
program buttons will
illuminate and the Nutri
Ninja is ready for use.
3. Align the arrows on
the lid and handle, then
lower handle to lock in
place.
NOTE: Once bowl is
correctly locked onto
base and POWER
button has been pressed,
program buttons will
illuminate and the Nutri
Ninja is ready for use.
Advertisement

Related Manuals for Ninja Auto-iQ BL490EU2


Summary of Contents for Ninja Auto-iQ BL490EU2
- Page 1 If pouring without lid, carefully remove Blade Assembly first. Failure to do so will result in a risk of laceration. Refer to the Ninja Owner’s Guide for additional information. QUESTIONS? We’re here to help. Visit us at www.ninjakitchen.eu...
- Page 2 BL490EU2_QSG_160909 Please make sure to read the enclosed Ninja Owner’s Guide prior to using your unit. ® COMPACT BLENDER DUO ® QUICK ASSEMBLY Thanks to smart settings with unique variable blending patterns, you can expect smooth, consistent, professional-quality results every time—no guesswork required.
Need help?
Do you have a question about the Auto-iQ BL490EU2 and is the answer not in the manual?
Questions and answers