
Related Manuals for NRG Systems SymphoniePLUS3


Summary of Contents for NRG Systems SymphoniePLUS3
- Page 1 USER MANUAL SymphoniePLUS3 User Guide Specifications are subject to change without notice.
- Page 2 NRG USER MANUAL SymphoniePLUS3 User Guide ©NRG Systems Hinesburg VT 05461 Tel: 802-482-2255 Fax: 802-482-2272 email: sales@nrgsystems.com SymphoniePLUS3_DataLogger_Manual support@nrgsystems.com | Page 2 Rev. 17 31 December 2018...
-
Page 3: Table Of Contents
Using This Manual ............................. 10 Definitions ..............................10 SymphoniePLUS3 Set-up Overview ......................10 Theory of Operation ..........................11 Features of the SymphoniePLUS3 Logger System ..................11 PRECAUTIONS ..............................13 Notes for First Time Users ......................... 13 Grounding ..............................13 Recharging the iPack Battery ........................14 Environmental Considerations ........................ - Page 4 NRG USER MANUAL SymphoniePLUS3 User Guide GSM Cellular Account ..........................32 CDMA Cellular Account (Verizon) ......................32 LTE Cellular Accounts ..........................33 Satellite Account ............................33 Internet Service Provider (ISP) Account (all iPacks)..................33 PRE-INSTALLATION SETUP: IPACK CONFIGURATION .................... 34 Items required to configure (program) an iPack ..................
- Page 5 Mounting the iPack and Logger in a Shelter Box ..................61 Field Wiring Panel ............................72 Sensor Connection ............................. 73 SYMPHONIEPLUS3 START-UP ..........................76 Checking logger status ..........................76 Checking logger measurements (all 15 channels)..................77 Installing the SD Card ..........................77 Formatting the SD Card ..........................
- Page 6 GSM iPacks .............................. 129 CDMA iPacks ............................132 Iridium Satellite iPacks ..........................134 Internet Error Codes as Displayed by SymphoniePLUS3 Logger ............... 135 iPackGPS Event Codes..........................135 Other iPack Error Codes ........................... 139 SymphoniePLUS3 Data Retriever and iPack Programming ............... 144 SDR installation ............................
- Page 7 NRG USER MANUAL SymphoniePLUS3 User Guide Battery Notes ............................149 APPENDICES............................... 150 Opening & Closing the iPack ........................150 Technical Specifications ........................... 151 Glossary ..............................154 Warranty & Repair ..........................158 iPack Data Sheet ............................158 Site Data Sheet ............................159 EU Declaration of Conformity ........................
-
Page 8: Customer Support
SymphoniePLUS3 User Guide CUSTOMER SUPPORT NRG Systems offers a variety of support options to help you get the most from your NRG Systems product. If you have questions about your NRG Systems product, first look in the printed product documentation, the Knowledge Base, or in the Technical Forum in the Tech Support section of the NRG Systems web site. -
Page 9: Introduction
SymphoniePLUS3 data logger is part of the world’s most advanced Internet enabled data logger system. SymphoniePLUS3 stores data on an SD card. With an iPack or iPackGPS, you can send data via your Internet provider over an embedded standard, satellite, or cellular phone. You receive an email with an attached data file at a chosen interval. -
Page 10: Using This Manual
SymphoniePLUS3 Set-up Overview SymphoniePLUS3 is a very flexible system for collecting data. When used as a standalone unit, data files are retrieved manually through regular site visits. When used in conjunction with an iPack for communication, data files are delivered to users as email attachments. -
Page 11: Theory Of Operation
Ethernet based iPackACCESS is suitable for windfarm reference towers which require real time and statistical data for SCADA networks. The SymphoniePLUS3 logger has a fixed averaging interval of 10 minutes. Each of the 15 channels’ averages, standard deviations, and other statistical values are calculated from continuous 1 second data samples. - Page 12 Wiring panel provides additional electro-static damage (ESD) protection for each input channel. SymphoniePLUS3 runs on two alkaline D-cells (included) for up to one year, depending on sensor configuration. iPack kits for CDMA cellular, GSM cellular, and satellite communications provide remote data collection via e-mail.
-
Page 13: Precautions
Transferring data from the SD card to your PC Grounding Whenever coming in contact with the SymphoniePLUS3 logger, either in the field or indoors, it is good practice to first grasp a piece of grounded (earthed) metal to avoid a potentially damaging electrostatic discharge (ESD) to the logger. -
Page 14: Recharging The Ipack Battery
Understanding the assignment of site numbers is the single most important step in setting up a wind assessment system. The SymphoniePLUS3 logger system requires that you assign a unique site number to each logger site. The assigned site number must stay with the site even if the tower, sensors, and logger are dismantled and moved to another location. - Page 15 NRG USER MANUAL SymphoniePLUS3 User Guide Type of terrain (open plain, mountainous forest, etc.) Type and height of trees Type of climate A topographic map of the area In the Appendices, we’ve provided some blank site data sheets that may be helpful in organizing site information.
-
Page 16: Symphonieplus3 Logger Components
Unpacking the SymphoniePLUS3 Logger System Follow standard precautions for handling electronic components when unpacking the SymphoniePLUS3 logger. Discharge static electricity from your body by touching a piece of grounded metal or wearing a ground strap. Do not remove the brown desiccant pack from the clear plastic package at this time. During the field installation procedure, you will remove the clear wrapper and place the desiccant pack inside the logger enclosure to keep it dry. -
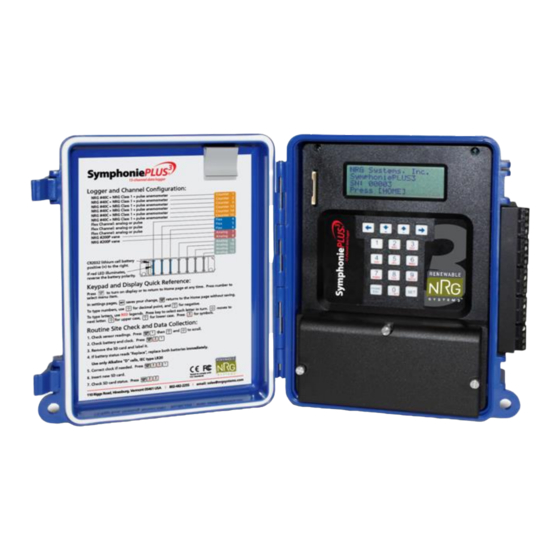
Page 17: Symphonieplus3 Logger Components Map
Here is an illustration of the logger with the cover open and the battery cover removed. Keypad Two field types are utilized when programming the SymphoniePLUS3 logger - numeric only and alphanumeric. While in a numeric only field, pushing a numbered key allows direct entry of any numeric value. - Page 18 Input connector This male DB-62 connector interfaces to the field wiring panel. Sensor wires are connected to the field wiring panel with the supplied NRG Systems screwdriver. iPack access port This port allows connection of the Programming Adapter for iPack and logger programming while the iPack or iPackGPS is connected to the logger.
- Page 19 This LED illuminates if the clock battery has been installed backwards. Reset Button The SymphoniePLUS3 has a reset button in the event that a nearby lightning strike or ESD event causes the internal electronics to lock up. It is located between the battery box and the clock battery.
-
Page 20: Channels
(counter channels) and 9-12 (analog channels) Channels The SymphoniePLUS3 Logger has 15 input channels; 6 are counters, 6 are analog, and 3 can be either. Channels 1 – 3 and 13 – 15 (Counters) Channels 1 through 3 and 13 through 15 have built-in sensor interfaces for both NRG anemometers and for other anemometers such as the P2546A WindSensor, Thies First Class, Vector, etc. -
Page 21: Symphonie Data Retriever Software
Symphonie Data Retriever Software must be installed in order to program iPacks or read data files. Download the latest version from NRG Systems’ website. 1. Go to the NRG Systems web site at http://www.nrgsystems.com, and go to the Free Software Downloads section of the Tech Support page. - Page 22 6. When the installation is complete, hit “Close.” If you are prompted to restart, do so now. 7. You are now ready to program iPacks or SymphoniePLUS3 loggers or process files. Please note that a default printer driver must be assigned before the software will run. You may use Windows Control Panel to do this.
-
Page 23: Pre-Installation Setup: Logger Configuration
Logger Direct Editor screen is accessed through SDR’s Modify iPack Settings screen. Grounding Whenever coming in contact with the SymphoniePLUS3 logger, either in the field or indoors, it is good practice to first grasp a piece of grounded (earthed) metal before touching the logger to avoid a potentially damaging electrostatic discharge (ESD) to the logger. -
Page 24: Installing D-Cell Batteries
SCM cards installed under battery cover Setting Logger Display Contrast The SymphoniePLUS3’s display contrast is pre-set at the factory but can be adjusted if necessary. Please note that changes in contrast are temporary. When the display is powered up again, the default contrast setting will appear. -
Page 25: Setting And Verifying Logger Units (Imperial Or Si)
NRG USER MANUAL SymphoniePLUS3 User Guide Setting and Verifying Logger Units (Imperial or SI) Sensor lists are used to configure each channel of the logger. There are two internally-stored factory- loaded sensor lists, one with scale factors in Imperial units and one with scale factors in SI (metric) units. - Page 26 NRG USER MANUAL SymphoniePLUS3 User Guide Use the arrow buttons to scroll through each channel to review current settings and make changes as needed. If a channel isn’t listed, it means there is no SCM currently installed for that channel and it is therefore inactive.
- Page 27 -> Units The SymphoniePLUS3 Logger may be set to use “mixed” units – that is, one can use SI units for some channels and Imperial units for others. Additionally, the units for each channel do not need to match the units that have been set for site elevation (altitude) and sensor height.
-
Page 28: Setting And Verifying Site Information, Time Zone, Clock And Data Encryption
All channel parameters that were loaded into temporary memory during editing are now finalized, and the configuration of this channel is now complete. The SymphoniePLUS3 data logger will return to the channel selection menu, and the process is repeated for the next channel. - Page 29 Do not lose the Data Encryption PIN! You must know the PIN in order to disable or change it. Keypad Security (optional) As an added security measure, SymphoniePLUS3 allows you to set a 6 digit lockout code for the logger’s keypad. When a key is pressed, the first screen displayed will be: NRG Systems, Inc.
- Page 30 000000. The security key is set to 000000 (disabled) at NRG Systems before shipment. Failure to enter the correct security code within 8 attempts will lock the SymphoniePLUS3’s keypad for approximately 2 days, and there is no way to defeat the lockout – use caution! SymphoniePLUS3_DataLogger_Manual support@nrgsystems.com | Page 30...
-
Page 31: Pre-Installation Setup: Ipack Accounts
NRG USER MANUAL SymphoniePLUS3 User Guide PRE-INSTALLATION SETUP: IPACK ACCOUNTS WindLinx Wireless Service iPacks shipped after June 1, 2010 are pre-configured for WindLinx wireless service. WindLinx streamlines the wireless account set-up process and simplifies overall management of met tower data transfer from multiple sites around the world. -
Page 32: Gsm Cellular Account
NRG USER MANUAL SymphoniePLUS3 User Guide GSM Cellular Account Before installing your GSM iPack, a GSM cellular account must be activated by a cellular service provider. Your GSM service provider will supply you with a SIM card that contains the GSM cellular account programming information. -
Page 33: Lte Cellular Accounts
Multiple loggers can share one POP3 account between them, but this account should not be used for anything other than SymphoniePLUS3. If you do not already have a POP3 account for your loggers, you can obtain one from an email provider. -
Page 34: Pre-Installation Setup: Ipack Configuration
Accessories section of this manual. You must follow the instructions to install the software before proceeding. iPack programming cable (available from NRG Systems) USB to serial converter with driver (if your computer does not have a 9-pin serial port) ... -
Page 35: Establishing Communication Between The Computer And Ipack
NRG USER MANUAL SymphoniePLUS3 User Guide Establishing communication between the computer and iPack From the main SDR Window, select Site>Modify iPack Settings. Check the lower left hand corner of the Modify iPack Settings window for a message. If you receive no message or “iPack Communication Failed,” it is likely that the COMM port on your computer is not configured properly. -
Page 36: Phone Programming & Initialization Overview - Set Up Phone
NRG USER MANUAL SymphoniePLUS3 User Guide If the port is properly configured, you should see the message “Verifying iPack Connection” and then “iPack detected” at the bottom of the window. iPackGPS users will see a tab labeled “iPackGPS/ACC” displayed. The “iPackGPS/ACC” tab (shown in many of the following screen shots) will not be visible if an older iPack is detected. -
Page 37: Phone Programming - Gsm Cellular
NRG USER MANUAL SymphoniePLUS3 User Guide Note that you may select Options>Set up Phone, and then use the Get button to retrieve the IMEI Number or ESN Number from the iPack’s phone modem. The appropriate type of phone (GSM, CDMA, Satellite, etc.) button should already be selected. - Page 38 NRG USER MANUAL SymphoniePLUS3 User Guide The iPack enclosure consists of two halves secured together by four recessed screws, two from each side of the enclosure. A gasket in between the two halves and 8 o-rings provide an environmental seal for the iPack and protect the internal electronics from the elements.
- Page 39 NRG USER MANUAL SymphoniePLUS3 User Guide Once the iPack cover is off, find the GSM transceiver. Install the SIM in the GSM Data Modem by gently sliding it in. Older GSM Data Modems will have an outline of the correct SIM orientation.
-
Page 40: Phone Programming - Satellite
NRG USER MANUAL SymphoniePLUS3 User Guide Closing the iPack Insert the (4) 2-½ inch mounting screws up through the half of the enclosure that contains the iPack electronics. Set the gasket into the groove of the shell. Slide the cover (the half with the battery) over screws being careful not to pinch the battery cable. -
Page 41: Phone Programming - Cdma (Verizon)
NRG USER MANUAL SymphoniePLUS3 User Guide There are no phone parameters to program. Clicking “Get” will provide the satellite phone’s IMEI number. Phone Programming – CDMA (Verizon) The CDMA phone in the iPack will be active once confirmation is received from Verizon. Clicking “Get”... - Page 42 “extended coverage area.” A manual initialization process may sometimes resolve the issue (contact NRG Systems for assistance). CDMA iPacks with WindLinx are pre-initialized at the factory and therefore do not require this step.
-
Page 43: Ipack Programming Overview (All Ipack Types)
NRG USER MANUAL SymphoniePLUS3 User Guide iPack Programming Overview (All iPack types) You are now ready to enter all of your iPack programming settings. WindLinx subscribers will be provided this information through the WindLinx web portal. For non-WindLinx iPacks, the process for programming ISP information is the same for every type of iPack. - Page 44 NRG USER MANUAL SymphoniePLUS3 User Guide For iPacks with firmware version 60 or earlier, the maximum number of characters for all fields is 22. To select all the checkboxes, select Options>Check All. All the checkboxes will be checked, and you may now edit each setting. General information regarding each setting is provided below.
- Page 45 NRG USER MANUAL SymphoniePLUS3 User Guide iPack ISP Configuration – Table of Internet Settings Check that there are no leading or trailing spaces in your entry. iPack Type Primary ISP User Name User Phone Number Numbers Password *99***1# 0.0.0.0 [blank]...
- Page 46 Enter the numbers with no spaces. Be sure to enter the decimal points between numbers. Authentication Method SymphoniePLUS3 supports both PAP and CHAP authentication methods. Select the authentication method provided by your ISP. User Name This is the account level user name your phone service provider gives you or you select when you sign up for an account.
-
Page 47: Ipack Settings - Email Configuration
we01.vzwstatic (West) GSM iPackGPS users who are not using Windlinx will need to set the APN to whatever the provider gives you. Please contact your service provider before NRG Systems. ˃ The format may be something like “apn.provider.com.” Save the settings to your iPack and move to the mail settings of the .ipk file. - Page 48 NRG USER MANUAL SymphoniePLUS3 User Guide Non-WindLinx users will enter an SMTP Server name that looks something like: smtp.myisp.com or smtpauth.myisp.net The SMTP port can be configured on the “iPackGPS/ACC tab”. My SMTP Server requires authentication Some SMTP servers require a login and password before allowing you to send mail.
-
Page 49: Ipack Settings - Mail Recipients
As part of the iPack’s calling routine, the current time (in UTC) is retrieved from a time server and is used to update or resynchronize the clock of the SymphoniePLUS3. The user must enter a local time server for the iPack to use. - Page 50 For iPacks with firmware version 60 or earlier, the maximum number of characters for each field is 22. Recipient’s E-Mail Address This is the primary e-mail address where the SymphoniePLUS3’s iPack is going to send the data. It should look something like: jsmith@mycompany.com...
- Page 51 NRG USER MANUAL SymphoniePLUS3 User Guide CC E-Mail Address 2 This is also an additional e-mail address where your iPack is going to send the data. Sender’s E-Mail Address This is the e-mail address that will appear in the “from” of the emails being sent to the recipient’s email address from the iPack.
-
Page 52: Call Schedule Programming - Call Schedule Tab
NRG USER MANUAL SymphoniePLUS3 User Guide Call Schedule Programming – Call Schedule Tab Next Call Time and Call Interval These entries give the iPack a first time to call and how often to call thereafter. The Next Call Time entry can actually be in the past, but the logger will initiate its call schedule calculations using this entry as a starting time. -
Page 53: Setting Ipack Preferences - Ipackgps/Acc Tab (Ipackgps Only)
NRG USER MANUAL SymphoniePLUS3 User Guide iPack GPS users can enter a 10-minute call interval; more frequent call intervals are not supported. Due to increased phone power requirements and potential problems with overlapping phone calls, use caution when choosing to program multiple calls per day. -
Page 54: Saving The Ipack Displayed Setup To The Connected Ipack
NRG USER MANUAL SymphoniePLUS3 User Guide Actions (firmware updates, extract events, etc.) iPack battery voltage and voltages from various locations on the iPack’s circuit board are displayed here when the Get Voltages button is clicked. iPackGPS firmware version can be updated via SDR and the iPack programming cable using the Firmware Upload button. -
Page 55: Saving A Copy Of The Ipack File (.Ipk) To Your Computer
NRG USER MANUAL SymphoniePLUS3 User Guide Saving a copy of the iPack File (.ipk) to your computer Save a copy of the iPack settings by selecting File>Load from iPack. This will load the current iPack configuration to your computer screen. Then choose File>Save iPack File. This will save a copy of the iPack configuration (*.ipk file) to your computer. -
Page 56: Office Testing
OFFICE TESTING Why It’s Important Office testing your SymphoniePLUS3 system prior to installation in the field will save you time and money. Internet access capabilities rely on perfect coordination between iPack, cellular phone, and ISP settings – if these are not set up correctly, the system will not work. Troubleshooting is much easier in the comfort of an office than in the field, where a variety of factors can cause problems. -
Page 57: Pre-Installation Testing
9) Verify iPack communications by performing a Call Now. 10) Verify that the *.rwd files are successfully received by the intended recipient(s). For detailed instructions on performing these tests, refer to the chapter on SymphoniePLUS3 Start-Up. SymphoniePLUS3_DataLogger_Manual support@nrgsystems.com | Page 57 Rev. -
Page 58: Recharging The Ipack Battery
500 mA). A completely discharged battery can be recharged in about 6 hours with such an adapter. An iPack charger is available from NRG Systems (item #3615). After completing tests, you may want to pre-assemble the logger and iPack in the logger’s shelter box. -
Page 59: Field Installation
Tin snips (optional; cuts excess hose clamp ends) Site Grounding Recommendations For many sites, the NRG Systems Grounding Kit provides all the needed parts to earth ground your TallTower and instrumentation. The Grounding Kit includes a copper-clad lightning spike, copper ground wire, and two copper-clad ground rods. - Page 60 NRG USER MANUAL SymphoniePLUS3 User Guide The NRG Grounding Kit will perform adequately in type 1 and 2 soils. For other soil types, or for sites with a high incidence of lightning, you will need to augment the earth grounding system.
-
Page 61: Mounting The Ipack And Logger In A Shelter Box
If your shelter box has keyhole slots, insert the mounting bolts through the iPack and logger assembly and screw them in until they are about 1 cm away from the back of the iPack. The SymphoniePLUS3 and iPack can be hung in the shelter box by inserting the mounting screws in the keyhole slots. The mounting screws can then be tightened from the back of the shelter box. - Page 62 NRG USER MANUAL SymphoniePLUS3 User Guide SymphoniePLUS3_DataLogger_Manual support@nrgsystems.com | Page 62 Rev. 17 31 December 2018...
- Page 63 3. Install the PV panel (iPack users only) Inside the PV panel carton you will find a PV panel and four screws. Remove the five plastic plugs from the SymphoniePLUS3 shelter box door. SymphoniePLUS3_DataLogger_Manual support@nrgsystems.com | Page 63 Rev.
- Page 64 Fiberglass-Reinforced Polymer (FRP) Shelter Box NRG sells FRP boxes in two sizes. In most cases, the SymphoniePLUS3 logger best fits into the smaller box. 1. Connect Logger and iPack Remove the protective water resistant sticker from the back of the logger to expose the plug.
- Page 65 NRG USER MANUAL SymphoniePLUS3 User Guide 3. Prep the Shelter Box The shelter box is shipped with mounting screws that hold the hanging bracket and wiring panel. Also included are some adhesive metal disks (to stick on the outside of the shelter box for magnetic antenna mounting) and some black plastic grommets for the open wire holes in the bottom.
- Page 66 It is recommended that you do not install the SymphoniePLUS3 and iPack in the shelter box until the very end of the installation process (after the tower is raised and secured).
- Page 67 NRG USER MANUAL SymphoniePLUS3 User Guide Thread the band clamps through the outer slots of the brackets on the back of the shelter box. Wrap the band clamps around the tower and secure with a 5/16” hex nut driver. A drill with a driver attachment will speed up the band clamp tightening process.
- Page 68 NRG USER MANUAL SymphoniePLUS3 User Guide 7. PV Panel Mounting The 15 Watt PV panel and mounting bracket (NRG part #9112 for tubular towers; NRG part #9111 for lattice towers) should be mounted on the tower to face the prevailing sun direction, depending on location.
- Page 69 NRG USER MANUAL SymphoniePLUS3 User Guide Put the angle bracket against the tower with the longer edge on top, thread the hose clamps through the outer slots of the angle bracket as shown below, and tighten securely. Use inner slots for lattice tower.
- Page 70 NRG USER MANUAL SymphoniePLUS3 User Guide When installing the PV panel, select a location that will minimize shading. Even the shade from a cable can greatly reduce the output of a PV panel. Coil and secure extra cables with electrical tape to prevent them from flapping in the wind.
- Page 71 NRG USER MANUAL SymphoniePLUS3 User Guide Connecting the PV Panel and/or External Battery Wires The iPack has an extra set of terminals that allow for connection of an external 12 V DC power source such as a battery in addition to the PV panel. Basic rules and explanations of those connections are outlined in the table below and on the iPack itself.
-
Page 72: Field Wiring Panel
If you haven’t done so already, connect the logger ground wire to earth ground. Please note that the SymphoniePLUS3, SymphoniePLUS, and Symphonie wiring panels are NOT interchangeable. Connect the logger ground wire to the earth ground rod before connecting any sensors! Installing the Wiring Panel 1. -
Page 73: Sensor Connection
NRG USER MANUAL SymphoniePLUS3 User Guide Note that the field wiring panel mounts over the grounding stud and can be removed from the logger without having to disconnect the sensor wires. This is particularly useful in the event a logger needs to be swapped out for service. - Page 74 NRG USER MANUAL SymphoniePLUS3 User Guide NOTE: Connecting sensors to the back terminals first may be easier in terms of installation. Sequence: (9-12, 7-8, 15, 4-6, 1-3, 13-14). Connect sensor wires to the field wiring panel according to the Sensor Connections diagram...
- Page 75 NRG USER MANUAL SymphoniePLUS3 User Guide Antenna Connection After connecting sensors to the field wiring panel, connect the iPack antenna and GPS antenna (for iPackGPS). Mount the GPS antenna to the top of the shelter box (outside). Satellite iPacks S/N: 35333300 and above have an SMA type antenna connector; older satellite iPacks have a TNC type antenna connector, so if you need to replace the older antenna or iPack, you will need an adapter.
-
Page 76: Symphonieplus3 Start-Up
Pressing any key will activate the logger display. NRG Systems, Inc. SymphoniePLUS3 SN: 00000 Press [HOME] Pressing the [Home] key at any time will always bring you back to the home menu of SymphoniePLUS3. Measurements Status Utilities Settings Check the logger functions in the order presented in this section. -
Page 77: Checking Logger Measurements (All 15 Channels)
NRG USER MANUAL SymphoniePLUS3 User Guide Checking logger measurements (all 15 channels) Press [Home][1], then scroll using [Down] to see each sensor’s current readings. Readings that vary widely with expected norms may indicate a sensor malfunction, incorrect channel configuration, or incorrect wiring. If a channel number displays no information, it means there is no SCM currently installed for that channel and it is therefore inactive. -
Page 78: Checking Sd Status (Logging, Files Stored, Days Left)
Memory card status displays the number of files stored on the SD card, as well as the number of days remaining until the card is full. The SymphoniePLUS3 data logger emits a beep when it writes to the SD card. The process of writing to the card takes about two seconds, so should the unit beep just as the card is about to be changed, wait until five seconds have passed before pulling the card. -
Page 79: Checking Ipack Status (If Present)
3. GPS Status 4. iPack Event Log * If an iPack is attached to the SymphoniePLUS3, the status screen will display the above menu. If an iPackGPS is not connected, then “No iPack present” will be displayed. The + symbol will alternate with the * symbol during an antenna test to indicate the iPackGPS is on. -
Page 80: Verifying Signal Strength And Connection Status
NRG USER MANUAL SymphoniePLUS3 User Guide Verifying Signal Strength and Connection Status The connection quality and signal strength can be checked while on site using the PLUS3 logger. To check signal and connection status, press [Home][3][4]. Wait for the menu to change while the iPack powers up. - Page 81 NRG USER MANUAL SymphoniePLUS3 User Guide GSM iPacks (s/n 38607905 and earlier): RSSI (RECEIVED SIGNAL STRENGTH Status INDICATOR): 24 to 31 (75% to 100%) Good (31 is best). 9 to 23 (30% to 75%) On the edge. It may miss calls, especially on foul weather days.
- Page 82 The antenna should be mounted so that it is away from structures by a distance of at least 0.5 meters. The NRG Systems mounting boom meets this requirement. The satellites fly in a South-to-North orbit; the antenna must be mounted such that no obstructions occur in this plane.
- Page 83 NRG USER MANUAL SymphoniePLUS3 User Guide CDMA iPack: The CDMA iPack antenna test will provide results ranging from 0 to 100%. A result of 100% indicates optimal signal strength, and a result of 50% indicates fair signal strength. Powering up phone is displayed briefly, followed by Contacting Carrier, and then a screen similar to this...
-
Page 84: Verifying Ipack Data Transfer To Isp (Call Now)
NRG USER MANUAL SymphoniePLUS3 User Guide Verifying iPack data transfer to ISP (Call Now) Once you have verified that the logger is functioning and that the iPack is present by pressing [Home][2][3], you should use the Call Now option to verify communications with your ISP. During a call, the Call Now and Antenna Test features are unavailable, but all other logger programming functions are available. - Page 85 NRG USER MANUAL SymphoniePLUS3 User Guide This message is displayed while the phone is powered, dials the ISP, and the iPack logs onto the Internet. The message could be displayed up to 3 minutes. If the logger can’t log on to the Internet within 3 minutes, a retry will occur automatically in 10 minutes.
-
Page 86: Ipackgps Status Checks
When entering *22899; in the Manual Dial screen, use the up arrow to enter a *, use the right arrow key to enter a semicolon, and then press the “SET” button on the logger’s keypad. If you are unsure about how to use this feature, please contact NRG Systems Technical Support for assistance. SymphoniePLUS3_DataLogger_Manual support@nrgsystems.com | Page 86... -
Page 87: Connecting To The Ipack Through The Logger
Most laptops and tablets no longer have DB9 serial ports, so an adapter cable must be used. In order to use these cables, you must first install the proper driver for your cable. Consult the manufacturer of the cable for the proper driver BEFORE contacting NRG Systems. SymphoniePLUS3_DataLogger_Manual support@nrgsystems.com | Page 87... -
Page 88: Before Leaving The Site
NRG USER MANUAL SymphoniePLUS3 User Guide Before Leaving the Site 1. Check sensor readings to assess sensor condition. Readings that vary widely with expected norms may indicate a faulty connection. Press [Home][1], then [Up] or [Down] to scroll through the sensors. -
Page 89: Site Visits
8. If any condensation is noticed inside the enclosure, replace the desiccant pack with a fresh one from a sealed package. Cleaning If it should become necessary to clean the SymphoniePLUS3 data logger, use a cloth slightly dampened with water and wipe clean. Do not use solvents. Never submerge the unit. SymphoniePLUS3_DataLogger_Manual support@nrgsystems.com | Page 89... -
Page 90: Symphonie Data Retriever Software: Data Processing
(.rwd) as well as the SDR site database (.nsd). A simple backup method is to copy your entire NRG Systems directory to an external drive after every successful data processing session. Always consult with your IT professional if unsure how to copy or back up files. -
Page 91: Opening The Sdr Software
From time to time it is necessary to check which version of SDR is installed on your computer so you may check for an update or submit a technical support inquiry. Go to the Help>About menu to check the version number. Be sure to check the NRG Systems’ website for updates! Viewing Data Header... - Page 92 NRG USER MANUAL SymphoniePLUS3 User Guide Press the “Load Header” button to view the header information. You can then navigate to your data files if they are stored in a folder elsewhere on your computer. Select a file and press “Open.” If files are not *.rwd, choose the correct type of file from the “Files of type”...
- Page 93 NRG USER MANUAL SymphoniePLUS3 User Guide To view the file header without creating the site, choose No. You should see the following window with the file header information: iPackGPS users can click on the iPack link shown above to access more detailed iPackGPS information...
-
Page 94: Reading Data In The Data Viewer
NRG USER MANUAL SymphoniePLUS3 User Guide Reading Data in the Data Viewer With the data file open, you may now “Read” the data in the graphical data viewer. Scaling from Logger settings If you wish to use the settings that are included in the data file (the settings that were programmed into the logger), select “Scale using settings from: Logger.”... -
Page 95: Saving Data From The Data Viewer To A Txt File
NRG USER MANUAL SymphoniePLUS3 User Guide Choosing parameters from selected logger channel to view in graph Once you have selected channels to view in the graph, you may change the parameter you are viewing for the channel by selecting from the View menu. For example, to view the standard deviation instead of 10 minute averages, select View>Standard Deviation. -
Page 96: Closing The Data Viewer
NRG USER MANUAL SymphoniePLUS3 User Guide Closing the Data Viewer Select File>Close from the Interpreted Data Window to close the Data Viewer. The SDR Main menu will appear once the Data Viewer has been closed. Batch Processing data files (Converting a group of raw data files to .txt files and... -
Page 97: Options
NRG USER MANUAL SymphoniePLUS3 User Guide Options Disabling Descriptive Headers from Output Files Certain data processing tasks require that the header information is not included in each saved ASCII (.txt) file. Go to File>Options and check the “skip descriptive headers” box if descriptive headers are unwanted in the file output. - Page 98 NRG USER MANUAL SymphoniePLUS3 User Guide Setting the working directory for Reports (.wmf file format) Go to the File>Options menu to change this working directory. This is the directory that SDR will point to for saving reports. Each time you run reports in SDR, they will be saved to this directory. The .wmf report files easily import into MicroSoft office documents and can be easily exchanged through email.
-
Page 99: Sdr Event Log
SymphoniePLUS3 User Guide SDR Event Log The SymphoniePLUS3 logger stores internal events into a log viewable from the logger display. The event log is transferred into the Data File header whenever a new file is created for any reason. The SDR software imports these events into the SDR “Event Log”... -
Page 100: Sdr Troubleshooting Wizard
NRG USER MANUAL SymphoniePLUS3 User Guide The screen below shows events generated by a failed call: A comprehensive list of Symphonie logger events and iPackGPS events and their definitions can be found in the Troubleshooting section of this manual. SDR Troubleshooting Wizard The troubleshooting wizard can assist in solving problems with data files in the unlikely event data corruption has occurred. - Page 101 SymphoniePLUS3 User Guide Fixing Timestamps Selecting this wizard makes it possible to fix timestamps (see Time Offset History Window). More details on fixing timestamp issues can be found in the NRG Systems Technical Support Forum at www.nrgsystems.com. Sensor Connections Selecting this wizard makes it possible to see if sensors are disconnected or have no SCM installed.
-
Page 102: Sdr Database And Reporting Functions
SDR includes a self-contained Microsoft Access compatible database to store imported SymphoniePLUS3 data. SymphoniePLUS3 raw files (.rwd) and ASCII files (.txt) can be imported, and all data are stored, after scale factors from the site information settings have been applied for each sensor. This section will provide an overview of the most useful features of the database. -
Page 103: Importing Data From The Database Main Window
You should see the Main Database window with the information from the selected site database you have opened. Importing raw (.rwd) files To import raw SymphoniePLUS3 data files (.rwd), click on “Import RWD Files.” A Windows “File Open” box should appear pointing to the raw files directory you have previously configured under the File>Options menu. - Page 104 NRG USER MANUAL SymphoniePLUS3 User Guide The “Batch Processing” window should appear. Uncheck the “Do not output text files” box only if you want daily text files to be placed into the “scaled data” folder. Most users prefer to use SDR’s export function rather than scaling individual daily text files.
- Page 105 Symphonie Data Retriever Software provides an ASCII import feature for use in the unfortunate event that the original raw files have been lost. To import SymphoniePLUS3 scaled ASCII data files (.txt), click on “Import .TXT Files.” A Windows “File Open” box should appear pointing to the scaled files directory you have previously configured under the File>Options menu.
-
Page 106: Exporting Data As 10 Minute, 60 Minute Or Wasp
NRG USER MANUAL SymphoniePLUS3 User Guide Exporting Data as 10 minute, 60 minute or WAsP SDR’s export feature allows you to export data for a particular month or date range for use with a spreadsheet or other software program that accepts .txt format. Click “Export.” The “Select Span for Report”... -
Page 107: Data Filtering
NRG USER MANUAL SymphoniePLUS3 User Guide Tab-delimited 10 minute data (.txt) Tab-delimited 60 minute data (.txt) WAsP data Remember that the exported data has been scaled according to the site information stored in the transferable user defined site file (.nsd). - Page 108 NRG USER MANUAL SymphoniePLUS3 User Guide This brings up the “Saved Data Filters” Window. Click “Create New” which brings up the “Create New Filter” window. Here you can assign your filter a name and choose the logical definition for your filter based on the data of up to 3 different channels.
- Page 109 NRG USER MANUAL SymphoniePLUS3 User Guide Note: Data marked by a filter are not deleted from the database. However, SDR will know to not include those records in report calculations. When exporting, you will have the option to export the data with or without applying filters.
- Page 110 NRG USER MANUAL SymphoniePLUS3 User Guide Blanket Filtering / Unmarking all data in database From the “Saved Data Filters” window, click on “Blanket Filter.” You should see the “Data Filtering” window. This window allows you to filter based on time range and channel and is handy when you may want to remove all marked data from the database.
-
Page 111: Creating (Configuring) Reports
NRG USER MANUAL SymphoniePLUS3 User Guide Select the desired data range and make your flag selection from the “All Channels” drop down box. You should see the 12 channel flags change when doing this. Click “OK.” Filtering any channel individually Select a date range and adjust the flags for each channel. - Page 112 NRG USER MANUAL SymphoniePLUS3 User Guide Selecting the report type Select the desired report from the “Report Type” pull down menu Report types include the following: Wind Rose Frequency Distribution Hourly Averages Table Hourly Averages Graph ...
-
Page 113: Generating (Running) Reports
NRG USER MANUAL SymphoniePLUS3 User Guide Generating (Running) Reports Each time you run reports in SDR, they will be saved to the “Reports” directory previously configured under the File>Options menu of SDR. The .wmf report files can be imported into MicroSoft Office documents and can be easily exchanged through email. - Page 114 NRG USER MANUAL SymphoniePLUS3 User Guide Running and printing the selected reports Once you have selected all the reports you wish to run in the Main database window, click on “Run Checked.” You should see the “Select Span for Report” window. Select the desired month or date range, check the “preview before printing”...
-
Page 115: Sdr: Site Information & Site History
NRG USER MANUAL SymphoniePLUS3 User Guide SDR: SITE INFORMATION & SITE HISTORY Creating a New Site The Site File A site file contains all the information necessary to successfully process raw data files from each individual site. The site file also contains all the scaled data that has been imported into the SDR database. - Page 116 NRG USER MANUAL SymphoniePLUS3 User Guide Creating a Site File From Data File (Recommended) The recommended way to create a new site file is to load the header for a data file from a new site. At that point, a warning message will appear on your screen informing you that “No local site corresponds to the one referenced in this data file! Create a new site with the data file parameters?”...
- Page 117 NRG USER MANUAL SymphoniePLUS3 User Guide Creating a Site File Manually To manually create a site, select Site>New Site from the SDR main window. This will bring you into the Site Information Editor Window. The site fields will appear empty. At this point, you will be able to populate all the fields and then save the site file.
-
Page 118: Site Information Editor - Site Information Parameters
NRG USER MANUAL SymphoniePLUS3 User Guide Site Information Editor - Site Information Parameters These parameters are found on the left side of the Site Information Editor window. Site # The site number is reported as a four-digit number. Site Desc (Site Description) A site description of up to 80 characters can be entered here. -
Page 119: Site Information Editor - Baseline Sensor Information Parameters
(scale factors) in both SI and Imperial units, allowing the user to specify which units are used for individual channels. Description Enter up to a 20-character sensor description. For NRG Systems sensors, this is the same as the sensor model. Details Enter up to 80 characters in this field for reporting any sensor details. -
Page 120: Site History Entries
NRG USER MANUAL SymphoniePLUS3 User Guide Print Precision The Print Precision field has a pull down menu that reports how many decimals and leading zeros the scaled data will have. Units (Imperial or SI) This five-character field reports appropriate SI or Imperial units for the sensor selected. Note that you may choose SI units for some sensors and Imperial units for others (wind speeds in m/s but barometric pressure in inches of Hg, for example). - Page 121 NRG USER MANUAL SymphoniePLUS3 User Guide Site History Concepts There are several important concepts to understand regarding the history editor. First, whatever row in the history table is selected will be affected by whatever changes are made in the “Sensor Information”...
- Page 122 NRG USER MANUAL SymphoniePLUS3 User Guide If you are making a change in your database, you will typically need to re-import any files from the time period after the change occurred. For example, if your field crew installed a new sensor in August, and it’s now October, and you have just made a history entry that shows the new sensor, you will need to re-...
-
Page 123: Data Retriever Software: Changing Ipack And Sensor Settings From Aremote Location By Creating A Patch File
NRG USER MANUAL SymphoniePLUS3 User Guide DATA RETRIEVER SOFTWARE: CHANGING IPACK AND SENSOR SETTINGS FROM A REMOTE LOCATION BY CREATING A PATCH FILE Cautions Extreme care must be taken when patching ISP parameters. If you make a mistake (specifying the wrong ISP phone number, for example), you risk cutting communication with the logger, and a site visit will be required. - Page 124 NRG USER MANUAL SymphoniePLUS3 User Guide Then enter your patch password, click “Save Patch,” and then “Save” in the Windows dialog box. The Patch Viewer will then show the entry for each field as it will be patched to the logger. Check the changes you made to be sure they are correct.
- Page 125 NRG USER MANUAL SymphoniePLUS3 User Guide The file name will be used as the subject line of the outgoing email to which the Patch File will be attached. Open your email program, and address an email message to the iPack (usually addressed to the email address in the Mailbox Name field of the *.ipk file).
- Page 126 NRG USER MANUAL SymphoniePLUS3 User Guide Configuration Patch From the SDR Main Window, select Site>Modify iPack Settings. This will bring up the Modify iPack Settings window. From here, select File>Open iPack File. Browse and select the iPack file you wish to modify.
-
Page 127: Saving The Patch File
NRG USER MANUAL SymphoniePLUS3 User Guide Saving the Patch File Select File>Save To Patch File. This will bring up the Select A Site window. With your mouse, select the site you wish to patch, and then click OK. This will bring up the Save As dialog box. SDR will generate an appropriate file name under which this patch file will be saved. - Page 128 NRG USER MANUAL SymphoniePLUS3 User Guide Internet server by the iPack. If the email is not deleted from the Internet server, the patch was unsuccessful and must be tried again after identifying the problem. Once the logger has received a new patch, if it is unable to download data or connect with a POP3 server within 12 attempts (within 2 scheduled calls), the iPack will revert to the previous configuration.
-
Page 129: Troubleshooting Guide
NRG USER MANUAL SymphoniePLUS3 User Guide TROUBLESHOOTING GUIDE Be sure to visit the support section of the NRG Systems website at for the most up to date troubleshooting information. Communication Problems Although the SymphoniePLUS3 system was designed to be as robust and simple as possible, it relies on phone service and the Internet to perform its functions. - Page 130 Remember that ISP usernames may change unexpectedly. If you are having a particularly difficult time, you may send the .ipk file to NRG Systems as an email attachment. We may be able to check (but not necessarily test) the settings for you.
- Page 131 NRG USER MANUAL SymphoniePLUS3 User Guide Is the SIM active? Have you tried the SIM in another phone? Has the SIM been properly activated for data transfer, and has the SIM been installed into the iPack? Be sure that the SIM card is activated for transparent data mode.
-
Page 132: Cdma Ipacks
Most CDMA users will use #777 as the Primary ISP Phone Number. NRG Systems has already seen situations where the provider unexpectedly changed the dialing requirements for a given area as well as a provider accidentally shutting off a customer's account ESN. - Page 133 Remember that ISP usernames may change unexpectedly. If you are having a particularly difficult time, you may send the .ipk file to NRG Systems as an email attachment. We may be able to check (but not necessarily test) the settings for you.
-
Page 134: Iridium Satellite Ipacks
NRG USER MANUAL SymphoniePLUS3 User Guide Iridium Satellite iPacks Phone Service Instructions are included with each Satellite iPack to turn on the phone service. This includes a registration form that needs to be filled out and faxed to the provider. -
Page 135: Internet Error Codes As Displayed By Symphonieplus3 Logger
If you receive an error code not listed below, please contact NRG Systems for assistance. iPackGPS Event Codes... - Page 136 2151 iPack is unable to connect to the POP3 server. Could be invalid POP3 name or mail server is down. SYNC_FAILED_ERR 10047 Modem failure. Contact NRG Systems for assistance. UNKNOWN_MODEM_ERR 10048 Modem failure. Contact NRG Systems for assistance. UNKNOWN_RSSI_ERR 10049 No antenna connected or damaged antenna or antenna cable.
- Page 137 Indicates an attempt to access a register group that is out of range. ACCEPT_SOCKET_ERR 2405 MODBUS socket connection error. INDEX_RANGE_ERR 2406 Contact NRG Systems for assistance. CLIENT_LIST_FULL_ERR 2407 Client list already has 4 (maximum) active MODBUS connections. INVALID_CLIENT_ERR 2408 Client attempting to connect is not in secure IP list.
- Page 138 NRG USER MANUAL SymphoniePLUS3 User Guide DIAL_FAILED_ERR 25102 Modem can’t connect to network. Satellite down and therefore unavailable; incorrect ISP phone number programmed into iPack; inadequate antenna signal strength. PATCH_NOT_APPL_ERR 25103 Data in patch file could not be validated and therefore patch was not applied.
-
Page 139: Other Ipack Error Codes
Possible cause(s): Bad iPack phone; cellular account is improperly configured and confusing the modem. Possible solution: Disassemble the iPack and remove the iPack battery for several minutes to re-boot; contact NRG Systems for return authorization number and return iPack for repair. Problem: Internet errors 41 – 52: Error messages 41 through 52 indicate an incorrect format was entered in an iPack programming field in SDR. - Page 140 Possible cause(s): The ISP has limited the size of email messages to less than 20 KB. Possible solution: Contact ISP for assistance. Problem: Internet error 61: Internal memory failure Contact NRG Systems for assistance. SymphoniePLUS3_DataLogger_Manual support@nrgsystems.com | Page 140 Rev. 17...
- Page 141 The phone dials but at that point, an operator voice message or special series of tones comes on the line from the service provider with instructions. Possible solution: Confirm that ESN is active; contact NRG Systems for assistance. Problem: Internet error 71: No dial tone response.
- Page 142 When performing an antenna test, if your iPack accesses the other system, your site is likely in an “extended coverage area.” A manual initialization process may sometimes resolve the issue (contact NRG Systems for assistance). Problem: Internet error 73: Dial failed Similar to Internet error 71;...
- Page 143 NRG USER MANUAL SymphoniePLUS3 User Guide Problem: Internet error 77: POP3 server timed out. Possible cause: POP3 server is down. Possible solution: Try again later; contact your ISP. Problem: Internet error 78: Access denied to POP3 server. Possible cause(s): Password is wrong; mailbox name is wrong or needs to be changed to include ISP name.
-
Page 144: Symphonieplus3 Data Retriever And Ipack Programming
Dead iPack battery. Check the battery voltage history in the data files (when an iPack voltmeter SCM is installed in the SymphoniePLUS3 logger) and test the battery voltage under load. If there are any questions about the effectiveness of the battery, replace it. - Page 145 NRG USER MANUAL SymphoniePLUS3 User Guide 3. Reconnect the DB25 cable to the iPack. 4. Reopen the ''Modify iPack'' window. You should now be connected to the iPack and be able to load a file from the iPack. Note: When the ''Modify iPack Settings'' window is opened, a request is made by SDR to open the configured COM port.
-
Page 146: Sdr Installation
SD was formatted after it was read, and files are present but hidden. SD card was used in a device other than a SymphoniePLUS3 logger and contains other files besides .RWD files, such as images or documents. -
Page 147: Data / Sd
Logger Error Log / SDR Event Log The SymphoniePLUS3 logger stores internal events into a log viewable from the logger display. The event log is transferred into the Data File header whenever a new file is created for any reason. The SDR software imports these events into the SDR “Event Log”... - Page 148 NRG USER MANUAL SymphoniePLUS3 User Guide This event is recorded when the keys of the logger’s keypad are pressed (for updating the logger clock, for example). Note: In loggers with firmware rev 10 and older, event 4 is logged for any completed request from the user. These include manual clock set, a manual call ("call now"), or entering the Utilities, iPack menu...
-
Page 149: Battery Notes
NRG USER MANUAL SymphoniePLUS3 User Guide Battery Notes Note that when an iPack is connected to the logger the logger is powered from the iPack 2 volt regulator. Fresh D Cell batteries can output a voltage as high as 1.6 volts. -
Page 150: Appendices
NRG USER MANUAL SymphoniePLUS3 User Guide APPENDICES Opening & Closing the iPack Installing or changing a GSM SIM card or iPack battery requires opening the iPack. It is important that this is done carefully to avoid damaging internal wiring or the iPack’s weatherproof seal. -
Page 151: Technical Specifications
NRG USER MANUAL SymphoniePLUS3 User Guide Technical Specifications DESCRIPTION Instrument Type 15-Channel data logger Applications Wind resource assessment Turbine power performance verification Sensor Compatibility NRG anemometers | Counter Channels Opto anemometers Reed switch anemometers ... - Page 152 NRG USER MANUAL SymphoniePLUS3 User Guide Maximum* *Not used for vanes File Format .RWD Windows-compatible (1) 14kb binary file per day Header information includes site number, serial number(s), & sensor information Software Symphonie Data Retriever ...
- Page 153 NRG USER MANUAL SymphoniePLUS3 User Guide CONNECTIONS Sensor Wiring Connections made to field wiring panel Field wiring panel attaches to logger Ground stud located on logger POWER Batteries (2) 1.5V D-cell batteries (included) REQUIREMENTS Nominal voltage: 1.5 V ...
-
Page 154: Glossary
SymphoniePLUS3 converts raw binary data to ASCII format files. AVERAGING INTERVAL The time period over which the logger collects data for averaging. The averaging interval for the SymphoniePLUS3 Logger is fixed at 10 minutes. “B” CARRIER A wireline or “regular” telephone company that also provides cellular service. - Page 155 (###.##) yields a number up to 999.99. Photovoltaic panel. A 15 watt PV panel is an available option for PV PANEL the SymphoniePLUS3 logger. The PV panel attaches to the outside of the SymphoniePLUS3 shelter box and uses solar energy to charge the logger’s batteries.
- Page 156 SCALE FACTOR A number that is used as a multiplier to convert raw data from the SymphoniePLUS3 logger to useful units of measure (such as °F, or m/s). The scale factor is often called the “slope” or “transfer function”. For example, the scale factor for the NRG 40C Anemometer is 0.765 m/s per Hz.
- Page 157 A computer file containing only text in ASCll format. TIME STAMP The time and date that identifies when a record was recorded. All SymphoniePLUS3 logger data files are time stamped with the beginning time of the interval. TURBULENCE INTENSITY A measure of the irregularity of air flow over a site. TI is related to...
-
Page 158: Warranty & Repair
NRG USER MANUAL SymphoniePLUS3 User Guide Warranty & Repair Unless specifically stated otherwise, all NRG Systems’ equipment and sensors comes with a two-year warranty against defects in materials and manufacturing. For more information, please visit the Warranty Page on our website. -
Page 159: Site Data Sheet
NRG USER MANUAL SymphoniePLUS3 User Guide APN Name Provided by GPRS service provider (GSM only) SMTP Server Name Provided/approved by ISP or wireless service provider SMTP Login Provided by ISP SMTP Password Provided by ISP Provided by ISP POP3 Server Name... - Page 160 NRG USER MANUAL SymphoniePLUS3 User Guide SITE DESCRIPTION (TREE TYPES, HILLS, ETC.) TERRAIN FEATURES (OBSTRUCTIONS, DISTANCES FROM TOWER) SOIL TYPE INSTALLATION DATE REMOVAL DATE Field Contact Information Company Contact Person Address Phone Number Fax Number Email Address SymphoniePLUS3_DataLogger_Manual support@nrgsystems.com | Page 160 Rev.
- Page 161 NRG USER MANUAL SymphoniePLUS3 User Guide Sensors Anemometers – Attach calibration sheets for any calibrated anemometers Anemometer 1 Anemometer 2 Anemometer 3 Anemometer 4 Anemometer 5 Anemometer 6 Anemometer 7 Anemometer 8 Anemometer 9 Monitoring height Serial Number Primary or...
- Page 162 NRG USER MANUAL SymphoniePLUS3 User Guide Wind Vanes Wind Vane1 Wind Vane 2 Wind Vane 3 Wind Vane 4 Wind Vane 5 Wind Vane 6 Monitoring Height Serial Number Mounting Orientation (degrees – magnetic) Boom Length Deadband Orientation (degrees) Logger Channel...
- Page 163 NRG USER MANUAL SymphoniePLUS3 User Guide Other Sensors Sensor 1 Sensor 2 Sensor 3 Sensor 4 Sensor 5 Sensor 6 Sensor 7 Sensor Type Monitoring Height Serial Number Mounting Orientation (degrees – magnetic) Slope Offset Logger Channel Number Comments SymphoniePLUS3_DataLogger_Manual support@nrgsystems.com | Page 163...
- Page 164 NRG USER MANUAL SymphoniePLUS3 User Guide Tower Tower Type Height Diameter Comments Site Photographs Take pictures in 8 directions at tower base and several pictures showing the surrounding terrain. ͟ North ͟ Northeast ͟ East ͟ Southeast ͟ South ͟...
-
Page 165: Eu Declaration Of Conformity
EU Declaration of Conformity... -
Page 166: References
NRG USER MANUAL SymphoniePLUS3 User Guide References Some of our products incorporate software that is available in the open source community, including www.freertos.org (version 6.00) and www.savannah.nongnu.org. The information that follows is provided to comply with the terms of use. -
Page 167: Index
NRG USER MANUAL SymphoniePLUS3 User Guide INDEX (.wmf file format), 102 Data header, viewing, 96 Adjust contrast, 24 Data Viewer, SDR, 98, 99, 100 Altitude, 28 D-cell batteries, 18, 24 Antenna Connection, 78 Descriptive Headers, 101 Antenna test, 83 Dial-Up iPacks, 34... - Page 168 NRG USER MANUAL SymphoniePLUS3 User Guide Imperial units, 25, 27, 125 ISP Programming, 44, 45 Importing data, 107 Keypad Security, 29 Importing raw (.rwd) files, 107 latitude, 72 Importing scaled ASCII (.txt) files, 109 Latitude & longitude, 29 Installing SCMs, 23...
- Page 169 NRG USER MANUAL SymphoniePLUS3 User Guide Report types, 116 installation, 23 Reports, 115 Signal conditioning module (SCM), 105 Reset Button, 19 SIM card, GSM, 32, 38, 41 RSSI, 84 Site file, 119 Saving .ipk files, 58 site files, 94 Scale factor, 124...
- Page 170 NRG USER MANUAL SymphoniePLUS3 User Guide Tools Viewing Data Header, 96 Site visits, 92 Warning LED, 19 Tools, field installation, 62 WAsP data, 111 Troubleshooting wizard, SDR, 105 Wind shear, 163 Unfiltering all data, 115 WindLinx, 10, 31, 38, 44...
Need help?
Do you have a question about the SymphoniePLUS3 and is the answer not in the manual?
Questions and answers