Table of Contents
Advertisement
Model Number:
Serial Number:
Date of Installation:
Phone: (360) 893-5554 • Toll free: 1-800-280-2495 • Fax: (360) 893-6128
___________
___________
___________
Baxter • 19220 State Route 162 East • Orting, WA 98360 •
Operation/
Installation
Manual
SP600 SERIES
WATER METER
FORM 36702 Rev. B (July 2009)
Advertisement
Table of Contents

Related Manuals for baxter SP600 Series


Summary of Contents for baxter SP600 Series
- Page 1 WATER METER Model Number: ___________ Serial Number: ___________ Date of Installation: ___________ Baxter • 19220 State Route 162 East • Orting, WA 98360 • Phone: (360) 893-5554 • Toll free: 1-800-280-2495 • Fax: (360) 893-6128 FORM 36702 Rev. B (July 2009)
-
Page 2: Table Of Contents
TABLE OF CONTENTS GENERAL ............................. 3 INSTALLATION ............................. 3 Unpacking ............................3 Location ............................3 Wall Mounting ..........................3 Installation Codes and Standards ....................4 Electrical Connections ........................4 Water Supply ........................... 6 Drain Connections ........................... 6 Plumbing Connections ........................7 Assembly ............................ -
Page 3: General
SP600 will help you gain uniform baking results and maximum productivity. Baxter Water Meters are produced with quality workmanship and material. Proper installation, usage and maintenance of your water meter will result in many years of satisfactory performance. -
Page 4: Installation Codes And Standards
4. Mark the position and hole location. 5. Mount the base to the wall using the appropriate mounting fasteners. 6. Slide the water meter, with the control panel facing up, downward onto the base. Make sure the horizontal groove on the back of the water meter is lined up with the top edge of the base. 7. - Page 5 Units with 120VAC Power Supply • Replace any UL listed fast-acting 1A/250VAC fuse inside the water meter if fuse is blown. Units with 230VAC/250VAC Power Supply • For 230VAC/250VAC operation, replace any UL listed fast-acting 3A/600V fuse inside the junction box if fuse is blown. Input power line and branch circuit protection will be provided and wired by customer.
-
Page 6: Water Supply
WATER SUPPLY The water meter requires separate hot and cold supply lines. A manual shutoff valve (not supplied) should be installed on each supply line at the water meter to accommodate servicing and shutdown. • HOT WATER INLET TEMPERATURE: 140°F (60°C) recommended. •... -
Page 7: Plumbing Connections
PLUMBING CONNECTIONS Water and waste piping and connections shall comply with the International Plumbing Code 2003, International Code Council (ICC), or to the Uniform Plumbing Code 2003, International Association of Plumbing and Mechanical Offi cials (IAPMO). Plumbing connections must comply with applicable sanitary, safety and plumbing codes and provide adequate backfl... - Page 8 WATER METER WITH PLUMBING CONNECTIONS NOTE: The Hot and Cold Water Supply lines can vary in location. Fig. 5 – 8 –...
-
Page 9: Assembly
ASSEMBLY The water meter is supplied with external fi ttings/components that must be assembled before the water supply is connected. Qty. FITTING/COMPONENTS Qty. FITTING/COMPONENTS Pressure Regulator Dual Check Valve 90 Degree Elbow Vacuum Breaker Dispenser Hose T-Fitting With Pressure Gauge Y-Strainer Hand Held Temperature Probe 20"... -
Page 10: Operation
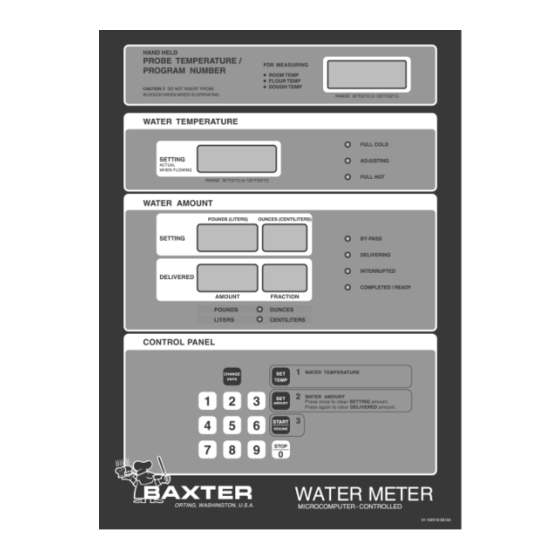
OPERATION ENVIRONMENTAL CONDITIONS • Indoor use at altitudes up to 6,500 ft. (2,000 m). • Main supply voltage fl uctuations up to +/-10% of nominal voltage. • Installation category III, pollution degree II. • The normal ambient operating temperature is between 41°F (5°C) and 105°F (40°C). The normal operating water temperature is between 32°F (0°C) and 125°F (52°C). - Page 11 Water Amount SETTING window - Displays the amount of water to be delivered, in pounds and ounces. Up to fi ve digits may be entered; the last two digits are always for ounces. Setting ranges are as follows: Pounds: 0 to 999 Ounces: 0 to 15 Liters: 0 to 461 Centiliters: 0 to 99...
-
Page 12: Before First Use
Control Panel For complete control of the water meter functions, a numeric key pad and the following control keys are provided. CHANGE UNITS key - Press to change °F to °C and pounds to liters. If CHANGE UNITS key is locked, see Locking and Unlocking the Change Units on page 14. -
Page 13: Using The Sp600 Water Meter
USING THE SP600 WATER METER Change Units (English/Metric) When the Water Meter is fi rst powered up, press CHANGE UNITS to select the English units (Fahrenheit and Pounds) or Metric unit (Celsius and Liters). If the unit of measure DO NOT change, the CHANGE UNITS key is locked. -
Page 14: Using The Temperature Probe
Operating Hints • To interrupt the water delivery, press STOP/0. • To continue dispensing, press START/RESUME. • To cancel dispensing, press SET AMOUNT. • The amount of water dispensed is displayed in the WATER AMOUNT DELIVERED window. When the delivery is complete, the display will blink and indicate 0 POUNDS 0 OUNCES. •... -
Page 15: Flush Time
FLUSH TIME Water is circulated through the water chiller bypass line to the chiller tank. The fl ush time setting allows for a certain amount of time for the meter to fi nd the set temperature, within +/- 2°F (1°C). The default fl... -
Page 16: Maintenance
MAINTENANCE Disconnect the electrical power to the machine and follow lockout / tagout procedures. On an annual basis, have the temperature, water volume and water weight settings calibrated by an authorized Bakery Systems service technician. At regular intervals, check the temperature probe, water volume and weight against a known constant for accuracy (see Calibration Check below). - Page 17 Calibrating Delivery Amount 1. Press SET TEMP. 2. Enter 32 using the numeric keypad. 3. Press SET AMOUNT. 4. Enter 93303 using the numeric keypad. The WATER AMOUNT SETTING window displays 933 lbs 03 oz. 5. Press START/RESUME. The WATER TEMPERATURE SETTING window displays the current calibration value.
- Page 18 Calibrating Delivery Temperature (Low and High Temperature Calibration) Low End Water Calibration 32°F (0°C) 1. Press SET TEMP. 2. Enter 32 using the numeric keypad. 3. Press SET AMOUNT. 4. Enter 96606 using the numeric keypad. The WATER AMOUNT SETTING window displays 966 lbs 06 oz.
- Page 19 Calibrating Hand Held Probe Temperature (Low and High Temperature Calibration) Low End Probe Calibration 32°F (0°C) 1. Press SET TEMP. 2. Enter 32 using the numeric keypad. 3. Press SET AMOUNT. 4. Enter 97707 using the numeric keypad. The WATER AMOUNT SETTING window displays 977 lbs 07 oz.
-
Page 20: Troubleshooting
TROUBLESHOOTING Symptom Problem Corrective Action Water meter indicator lights and No power. Plug power in and/or check circuit displays are off. breakers. Check fuse. Water temperature does not No hot or cold water supplied to Check that both hot and cold water stabilize.
Need help?
Do you have a question about the SP600 Series and is the answer not in the manual?
Questions and answers