
Related Manuals for AAXA Technologies M2


Summary of Contents for AAXA Technologies M2
-
Page 1: Table Of Contents
Table of Contents Warnings Package Contents Product Overview Keypad & Remote Control Functions General Operation External Inputs PMP Menu System Videos Pictures Music eBooks Games Settings Troubleshooting Specifications Table of Contents... -
Page 2: Warnings
Warnings *Do not operate the Projector in direct sun- light or near heat sources such as heaters, fires, and stoves as this may cause a fire hazard. *Do not operate the projector close to sources of steam or oil such as a humidi- fier as this may cause electric shock. -
Page 3: Package Contents
Projector Composite A/V Cable Power Cord Package Contents Remote Control USB Cable VGA Cable Tripod... -
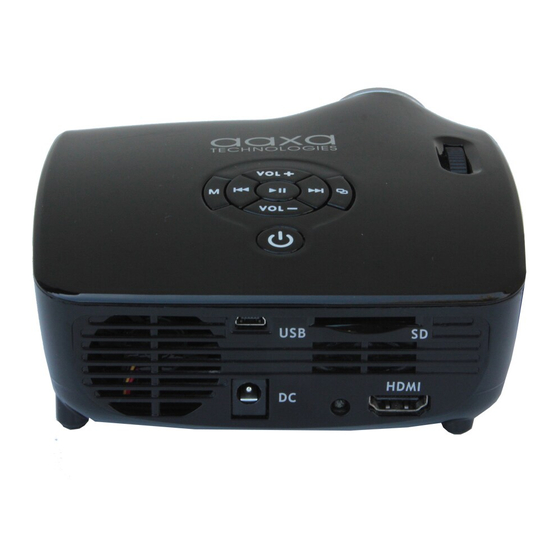
Page 4: Product Overview
Product Overview Input Input Headphone/ Speaker Out Projection Lens Focus Adjustment Keypad Controls Power Button USB Input Power Input SD-HC Reader HDMI Input... -
Page 5: Keypad & Remote Control Functions
Keypad & Remote Control Functions Navigation Buttons (Play = Select/Enter) Exit/Back (Quick Press) Source Select Open Menu (Long Press) Power On/Off Power On/Off Select Source Mute Sound Display Settings Menu System Navigation & Volume Controls Adjust Vertical Keystone Flip Vertical Image PMP Volume Up Flip Horizontal Image PMP Menu Navigation... -
Page 6: General Operation
General Operation Turning on the projector To turn on the projector first plug the power supply into a suitable wall outlet and to the rear of the projector. Then power the projector on by holding the power button for 3 seconds until the optical engine turns on. Shutting down the projector To shut down the projector, press and hold the power button for 3 sec. -
Page 7: Accessing The Onboard Memory
General Operation Accessing the Onboard Memory The M2 Micro Projector includes 1GB of onboard memory. To access this memory, connect a USB cable from your computer to the back of the projector in the slot that reads “USB”. A folder will appear on your computer screen after the projector is detected. - Page 8 To access data on your USB storage device, plug your USB device into the USB slot on the back of the M2. The supplied mini USB adapter cable may be required for some USB thumbdrives.
-
Page 9: External Inputs
“extend my desktop to this monitor”. The native resolution of the M2 projector is XGA (1024 x 768) and it accepts up to a 1600x1200 signal. Depending on the video driver different resolutions many need to be selected for proper output. - Page 10 This is done by connecting the HDMI cable to the HDMI input port of the projector. Toggle through the input sources and once you select HDMI input, your display should appear. The M2 accepts up to a HDMI 1.2 signal.
- Page 11 The M2 projector features a built-in PMP (Portable Media Player) function. This function allows the projector to play videos, pictures, music files, and text. To access the Main Menu, simply turn on the projector. The screen displayed below will appear. To navigate through the Main Menu, follow these...
-
Page 12: Videos
PMP System - Videos The M2 micro projector’s PMP system supports direct playback of a wide variety of video formats. To access videos in memory, a SD Card, or an USB storage device, first select the “Videos” item in the main menu:... -
Page 13: Playing Videos
Playing Videos play/pause - To a video, press the play button button the keypad or remote control. rewind - To , press and hold the left arrow fast-forward - To , press and hold the right arrow jump forward - To to the next video, press the right arrow jump back - To... - Page 14 PMP System - Photos The M2 micro projector’s PMP system supports direct playback of a wide variety of image formats. To access photos in memory, a SD Card, or an USB storage device, first select the “Photos” item in the main menu:...
-
Page 15: Pictures
PMP System - Photos Viewing Pictures The M2 Micro Projector allows you to view pictures individually or in a slide- show. To view individual photos, select the file you want to view in the file menu for the particular storage device on which the image file is stored. You... -
Page 16: Music
PMP System - Music The M2 micro projector’s PMP system supports direct playback of a wide variety of music formats. To access music in memory, a SD Card, or an USB storage device, first select the “Music” item in the main menu:... -
Page 17: Music Settings Menu
Listening to Music The M2 Micro Projector allows you to playback music as singles or in se- quence. To begin music playback, select the file you want to play in the file menu for the particular storage device on which the music file is stored. - Page 18 PMP System - Music Library The music library can be accessed through the Music Menu. This library sorts all your music by artist, album, genre, star, year and all items. To access your library, follow the directions below: - Select Music from the main menu - Select Library from the music menu - Select which category you want to search your song - Select the file you want to play...
-
Page 19: Ebooks
PMP System - eBooks The M2 micro projector’s PMP system supports direct playback of written text from pages of an ebook or text file. To access eBooks in memory, a SD Card, or an USB storage device, first select the “eBooks” item in the main menu:... -
Page 20: Reading Ebooks
PMP System - eBooks Reading eBooks The controls for ebooks is different from the other onboard programs. Please follow the directions below to better understand how to use ebooks with the next page - To go to the previous page - To go to the exit the book - To... -
Page 21: Games
PMP System - Games The M2 micro projector’s PMP system lets you play games through the projector. To access games in memory, a SD Card, or an USB storage de- vice, first select the “Games” item in the main menu:... - Page 22 PMP System - Games There are three pre-uploaded games in the projector for your entertainment - Chess, Pick Block and Russia Block. Other games can be added to the onboard memory and you can also play games saved on a SD card or USB device.
- Page 23 Pic Block After selecting Pick Block from the game menu, you will be shown the following four options before starting your game: New Game: Select to start a new game Level Setting: Select to set the diffculty of the puzzle, from 9 to 49 blocks Select Picture: Select from five different puzzles to unscramble.
-
Page 24: Russia Block
PMP System - Games Russia Block After selecting Russia Block from the game menu, you will be shown the following four options before starting your game: New Game: Select to start a new game Level Setting: Select to set the diffculty of the game Exit: Select to go back to game menu Russia Block Controls... -
Page 25: Settings
PMP System - Settings The Settings Menu can be accessed by selecting “Settings” on the main menu. Once in the Settings menu, there are four items that can be selected to ad- just the basic PMP system settings:... -
Page 26: Menu Language
PMP System - Settings Key Sound Effect The key tone is the subtle “beep” your projector makes each time you press a button within the menu and submenus. To turn this sound on/off, select Key Sound Effect from the Settings Menu. From there you will have the option to change your preference. -
Page 27: Troubleshooting
THE PROJECTOR DOES NOT TURN ON Possible Causes There is no power NO PICTURE / FILE NOT SUPPORTED Possible Causes The video source is not properly connected or selected Incorrect file extension / Video is encoded with incorrect codec IMAGE IS BLURRED Possible Causes The projector is not in focus Image appears stretched when... -
Page 28: Specifications
Specifications Brightness: Resolution: Contrast Ratio: Noise: Projection Lens: Image Size: Lamp: Video In: Audio Output: Storage Capacity: USB: Dimensions: Weight: Supported File Formats: AVI, MPG, MP4, MKV, MP3, WAV, RMVB, RM, JPG, TXT 110 ANSI-Lumen XGA (1024x768) 2000:1 <30 dB Manual Focus 10 ~ 100 inches 15,000 hour RGB Triple LEDs Composite A/V...
Need help?
Do you have a question about the M2 and is the answer not in the manual?
Questions and answers