Table of Contents
Advertisement
Quick Links
Advertisement
Table of Contents

Related Manuals for In Win 301C


Summary of Contents for In Win 301C
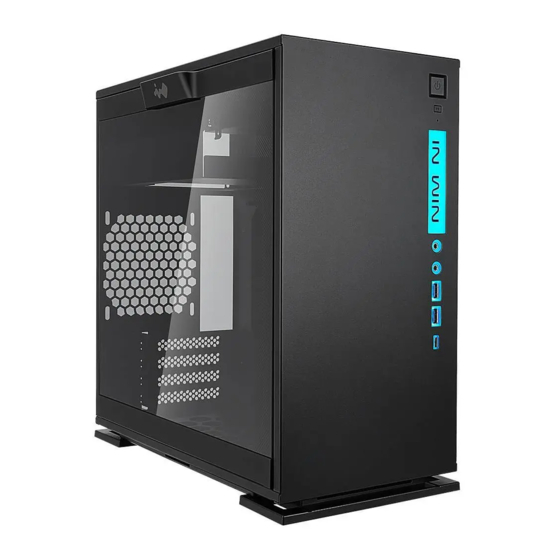
- Page 2 300-Series, the 301C. The 301C continues the simple and clean top/front panel interface, while maintaining the LED front I/O. Accompanied with a toolless, screwless tempered glass side panel, the 301C is quality you can see, feel and experience! Which definitely over your expectation!
-
Page 3: Specifications
(H x W x D) (17.7"x 10.7"x 18") Net Weight 6.50KG/ 14.3lb Gross Weight 7.59KG/ 16.7lb * In Win products comply with RoHS regulations * Specifications may vary based on different regions * Pre-installed glass panel. Extra fee for closed panel... -
Page 4: Package Content
Package Content 301C Chassis Accessories Bag QR Code Card... -
Page 5: Accessories Bag
Accessories Bag Motherboard Stand-off Motherboard Stand-off Socket Hexagon Head Screws 2.5" HDD Screws Water-cooling System Washer Cable Tie Graphics Card Holder... - Page 6 Case Structure Tempered Glass Power Button Reset Button HDD/Power LED Indicator LED Logo Audio Ports (Earphone and Microphone) USB 3.0 Ports USB 3.1 Gen 2 Type-C SECC Front / Side Panel...
- Page 7 3.5"/ 2.5" Drive Bay 2.5" Drive Bay Front Fan/ Radiator Mounting Area Rear Fan/ Radiator Mounting Area Bottom Fan Mounting Area Motherboard Mounting Area CPU Cooler Installation Cut-Out Hole PCI-E Expansion Slot Extra PCI-E Supporting Mounting Hole Power Supply Mounting Area Shock-Proof Stand...
-
Page 8: Opening The Chassis
Installation Guide Opening the Chassis Please remove by pressing the handle on top of tempered glass side panel. Power Supply Installation Parts Required: Hexagon Head Screws Power supply can be mounted on the top bracket Motherboard Installation Parts Required: Motherboard Stand-Off, Motherboard Stand-Off Socket, Hexagon Head Screws... -
Page 9: Expansion Card Installation
Expansion Card Installation Parts Required: Graphics Card Holder, Hexagon Head Screws... - Page 10 I/O Wires Installation RESET SW POWER SW H.D.D. LED POWER SW POWER SW RESET SW RESET SW HD Audio Header PORT2_L BLUE BROWN SENSE2_R SENSE_SEND PURPLE PORT2_R YELLOW WHITE SNAS1_R PORT1_R ORANGE PRESENCE# PORT1_L GREEN BLACK LED Pipe Power Header Ensure the beveled edge of the PSU connector is properly aligned with thebeveled edge of the LED light connector PSU Connector...
- Page 11 USB3.0 Header PIN#1 PIN#19 Vbus IntA_P1_SSRX Vbus IntA_P2_SSRX IntA_P2_SSRX- IntA_P2_SSRX+ IntA_P1_SSTX IntA_P1_SSTX IntA_P2_SSTX- IntA_P2_SSTX+ IntA_P1_D- IntA_P1_D+ IntA_P2_D- ID USBOC- IntA_P2_D+ PIN#10 PIN#11 The Instructions of RGB-Strip If your motherboard support the RGB luminous effect, please follow the direction of sign and insert RGB-strip into the 4-pin RGB-strip header directly on the motherboard.
- Page 12 The Instructions of Type-C Cable If your motherboard supports Type-C, please connect the Type-C connector with the header directly on the motherboard.
- Page 13 3.5"/ 2.5" Drive Bays Installation Parts Required: 2.5" HDD Screws Fan / Liquid Cooling Radiator Installation Parts Required: Water-cooling System Washer...
-
Page 14: Completing Installation
Hiding Cable Lines Parts Required: Cable Ties Completing Installation... - Page 15 CD-ROM, motherboard and CPU, etc) ■ Warranty * For more detailed warranty information, please visit In Win retail website at www.in-win.com. * The actual product is subject to change without prior notice. In Win Development Inc. reserves the right to make final modifications.
- Page 16 Copyright © 2017 In Win Development Inc. All Rights Reserved.
Need help?
Do you have a question about the 301C and is the answer not in the manual?
Questions and answers