Advertisement
Quick Links
Advertisement

Subscribe to Our Youtube Channel
Related Manuals for Cricut EasyPress


Summary of Contents for Cricut EasyPress
- Page 1 Welcome Booklet...
- Page 3 Welcome. Things are heating up ... get ready! In the box. Let’s unpack and admire your goodies. At a glance. An overview of Cricut EasyPress controls. Make it last. Suggestions for the longest-lasting iron-ons. Instructions. Just a few easy steps to iron-on success.
- Page 4 Welcome Hello, future iron-on pro. We’re so thrilled this Cricut EasyPress has found its way into your amazing hands. You inspired us with your passion to create and challenged us with your creative need: crazy-simple iron-on transfers that last and last and last. So, here you go! We cannot wait to see what you make with the magic of iron-on.
- Page 6 In the box • Cricut EasyPress • Safety Base • Welcome Booklet • Quick Reference Chart • Practice project materials • Warranty IN THE BOX...
- Page 7 Safe and easy to grip during use 9" x 9" evenly heated plate Dry, even heat means flawless transfers Safety Base Insulated base keeps Cricut EasyPress ™ in a protected, resting position Auto shutoff Shuts off automatically after 10 minutes...
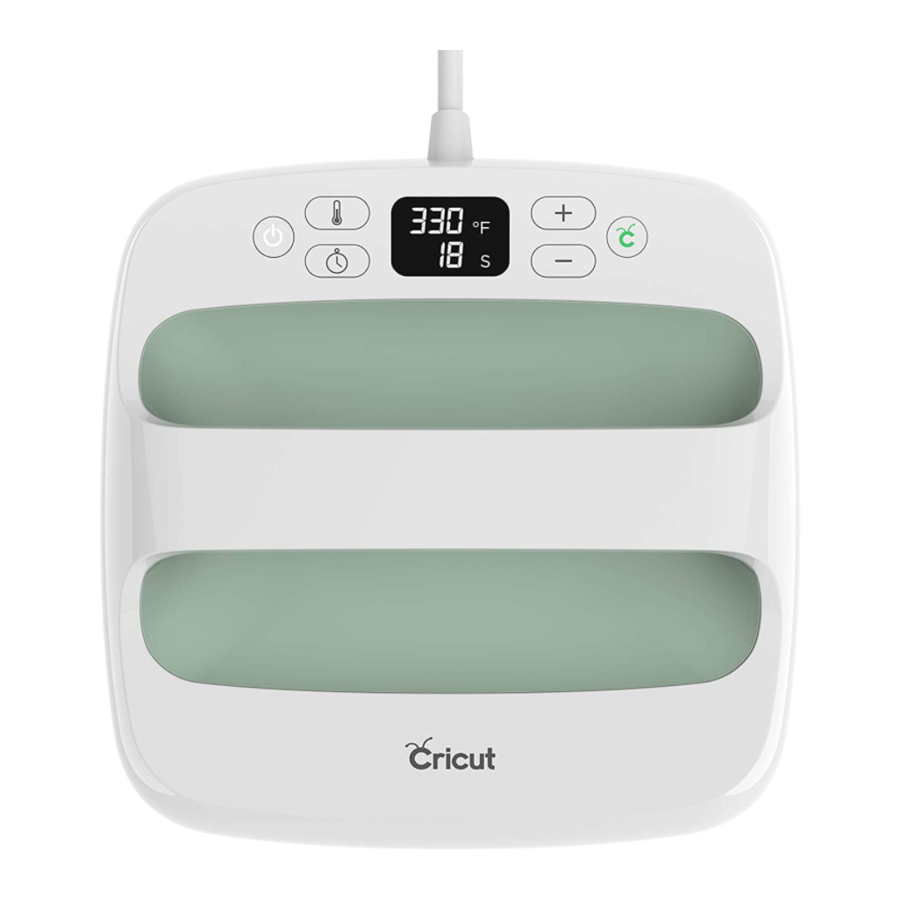
- Page 8 At a glance The simple Cricut EasyPress controls are the secret to your iron-on success. You’ll love the results. TIP: To find the correct time and temperature settings for your specific iron-on project, refer to the included Quick Reference Chart. If you don’t see your project specifics listed, visit help.cricut.com/easypress.
- Page 9 Celsius, press and hold the Temp button. Set time Start timer Press Timer button, then adjust value with plus (+) Press the Cricut C button to start the countdown. and minus (-) buttons. A beep signals time is up.
-
Page 10: Make It Last
Wait at least 24 hours before washing. Always wash inside-out. Do not bleach. Wash only in cool water, then tumble dry low or lay flat to dry. For foil iron-ons, hand-wash in cold water only. Get more great tips and suggestions at help.cricut.com/easypress. MAKE IT LAST... - Page 12 We’ll take on a T-shirt in the following steps, but you can apply these instructions to anything your heart desires, from a purse to a pillowcase … to a wedding dress? (Yes, it’s been done!) We want to see the projects you’ve made using Cricut EasyPress. Share your iron-on creations using #CricutMade & #CricutEasyPress.
- Page 13 The beep signals Cricut EasyPress is ready to use. Get prepped Power on Cricut EasyPress. Find a firm, flat, heat-resistant surface around waist height. We recommend that you use Cricut EasyPress Mat (pictured, sold separately) as your foundation.
- Page 14 Position your design Place your design where you want it. Make sure the shiny side (clear liner) is facing up. Preheat mat and base material Place Cricut EasyPress on your fabric for 3 – 5 seconds to remove wrinkles and moisture. INSTRUCTIONS...
- Page 15 Woo-hoo, that’s it! Apply heat on both sides Place Cricut EasyPress on your design. Start the timer. Hold Cricut EasyPress in place and apply gentle pressure until it beeps. Flip the T-shirt and apply heat on the back side of the design...
- Page 16 • For the most magnificent results, use Cricut EasyPress with Cricut brand iron-on film. We don’t just suggest “average” temperature and time settings for any old heat press on any random fabric.
- Page 18 Learn to love the “layer” Make a multicolored and textured masterpiece with an iron-on technique called layering. We’ll show you exactly how to do it and which iron-on types work best at help.cricut.com/easypress.
- Page 19 It’s not always what it “seams” We have a simple strategy to get around pesky seams to keep your fabric and design flat for a perfect press. Learn how at help.cricut.com/easypress. Think beyond fabrics Customize your home decor. Iron-on works on so many things, including wood and paper.
- Page 20 Cricut machines and Cricut EasyPress are optimized for Cricut iron-on films. When you select your iron-on type, your Cricut machine automatically adjusts for cut depth. When you use Cricut brand iron-on film, you’ll get the perfect cut and a perfect press every time. Visit shop.cricut.com.
- Page 22 Time and temperature chart Use this chart (or the Quick Reference Chart) to determine the perfect time and temperature settings for your project. For a complete list of Cricut EasyPress settings go to help.cricut.com/easypress. Base material Iron-on type Cotton / poly...
- Page 24 Useful Links help.cricut.com youtube.com/officialcricut Answers to all your Cricut questions Instructional videos, news, and more learn.cricut.com facebook.com/officialcricut Educational videos, instruction manuals, Join the discussion and connect with and other learning materials the Cricut community cricut.com/blog cricut.com/contact-us News, announcements, tips, and inspiration...
Need help?
Do you have a question about the EasyPress and is the answer not in the manual?
Questions and answers