
Related Manuals for bk ultrasound 8818


Summary of Contents for bk ultrasound 8818
- Page 1 User Guide Type 8818 Biplane and Endfire Transducer English BB1505-H March 2017 For Professional Users Only...
- Page 2 BK MEDICAL Mileparken 34 2730 Herlev Denmark Tel.:+45 4452 8100 / Fax:+45 4452 8199 www.bkultrasound.com Email: info@bkultrasound.com The serial number of a BK Medical product contains information about the year of manufacture. To obtain the date of manufacture of a product, please contact your BK Medical representative or write to us at the email address above, including the product’s serial number (SN number).
-
Page 3: Table Of Contents
Imaging with Type 8818 ........ -
Page 5: Introduction
Introduction This is the user guide for Type 8818 and must be used together with Care and Cleaning which contains important safety information. Indications for Use Biplane and Endfire Transducer Type 8818 combines simultaneous biplane imaging and endfire imaging in a single transducer. Type 8818 is designed for transrectal procedures. -
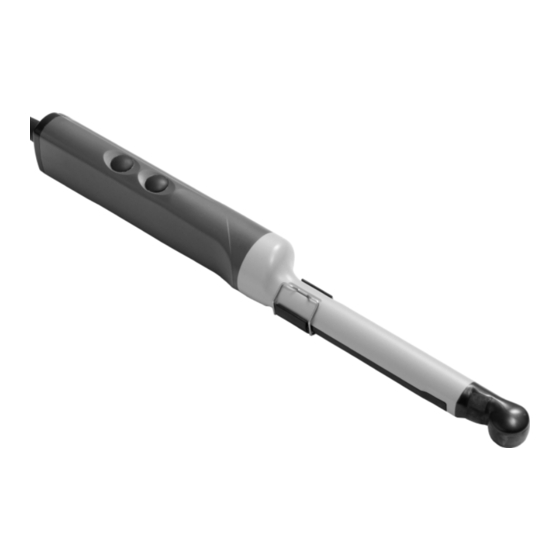
Page 6: General Information
Simultaneous biplane portion of sagittal array Endfire portion of sagittal array Transverse array Transverse array Figure 2. Imaging plane for Type 8818. General Information Product specifications for this transducer can be found in the Product Data sheet that accompanies this user guide. -
Page 7: Service And Repair
Align the plug to the system socket and insert securely. Turn the locking lever clockwise to lock in place. When connected, the transducer complies with Type BF requirements of EN60601-1 (IEC 60601-1). 8818 User Guide (BB1505-H) Cleaning and Disinfection... -
Page 8: Changing Frequency
A second button enables the transverse array. Each time a button is pressed, a beep is emitted. Changing Orientation To change the orientation of the image on the monitor, refer to the applicable system user guide for instructions. March 2017 8818 User Guide (BB1505-H) -
Page 9: Imaging With Type 8818
Click Simultan to toggle simultaneous live transmission on or off. Imaging Without Puncture or Biopsy When 8818 is used for transrectal imaging without the puncture facilities, the dummy bracket UA1325 must be in place. This clicks into position on the transducer to cover the open channel (see Figure 3). -
Page 10: Contrast Imaging
The width of the image area can be adjusted using the Width key on the system’s control panel. See the applicable system user guide for instructions. With the Expanded Sector feature and the 8818, you can increase the transverse sector angle from a default width of 140 to 180. -
Page 11: For Transrectal Puncture
For Transrectal Puncture With Type 8818, you can perform transrectal puncture and biopsy by imaging in one of three ways: Simultaneous biplane (imaging in both the transverse and sagittal planes). • Endfire (imaging in the sagittal plane). • Dual (combines both the simultaneous biplane and endfire imaging in one •... - Page 12 UA1326 are used for simultaneous biplane imaging. Figure 5. Reusable biopsy guide UA1326. The puncture line for UA1322-S, UA1322-S14 and UA1326 on 8818 is shown in Figure 6. UA1322-S and UA1326 have a bore diameter of 1.6mm, suitable for 18- gauge needles.
- Page 13 The puncture line for UA1323-S and UA1327 on 8818 is shown in Figure 8. The needle guide is parallel to the centerline of the transducer. Figure 8. Illustration of the puncture line for biopsy guides UA1323-S and UA1327. Dual The sterile single-use biopsy guide UA1329-S and reusable biopsy guide UA1328 are used in dual imaging.
-
Page 14: For Transperineal Puncture
Click the channel bracket into position on the transducer and lock it into place (see Figure 11). Figure 11. Biopsy channel bracket and needle guide mounted on 8818. WARNING Ensure that the channel bracket and needle guide are correctly positioned. Never insert the needle guide while the transducer is inside the patient. - Page 15 Figure 13. Puncture attachment UA1324 mounted on 8818. The puncture lines for UA1324 on 8818 are shown in Figure 14. Figure 14. Illustration of the puncture line for puncture attachment UA1324.
-
Page 16: Performing Puncture And Biopsy
To remove the puncture line from the image, refer to the applicable system user guide for instructions. WARNING When performing a biopsy, always make sure that the needle is fully drawn back inside the needle guide before moving the probe. March 2017 8818 User Guide (BB1505-H) -
Page 17: Cleaning After Puncture And Biopsy
See Care and Cleaning for cleaning instructions. 3D Imaging 3D imaging with the 8818 may be carried out in either of two ways: Freehand – where the transducer is combined with the appropriate 3D system •... - Page 18 March 2017 8818 User Guide (BB1505-H)
- Page 20 BK Medical ApS, Mileparken 34, 2730 Herlev, Denmark. T +45 4452 8100 F +45 4452 8199 Europe and Rest of World BK Ultrasound North America Asia 8 Centennial Drive & BK Ultrasound BK Ultrasound Peabody Analogic Medical Equipment 8 Centennial Drive...
Need help?
Do you have a question about the 8818 and is the answer not in the manual?
Questions and answers