Table of Contents
Advertisement
Available languages
Available languages
Quick Links
Advertisement
Table of Contents

Related Manuals for CCV Fly Next


Summary of Contents for CCV Fly Next
- Page 1 Erste Schritte CCV Fly Next...
- Page 2 Sollte sich im Betrieb eine kontinuierliche Verringerung der Terminallaufzeit einstellen, so ist eine Akku- Kalibrierung durchzuführen. Bei den Geräten CCV Go, CCV Fly, CCV Mobile Premium, CCV Base Next und CCV Fly Next erfolgt diese über den Betrieb bis zur vollständigen Entladung mit nachfolgender vollen Aufladung des Akkus.
- Page 3 Betrieb ACHTUNG: Wegen des Risikos eines Stromschlages oder der Beschädigung des Terminals das Gerät nicht in der Nähe von Wasser (z.B. Badewanne, Waschbecken, Spüle, Waschmaschine, nasser Boden oder Schwimmbad) benutzen. Vermeiden Sie die Nutzung neben elektrischen Anlagen und Anlagen, die hohe Stromschwankungen verursachen oder eine hohe elektrische Strahlung abgeben (z.B.
-
Page 4: Ce Declaration Of Conformity
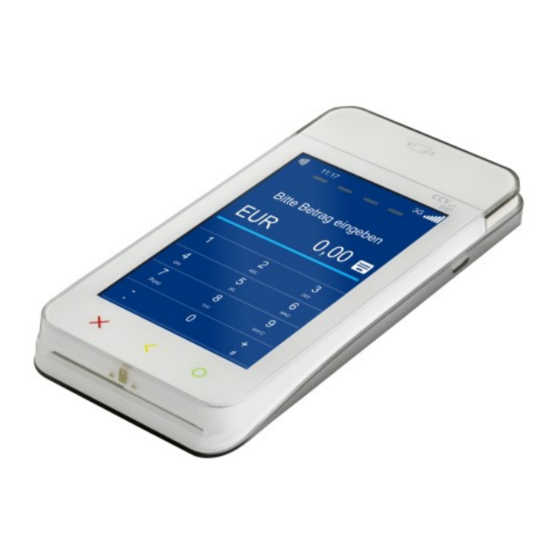
Declaration Conformity CE Declaration of Conformity Hiermit erklärt die CCV Deutschland GmbH, dass der Funkanlagentyp CCV Fly Next und dessen Netzteil der Richtlinie 2014/53/EU entspricht. Die vollständigen Texte der EU-Konformitätserklärungen sind unter der folgenden Internetadresse verfügbar: www.ccv.eu/de/download-bar/ CE Declaration of Conformity Hereby declares CCV Germany GmbH the accordance of the radio equipment CCV Fly Next and its power supply to the directive 2014/53/EU. - Page 5 Produktbeschreibung Ein-/ Ausschalter ON/OFF Ein-/ Ausschalter Magnetstreifen-Leser Micro USB (Akku laden) Händlerkarte (GeldKarte) Micro-SIM (4G) Kontaktlos-Leser (um das Display) Chipkarten-Leser Chipkarten-Leser Seite 5...
- Page 6 Inbetrieb- nahme 1. Inhalt - Terminal CCV Fly Next - Netzteil mit Micro-USB-Ladekabel - Dokumentation „Erste Schritte“ - Akku (fest verbaut, 3050 mAh) (Output: 5VDC, 2A) 2. Optional - SIM-Karte einlegen (4G) 3. Akku vollständig laden mit Micro-USB-Kabel laden mindestens 6 Stunden!
- Page 7 4. Terminal einschalten 5. Inbetriebnahme und Sprachenwahl 3 Sekunden ON/OFF Ein-/ Ausschalter 6. Terminal-ID eingeben 7. PU-Anwahlsatz wählen Seite 7...
- Page 8 8. Kommunikation einrichten (WiFi/4G/BT) Mobilnetz WLAN Seite 8...
- Page 9 9. Optional - Kassenanbindung aktivieren Mit Kasse (ZVT seriell) Ohne Kasse Seite 9...
-
Page 10: Bluetooth Pairing
Bluetooth Pairing Das CCV Fly Next unterstützt Bluetooth 4.0 (PAN profile). Sie können das Gerät mit einem Smartphone oder Tablet verbinden. Bluetooth kann hierbei für die Kassenkommunikation (ZVT oder O.P.I. Protokoll) wie auch die Hostkom- munikation zum Netzbetrieb genutzt werden. Bitte beachten Sie, dass am Smartphone/ Tablet zwingend Blutooth- Tethering aktiviert ist und dies während des Betriebes nicht deaktiviert wird. -
Page 11: Bedienung
Tagesabschluss Bedienung 1. Funktion Tagesab- 2. Beleg kontrollieren schluss („gebucht“) Zahlung 1. Betrag eingeben 2. Karte einlesen (Chip-, 3. PIN-Eingabe (opt.) 4. Beleg kontrollieren Magnet- oder Kontaktlos- und Bestätigung Karte) Kartenleser Chip-Karte stecken Kontaktlose Karte Magnetstreifen-Karte (Chip nach oben) Zügig durchziehen Karte am Display vorhalten. - Page 12 Storno 1. Funktion Storno 2. Transaktionsnummer 3. Karte einlesen (Chip-, 4. PIN-Eingabe (opt.) und eingeben Magnet- oder Kontaktlos- Bestätigung Karte) Zahlungsverfahren (optional) Sofern freigeschaltet, kann das Zahlungsver- oder fahren im Zuge der Zahlung gewählt werden. „Karte bitte“ Bildschirm → Anwendungsaus- wahl aktivieren (select-Button oder gelbe CORR -Taste) →...
- Page 13 Menü-Aufruf (Passworteingabe Kassierer, Softkeys Manager oder Techniker) Anwendungsauswahl (Wahl des Zahlungsver- fahrens) Softkey-Reihenfolge ändern Kassenschnitt (Einreichung Offline-Umsätze, Abschluss der Transaktion) Favoriten-Aufruf (Anzeige der möglichen Softkey-Funktionen) Konfigurations-Diagnose (z.B. Abholung eines TKM-Kommandos) Belegwiederholung (druckt Händler– und Kundenbeleg nochmals aus) Nachzahlung (Start einer Nachzahlung) Umschaltung Kommunikation (z.B.
-
Page 14: Menü Aufrufen
Menü aufrufen Tagesabschluss Buchungen Storno Tel. Genehmigung Gutschrift (M) Menü-PIN Reservierung Trinkgeld Beispiel: Nachzahlung Prepaid 000000 China Union Pay Tax Free Informationen Zahlungsspeicher Umsatzjournal Letzter Abschluss Zwischensumme Tax Free Liste System Konfiguration Softwareversion Diagnose Initalisierung Diagnose Konfig Diagnose EMV-Diagnose Leitungstest Inbetriebnahme (M) Service Wartungsruf (TKS) (M) -
Page 15: Technische Daten
Technische Daten Prozessor/ Speicher Cortex-A9 Prozessor mit 1000 MHz/ 512 MB Flash und 512 MB SDRAM Tastatur Full Touch Display mit situativ angepassten Tastaturvarianten, 3 Funktionstasten, An-/Ausschaltknopf Display 4“ Farbdisplay, 480 x 800 Pixel (WVGA) Kommunikation/ Schnittstellen Bluetooth + WiFi + 4G oder Bluetooth + WiFi, 1 Micro SAM (nicht geeinget für GeldKarte SIM, virtuelle GeldKarte nutzen, 1 Micro SIM Slot, 1 Micro USB Externes Netzteil Eingang: 110-240 VAC, 50 /60 Hz, Ausgang: 5V / 2A... - Page 16 Sollte das Siegel gebrochen sein, kontaktieren Sie bitte unverzüglich Ihren Netzbe- treiber! Weitere Informationen finden Sie im Handbuch unter: www.ccv.eu/de/download-bar/ © CCV Deutschland GmbH Alle Rechte vorbehalten. Änderungen vorbehalten. Abbildungen ähnlich. Verwendete Produktnamen sind Warenzeichen oder eingetragene Warenzeichen der jeweiligen Inhaber.
-
Page 17: First Steps
First steps CCV Fly Next... -
Page 18: Safety Notes
Safety notes Power Before you connect the terminal power pack to an electrical outlet, check that the on/off power switch on the terminal is off. If the terminal does not have an on/off switch, check that the power cable connector is removed from the terminals´s power port. Or, when connecting the terminal to a power pack, always connect the plug of the power pack to an electrical wall outlet first. - Page 19 Location — Electrical Considerations CAUTION: Due to risk of electrical shock or terminal damage, do not use the terminal near water, inclu- ding a bathtub, wash bowl, kitchen sink or laundry tub, in a wet basement, or near a swimming pool. Also, avoid using this product during electrical storms.
- Page 20 Declaration Conformity CE Declaration of Conformity Hiermit erklärt die CCV Deutschland GmbH, dass der Funkanlagentyp CCV Fly Next und dessen Netzteil der Richtlinie 2014/53/EU entspricht. Die vollständigen Texte der EU-Konformitätserklärungen sind unter der folgenden Internetadresse verfügbar: www.ccv.eu/de/download-bar/ CE Declaration of Conformity Hereby declares CCV Germany GmbH the accordance of the radio equipment CCV Fly Next and its power supply to the directive 2014/53/EU.
-
Page 21: Product Description
Product description on/off button ON/OFF on/off button Magnetic stripe reader Micro USB (load battery) Händlerkarte (GeldKarte) Micro SIM (4G) Contactless reader (display) Chip card reader Chip card reader Page 21... - Page 22 Startup 1. Content - Terminal CCV Fly Next - Power supply (Micro-USB - Manual „First steps“ - Battery (not changeable, 3050 (Output: 5VDC, 2A) mAh) 2. Optional - insert SIM (4G) 3. Load battery Use micro USB cable to load battery min.
- Page 23 4. Switch on 5. Startup and select language 3 Sec. ON/OFF on/off button 6. Enter Terminal-ID 7. Select Host target Page 23...
- Page 24 8. Set communication (WiFi/4G/BT) Mobilnetz WLAN Page 24...
- Page 25 9. Optional - activate cash register with cashregister (ZVT serial) without cashregister Page 25...
- Page 26 Bluetooth Pairing Your CCV Fly Next supports Bluetooth 4.0 (PAN profile). You can connect your terminal with a smartphone/ tablet. Use Bluetooth for cash register communication (ZVT or O.P.I. protocol) and host communcation to your payment provider. Please take care that Blutooth tethering on your smartphone is always on. To be sure you can use the android API or a 3rd party watchdog app.
- Page 27 Reconsiliation with closure Handling 1. Softkey reconsiliation 2. Proof your receipt with closure Payment 1. Enter amount 2. Card please … (smart 3. Enter PIN 4. Proof your receipt card, magnetic stripe or contactless) Card reader Smart card Contactless card Magnetic stripe (Chip upside) (draw quickly and mag-...
-
Page 28: Transaction Information
Reversal 1. Softkey Reversal 2. Enter transaction 3. Card please … (smart 4. Enter PIN number card, magnetic stripe or contactless) Select transaction type (optional) If enabled you can choose your payment application. Transaction information Softkey intermediate or menu revenue Information MENU- →Transaction →... - Page 29 Menu (password level merchant, manager or Softkeys technician) Select payment application (select your payment application Softkey order (change your softkeys) Reconsiliation with closure (start of booking all open transactions end of the day) Favourites (show all possible softkeys) Config diagnosis (sync host commands) Receipt Copy (reprints merchant and custo- mer receipt) Additional payment (increase the original...
- Page 30 Menu Menu PIN example 000000 Page 30...
-
Page 31: Specifications
Specifica- tions CPU/ Memory Cortex-A9 CPU 1000 MHz/ 512 MB Flash and 512 MB SDRAM Keypad Full Touch Display with dynamic keypad layout, 3 function keys, on/off button Display 4 Inch 480 x 800 pixels capacitive touch screen Communication/ Peripheral Ports Bluetooth + WiFi + 4G or Bluetooth + WiFi/ 1 Micro SAM (not suitable for GeldKarte SIM - please activate virtual GeldKarte), 1 Micro SIM Slot, 1 Micro USB Power Supply... - Page 32 If the seal is broken, contact your network provider immediately! Please find further information in the manual which you can download under: www.ccv.eu/de/download-bar/ © CCV Deutschland GmbH All rights reserved. Subject to change. Similar to illustration.
Need help?
Do you have a question about the Fly Next and is the answer not in the manual?
Questions and answers