Advertisement
Quick Links
Please read these instructions thoroughly before starting your installation
Note: These instructions apply to both models. The TwinTemp-2 is a dual zone heating unit whereas the Junior is a
single zone. Both also provide continuous hot water. Installation is identical except for the additional zone.
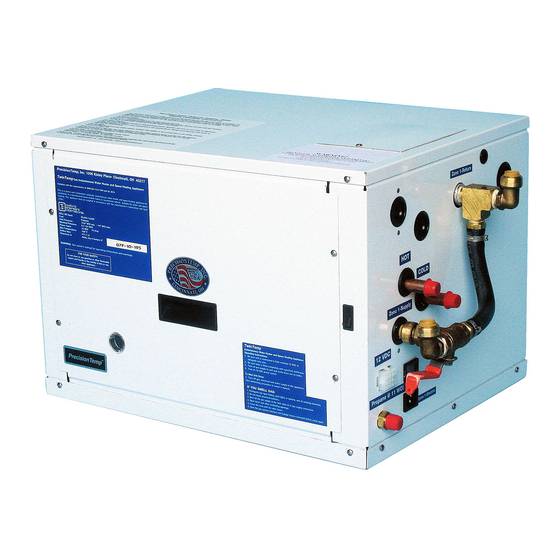
The TwinTemp is designed to be installed in a ventilated compartment of the vehicle such as a lower luggage
compartment
or "basement" and vented through the bottom of that compartment to the outside. The heater must not be mounted
in the living area of the vehicle or in a way that receives its combustion air from the living area or flues into the
living area of the vehicle. Doing so will void the warranty and cause the heater to malfunction and could cause
damage, injury or death.
Please read these instructions before making any modification to the construction of your RV.
Installation Overview
The installation of the TwinTemp is done in three steps:
Installation of main heating unit and exhaust system
•
Installation of blower heating units and thermostats
•
Routing wiring and high temperature tubing from main heating unit to blowers
•
Installation of main heating unit and expansion tank
When selecting an installation location, please note the following installation requirements:
Surface should be able to support at least 100 pounds
•
The front panel of the heater should be accessible for inspections or servicing
•
The vent must be able to be installed through the floor without interference with frame members or
•
other equipment.
The compartment where the heater is installed must not be air tight from the outside. There should
•
be at least 12 square inches of fresh air available from the outside, NOT FROM THE LIVING
AREA OF THE VEHICLE OR TINY HOUSE.
Caution: the combustion air cannot be supplied from any compartment which may contain
combustible gases (i.e. battery gases, gasoline fumes, propane fumes, etc.)
Water, gas and electric line should be able to run to the installation.
•
Installation must be done to allow at least 10" access to the front and at least 8" access above the
•
unit. There must be access to all plumbing connections on the right side of the heater if they are not
•
made prior to securing the installation into place.
•
There should be at least 1" clearance in the back and at least 8" of top clearance is recommended to
•
facilitate startup.
•
It is recommended to install the heater as close to the gas supply as practical to minimize the length
of the gas line.
TwinTemp Installation Manual
Advertisement

Related Manuals for PrecisionTemp TwinTemp Junior


Summary of Contents for PrecisionTemp TwinTemp Junior
- Page 1 TwinTemp Installation Manual Please read these instructions thoroughly before starting your installation Note: These instructions apply to both models. The TwinTemp-2 is a dual zone heating unit whereas the Junior is a single zone. Both also provide continuous hot water. Installation is identical except for the additional zone. The TwinTemp is designed to be installed in a ventilated compartment of the vehicle such as a lower luggage compartment or “basement”...
- Page 2 Screw assembly into place and use a proper exhaust bracket to support the bottom o the coach. • NOTE: The above procedure is a typical exhaust installation. If the coach floor is more than 1” inch thick or the tail pipe needs to be longer than 17”, contact PrecisionTemp for additional components and information.
- Page 3 Up to four blowers per zone, or a total of eight blowers, can be installed in the TwinTemp-2 system. Up to six blowers can be installed in the TwinTemp Junior system. In a two zone system, the living and kitchen areas are general put on one zone and the bedroom and bath area on the other zone.
- Page 4 Connecting Gas Supply The gas line should be of approved type and size with a 3/8” female flare nut. If the gas line is very long or has numerous bends, it should not be less than 3/8” ID or performance of the TwinTemp will suffer.
- Page 5 12 Volt DC Power Hook-up This is the main power harness that should be switched at a panel inside the coach on a 15 amp circuit. The wire must not be smaller than 12 gauge. Red is positive (+) and black (or green) is negative (-). Under-sizing this wire will result in the TwinTemp malfunctioning.
- Page 6 Minimize extreme bends and any extreme rises in height should be avoided. Where possible use “flow bender” clamp rather than elbow fittings the reduce restriction. PrecisionTemp can supply the flow benders. Be sure the secure all PEX where necessary and apply protective shielding in areas where chafing may occur.
- Page 7 TwinTemp Start-up / Testing Procedure Filling system with antifreeze Power, propane and water should be turned off. Turn Thermostats to highest setting. • Remove radiator cap from TwinTemp tank. • Turn Summer/Winter valve to winter position. • Using a funnel fill tank with approximately 2.5 gallons of 50/50 propylene glycol/distilled water mix.
- Page 8 Testing Water Heating System • Put Summer/Winter valve in summer position. • Turn on power and allow the system to heat up until burner shuts off. • Open hot water tap and purge all air from hot water line • Water should be hot (approximately 120 degrees) within 30 seconds. Allow hot water to run for 3-5 minutes and verify burner activates to maintain water temperature.
- Page 9 If Hot Water is Needed Once the tank reaches set temperature (5-15 minutes after system is turned on), continuous hot water is delivered when any tap is opened. Delivery temperature is determined by the setting of tempering valve (Adjustable 100˚ - 145˚...
- Page 10 (op to 88˚ F temperature rise per GPM). 110 Volt Heating Element The TwinTemp-2 is equipped with two 110 VAC electric heating elements and the Twintemp junior has one element. These provide limited amounts of hot water or space heating, such as washing hands or dishes. The electric element can be used with or without the propane burner, but for continuous hot water or space heat, the propane burner must be used.
- Page 11 TWINTEMP WATER SYSTEM DRAINING/WINTERIZING INSTRUCTIONS Note: Even though the heating system of the Twintemp is filled with antifreeze the water heating exchanger inside the tank is filled with water and must not be allowed to freeze. Freezing can cause severe damage not covered by the Twintemp warranty. When traveling in freezing temperatures or in storage or not being used the plumbing system containing water must be drained.
- Page 14 TwinTemp Hydronic Heating & Water Heating Operating Instructions For maximum heat and hot water output, it is recommended to use the LPG mode of operation in addition to the 120 volt electric element. Electric element operation should be used for minimal hot water demand such as washing hands or dishes.
- Page 15 Once the tank reaches set temperature (5-15 minutes after system is turned on), continuous hot water is delivered when any tap is opened. Delivery temperature is determined by the setting of tempering valve Warning: this valve is factory set at about 120˚ F. adjusting temperature any higher could result in severe injury due to scalding.
- Page 16 IMPORTANT COLD WEATHER PROTECTION INFORMATION Do not WARNING: disconnect or turn off the electrical supply to include 12vDC and 120vAC electric element. Do not turn off the propane supply when temperatures are near or The TwinTemp hot water heating system below freezing.
- Page 17 TwinTemp Preventive Maintenance Schedule Clean interior of TwinTemp cabinet including combustion air intake grill. Inspect all wiring connectors for corrosion and tighten or repair if needed. Performance test heating and hot water functions and rotate mixing valve temperature adjustment knob several times clockwise and counter clockwise direction.
- Page 18 3428 Hauck Rd. Cincinnati, OH 45241 800-934-9690 www.precisiontemp.com 1/2020...
Need help?
Do you have a question about the TwinTemp Junior and is the answer not in the manual?
Questions and answers