Advertisement
Quick Links
Advertisement

Related Manuals for Motorola TETRA


Summary of Contents for Motorola TETRA
- Page 1 MTM800 TETRA...
- Page 3 目录 一般信息 ........安全信息 ......... . 废弃处理信息...
- Page 4 TMO 组呼 ........概述 ..........27 选择通话组...
- Page 5 电话及专用自动交换分机呼叫 ..... 概述 ..........52 发起电话或...
- Page 6 快速参考指南 ....... . . 109 MOTOROLA 和 M 格式商标均为美国专利商标局注册商标。所有的 产品或服务的名字是该所有者的物产。...
- Page 7 一般信息 安全信息 在使用此类产品之前 请阅读随机附带的产品 安全与射频辐射小册子中关于安全使用对讲机 的操作说明 (摩托罗拉出版物部件编号 ,适于欧洲、中东和非洲;或 6866537D37 ,适于亚太地区) 。 6804112J96/6804113J25 这些附件仅限于能够满足 ICNIRP 射频能量辐射要求的职业应 用。在使用此类产品之前,请仔细阅读产品安全与射频辐射 小册子中的射频能量信息和安全操作说明,以确保符合射频 能量辐射限制标准。 请将本用户手册和产品安全与射频辐射小册子保存好,当附 件转交给其他操作员时,可供他们参阅。 废弃处理信息 欧盟废弃电子电气设备 (WEEE) 指令要求销售到欧盟 成员国的产品必须在产品上 (有时是在包装上)张贴 带交叉符的垃圾箱标签。根据 WEEE 指令的定义, 此垃圾箱符号表示 EU 成员国的客户和终端用户不得将此电子 电气设备作为生活垃圾处置。 欧盟成员国的客户或最终用户应联系当地的设备供应商代表 或服务中心,以了解有关各国废物收集系统的信息。...
- Page 8 版权信息 本手册所介绍的产品可能包括储存于半导体存储器或其它媒 体中的有版权的电脑程序。美国和其他国家的法律保护摩托 罗拉公司的某些有版权的电脑程序的专有权利,其中包括以 任何形式拷贝或复制有版权的电脑程序的权利。因此,本手 册所介绍的摩托罗拉产品所包含的任何有版权的摩托罗拉电 脑程序,在未经摩托罗拉书面允许的情况下,不允许进行任 何形式的拷贝、修改、反向工程或分发。除此之外,购买这 些产品将不被认为拥有直接或暗示的版权人之版权、专利或 专利使用的任何许可证授权,产品销售过程中法律运用所引 起的普通非专有性免税许可证除外。 产品规格信息 • 最大射频功率 3 瓦特 • 最大扬声器负载 10 瓦特 (4 欧姆) • 天线阻抗 50 欧姆 • 环境温度范围 -30 °C 到 +60 °C 当此对讲机工作时,其表面温度会上升到 。 70 °C 请不要触摸发热表面 • 工作时间 连续...
- Page 9 图标约定 本文档集可以为读者提供更多的直观提示。整个文档集中使 用了以下图标,这些图标及它们各自的说明如下所述。 带有相应安全图标的信号词 “警告”表示, 如果不注意其中的信息,则可能导致死亡或严 重的人身伤害和产品损坏。 带有相应安全图标的信号词 “小心”表示, 如果不注意其中的信息,则可能导致轻伤或中度 的伤害,或者严重的产品损坏。 在无安全图标时,该信号词 “小心”可用于声明与本产 品无关的潜在损坏或伤害。 “注意”含有比周围文字更重要的信息,如例外或注意事项。 它们通常为读者提供一些补充参考信息,提醒读者如何操作 (例如当其不是当前过程的一部分时) ,或者告诉读者屏幕中某 些项目的位置。 “注意”没有相应的警告级别。...
- Page 10 开始 恭喜您购买了摩托罗拉 MTM800。增强型 TETRA 的性能和 最新的技术能够帮助您随时了解您的工作和保持与其他工作 人员的联系。 您可以选择让 MTM800 使用英语、简体中文,繁体中文或您的 运营商所限定的语言。工厂的缺省设置是用英语进行操作。更 详细的信息请参阅第 76 页中的 “设置显示屏的工作语言” 。 如何使用本手册 本手册描述了在出厂时设置并预编程好的 MTM800 功能特点。 您的运营商或您的机构或许已经将您的 MTM800 设置进行了定 制,以满足您个人的最佳使用需求。请与您的运营商或机构联 系以获得与本手册所述设置不同的信息。在本手册的描述中, 您将发现以下的特殊注解,它们是用来突出某些信息和项目的: 举例 说明 您所按下的按键将以一个按键符号来表示, 或是 Mode 软按键的功能以粗体印刷来显示。 使用数字或字母按键作为快捷键以达到所需的 2 2 1 Menu 子菜单。在本例中,顺序按下 Menu 键,但不要同时按。...
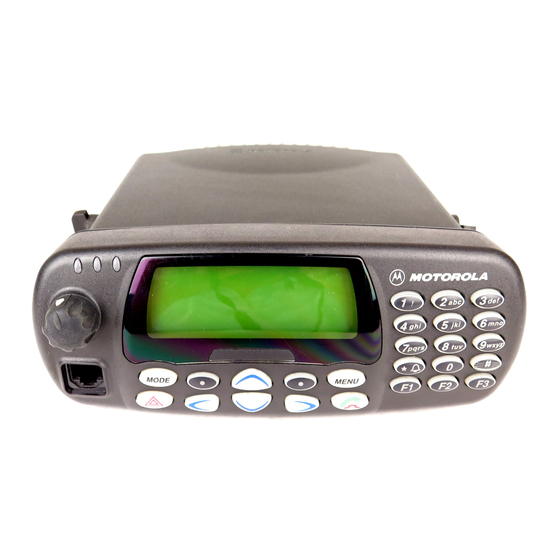
- Page 11 控制键和指示灯 1. 开 / 关按钮 2. LED 指示灯 红色、 黄色、 绿色 5. 字母及数字 3. 显示屏图标 键盘 4. 字母及数字 显示 警察 Rescue 1 6. 背景灯键 7. 功能键 8. 外部报警键 9. 菜单键 10. 发送 / 结束键 11. 软按键 12. 浏览键 上、 下、 左、 右 13.
- Page 12 项目 说明 开/关键 打开或关闭 MTM800。 (请参阅第 10 页。 ) 指示灯 显示工作状态。 (请参阅第 10 页。 ) 图标 显示屏 用来显示补充信息和 MTM800 状态。 (请参阅第 7 页。 ) 显示屏 字母和数字 背景灯可以照亮最多 4 行字符或数字。 (每行最多 16 个 字符或数字) 。 键盘 字母和数字 输入数字和字母。 (请参阅第 14 页。 )这些按键的功能 由您的运营商进行设置。...
- Page 13 项目 说明 模式键 选择电话、 PABX、个呼或组呼模式。 (请参阅第 12 页。 ) 紧急键 触发紧急模式并发送紧急告警。 (请参阅第 14 页。 ) 麦克风接口 用于连接带有 PTT 的手持式麦克风、台式麦克风或电话型 手机的接口。 音量旋钮 调整音量。 (请参阅第 25 页。 ) 通话键 (PTT) 按下可以: • 发送一个组呼、个呼模式呼叫或紧急呼叫。 • 发送一条状态信息。 麦克风 在通话进行时对着它讲话。 显示屏 显示屏图标列表 在您打开 MTM800 之后,在显示屏的上方将显示出各种图标, 用以指示如下的情形:...
- Page 14 图标 说明 DMO 网关 表示您选择通过网关工作。本图标有三个状态: 保持亮着 — 当对讲机与网关同步时 (例如接收一个 存在的有效信号时) 。 闪烁 — 当对讲机不与网关同步或连接时。 无图标 — 在进行用户机到用户机和转发呼叫时。 DMO 转发器 当在 DMO 中选择了转发器选项时显示。本图标有三个 状态: 保持亮着 — 当对讲机检测到转发器时 (例如接收一个 存在的有效信号时) 。 闪烁 — 当对讲机未检测到转发器,或者在连接时。 无图标 — 在进行用户机到用户机和网关呼叫时。 有未读的信息 说明在您的收件箱中有未读的信息。 接收到新短消息 因为您正在进行呼叫,您的收件箱不能自动打开。此图 标会一直显示在显示屏上以提醒您在您的收件箱中有新 邮件到达。...
- Page 15 图标 说明 数据已连接 当 MTM800 成功地与一台外设 (笔记本或台式电脑) 相连接并已准备好传送数据时,图标将显示。 接收/发送数据 此图标表示正在进行数据传输。 指示扬声器开/关 扬声器开 关指示只能在组呼模式中使用。 当配置了电话型手机时将使用反白显示的通话组线路 (请参阅 第 81 页) 。 • 如果通话组线路反白显示,则任何呼入 范围 1 都通过手机听筒接收。 通话组 1 状态 选项 • 如果通话组线路没有反白显示,则呼入 范围 1 的话音通过外部扬声器接收。 通话组 1 状态 选项 通过 “扬声器开/关”编程键选择手机听筒 或扬声器。 长号码的显示...
- Page 16 激光二极管状态指示灯 激光二极管指示灯能说明您的 MTM800 所处的工作状态。 指示灯 状态 绿灯常亮 正在使用 闪烁的绿灯 在系统覆盖范围内 红灯常亮 不在系统覆盖范围内 闪烁的红灯 对讲机在开机时正在连接网络/ 进入 DMO 模式 黄灯常亮 禁止传输 (TXI) 正在使用/ 在 DMO 中信道忙 先持续发亮,然后闪烁为黄色 有呼叫正在呼入 没有指示灯显示 关机状态 电源打开/关闭 打开: • 按开/关键。 • 如果 MTM800 使用点火传感器进行配置,则只要车辆点火 此对讲机就会自动打开。 • 如果附件连接头连接到紧急脚踏开关,并且您的运营商激活 了 “紧急唤醒” ,则只要按紧急开关, MTM800 就会自动 打开紧急模式...
- Page 17 关闭: • 再次按开/关键。 • 如果该对讲机是通过点火器打开的,则它可以通过点火器 关闭,或者按开/关键将其关闭。 您将见到 “关机”信息。 当启动了对讲机的隐蔽模式时,打开和关闭对讲机都不会出现 可见的和音频提示。 (参阅第 页中的 “隐蔽模式” 。 ) 拆卸对讲机 选项 1: 从对讲机断开 13.2V 主电源之前: 1) 关闭对讲机。 2) 松开对讲机关闭按键后等待最少 4 秒钟。 断开 13.2V 主电源。 选项 2: 不关闭对讲机,直接断开主电源。 解除 MTM800 锁定 您的 MTM800 在开机时有可能是锁住的。要解除锁定,请参阅 第 72 页中的 “如何解锁 MTM800” 。 选择您的网络...
- Page 18 如果您要退出 TXI 模式,按是软按键 (请参阅第 13 页中的 “软按键” )– 比如您已不在建议使用 TXI 模式功能的射频敏 感地区。如果 MTM800 之前被使用在集群模式 (TMO) 下, 它将入网登记。 如果您按下是,而对讲机之前被用在 TXI 模式和直通模式, 它将会退出 TXI 模式并保持在直通模式。 如果此对讲机之前是处在集群模式,而且 TXI 模式是激活的, 按下否关闭对讲机。 如果您按下否,而对讲机之前被用在 TXI 和直通模式,它将 保持在 TXI 和直通模式。 按键概述 模式键 当工作于集群模式 (TMO) 时, MTM800 有四个主要的呼叫模式: •...
- Page 19 当工作在 模式下时,信号传送直接从发射对讲机天线发 送到接收对讲机天线,不需要任何基站或发射塔的支持。这样 以来,有效范围主要取决于车辆所处的位置。 对讲机 TETRA 用户之间的任何障碍物 (山、楼房等)都会进一步缩小有效 范围。反之,将车辆开到另一位置或更高的位置则会扩大有效 范围。 通过一个网关设备,处于 DMO 模式下的对讲机便可以与集群 系统 (反之亦然)进行通信。要使用该功能,请启动对讲机 的网关选项 (请参阅第 39 页中的 “选择网关/转发器” ) 。 在 模式中是可以发起组呼和紧急组呼的。 要在组呼模式、个呼模式、电话模式和可选的 PABX 模式之 间循环切换,您只需连续按下 即可。 Mode 当您的 MTM800 处于工作状态时,其电话模式、组呼模式、 个呼模式和 PABX 模式缺省设定的起始显示与下面所示的屏 幕显示相似: 各种模式下的起始显示屏幕的例子: 范围 1 个呼模式...
- Page 20 菜单键 按 进入主菜单 (当没有任何活动正在进行时) 。 Menu MTM800 菜单允许您控制您的 MTM800 设置。菜单都是以分 级结构进行管理的。请参阅第 66 页中的 “菜单选项列表” 。 菜单选项使您能够选择更深一层的选项列表,我们称之为子 菜单。 以下的例子说明了如何检查并修改号码簿中可用的空闲存储 空间。最后一个选项出现在显示屏的第一行,告诉您一共有 多少个选项可供选择。 第二层子菜单 第一层子菜单 4 内存状态 8 最新呼叫号码 1 私密 1 短消息 1 输入电话号码 2 电话模式 Menu 2 地址簿 2 字母顺序 3 PABX 返回...
- Page 21 输入文本 (字母和数字) 要在号码簿中输入别名文本,或者在短消息中输入文本,按 标有所需字符的按键,第一个字符按一次,第二个字符按两 次,以此类推。按键带有更多的字符 (请参阅第 15 页) 。 编辑文本 到 ... 操作 将光标向右移动一个字符 按 、按一个新键、或稍候 将光标从文本结尾移动到开头 按住 将光标向左移动一个字符 按 删除光标所在位置左侧的字符 按清除 删除全部文本 按住清除 快速编辑 按清除 别名 (名称) 别名是一个您为存储的电话和个人号码 (或身份码)而指配 的选用名称。 别名可以由 14 个字符组成,并可以由字母、数字和空格构成。 当在存储器列表中滚动时,别名就会被显示。别名也用来从 您的存储器列表中找出您想要的号码。 以下屏幕显示如何将呼叫方的个呼模式呼叫号码显示出来: 个呼模式通话中 个呼模式通话中 或 Simon 私密...
- Page 22 可用字符列表: 键 字母和数字 € . , ? ! 0 1 @ ' " - ( ) / : _ ; + & % × * = < > £ $ ¥ ¤ [ ] { } \ ~ ^ ¿ ¡ § A B C Ä...
- Page 23 编程键 MTM800 支持单键的功能可让您选择/激活常用的功能。您只 要按住数字键或者从 F1 到 F3 中的任何一个功能键即可激活 单键功能。您的运营商应按照相关的功能编程数字键和选项 键。所有键盘上的数字键都可以编程的。以下的图表列出可 编程的功能及其在 MTM800 指定状态/模式中的可用性。有关 功能的详细信息,请参阅用户手册中相关的部分: 功能 说明 通话组切换 切换到指定的通话组 当前/最后切换 切换到之前的通话组 (即使工作模式不同) 通话组 通话组扫描 激活或关闭通话组扫描功能 (仅在 TMO 模式) 复原返回 讲 MTM800 转回组呼模式 DMO/TMO 在 DMO 和 TMO 之间来回切换 状态信息 向一个指定的地址发送指定状态信息 (仅在 TMO 模式) 扬声器开/关...
- Page 24 要使用单键功能: • 无论在任何模式下,只要按住所需的数字键数秒钟即可。 • 您的 MTM800 将会显示号码或功能名称,然后根据所编程 的功能进行操作。 单键个呼功能需由运营商进行设置。 1. 如果设置为 “单工” ,则呼出的个呼也为单工呼叫。 2. 如果设置为 “双工” ,则呼出的个呼在 TMO 模式下为双工 呼叫,而在带有上一个组呼发起人号码的 DMO 模式下则为 单工呼叫。 3. 如果设置为 “双工 ",则呼出的个呼在 TMO 模式下为双工 呼叫,并且当需要电话号码簿索引时,无法在 DMO 模式下 发起呼叫。 初始模式显示 您的 MTM800 还提供了一项功能,即运营商可以向您的 MTM800 显示屏发送特别文本短消息。 按任意键后此信息将显示数秒。 范围...
- Page 25 关闭/激活对讲机 您的 MTM800 提供了一项功能,即运营商可以暂时性的 (被盗或丢失时)将它关闭。 当您的 MTM800 被关闭期间,它不能发起/接收任何呼叫。 当您的 MTM800 被关闭时,它将显示一个 如下所示的空屏幕。 您的 MTM800 看上去就像被关机一样。 如果当您的 MTM800 已经被关闭,而您想试着打开它时, 屏幕将如上图所示。 如果您找回了丢失的 MTM800,运营商可以再次激活它。 在您的 MTM800 再次被激活之后,您就可以正常使用了。 对讲机永久禁用 您的 MTM800 具有一项功能,即运营商可以永久性的 (被偷 或丢失时)将它关闭。 MTM800 被永久禁用后将不能工作。 永久禁用后,您的运营商不能重新启用 MTM800。 建议只在不准备恢复对讲机的前提下禁用您的 MTM800。 发起呼叫 您可以在您所处的模式下根据需要发起呼叫: • 按 发起呼叫,按...
- Page 26 VOX 控制 VOX (声控传输)允许用户在免提模式下发送话音。使用手 持式麦克风进行全双工个呼和电话呼叫时,该功能会自动检 测音频。 此功能只有当运营商为您设置后才能使用。 如果将其禁用,则按 后可以发送话音。 接收呼叫 MTM800 可以自动切换到呼入呼叫的模式。呼入结束后, 显示屏将自动返回呼叫呼入前的模式。 在个呼、电话和 模式下接收到非紧急 或 组呼时, PABX 保留当前模式。您可以听到呼叫,而显示保持不变。 MTM800 根据您在 “提示音”菜单选项 (请参阅第 79 页)中选择的 设置,您的 MTM800 会在有呼叫呼入时提示您。 在编辑短消息的过程中,如果您的运营商进行了配置,则当有 组呼/紧急组呼/广播组呼呼入时,该对讲机会对您进行提示。 占用繁忙用户优先权 (BUP) 此功能只有在您的运营商为您设置后才能使用。 系统中的控制台操作员或调度员可能希望在您有有呼入 (个呼、电话呼叫、 PABX)时呼叫您。控制台操作员会启动 BUP 功能中断并强占您的呼叫。 也可以强占正在建立的呼叫。建立的呼叫必须是个呼模式 呼叫,电话呼叫或 呼叫。...
- Page 27 先占式呼叫 (PPC) 先占式优先权呼叫功能特别有用,尤其是在您迫切需要和一 个用户通话,而该用户的对讲机处于繁忙状态,正在进行一 个非紧急呼叫时。 先占式优先权呼叫 (PPC) 是一个紧急组呼或是一个私密 PPC (半双工或全双工呼叫) 。 此功能让您可以打断正在与对方通话但优先级较低的呼叫, 并将您连接到较高优先级的呼叫。 运营商会设置 PPC 的优先级。其最高的优先级是紧急优先级。 要发起一个 PPC,请参阅用户手册中的紧急模式和个呼模式 部分。 MTM800 是否会通过扬声器或是手机听筒接听呼叫,将取决 于接收到 PPC 时此对讲机的设置。 有关呼叫提示的信息,请参阅 “提示音”菜单选项中的设置 。 (第 页) 接收 PPC 的说明如以下段落所述。 在以下的屏幕中, “<正在使用> 任何模式”表示任何一种非 紧急性质的话音呼叫:组呼,个呼,电话呼叫或 PABX 呼叫。 通话进行时接收到一个紧急组呼 MTM800 接收紧急组呼,打断正在进行的非紧急性质话音呼 叫,然后连接到紧急组呼。...
- Page 28 通话进行时接收到一个私密 PPC 呼叫 如果您的运营商已经设置好,当 MTM800 接收到 PPC 呼叫 时,它会打断正在进行但非紧急性质且优先级较低的话音呼 叫,然后连接到较高优先级的个呼模式呼叫。 一个较低或相等优先级的 PPC 会被被叫方的忽略,且不会 给予任何指示,但会被输入未应答呼叫列表。 带有紧急优先级的 PPC 呼叫在屏幕中显示为 “紧急呼叫” (不是 “优先级” ) 。 接收到半双工私密 个呼优先级 个呼模式通话中 < 任何模式 > 优先级 David 正在使用 按 拒绝 PTT 键 接收全双工私密 个呼模式通话中 个呼优先级 < 任何模式 > 优先级...
- Page 29 氛围聆听 (AL) 如果您的运营商已经设置好,这个功能可让一个主控台的操 作员或调度员使用一个指定的 MTM800 建立一个特别的呼 叫。这个特别呼叫可以监听本区邻近范围的话音活动。这个 呼叫的建立不会发给受影响的 MTM800 任何指示。任何较低 优先级的当前话音呼叫或传输数据包可能会被占据。 在接收该呼叫后, MTM800 在半双工个呼模式呼叫传输。传 输时,没有任何活动来自用户或指示传给用户。当用户发起 任何话音呼叫和作一般的操作时,氛围聆听呼叫会自动结束。 取消呼入呼叫 在所有模式下 (组呼模式除外) ,如果您要在呼叫进行中取 消呼叫,按拒绝。呼叫号码将被转发到未应答呼叫列表。 电话方式下的功能 电话方式下的功能只有在使用电话手机时才能使用 (请参阅 第 页中的 “设置附件” ) 。 打开 关闭扬声器 将电话手机从机座上拿起后将会将扬声器断开,接收的声音 将只能从手机的听筒上听到。 1. 要启动外部扬声器,按扬声器。 David 一旦被激活,扬声器软按键将开始 2822 闪烁。 静音 扬声器...
- Page 30 麦克风静音 解除静音 当电话、 PABX 或全双工个呼模式呼叫正在进行时,使用静音 功能可以: • 主叫方不会听见进行的会话。 • 尽可能地降低您所在地区的背景噪音。 1. 按静音软按键。被激活时,静音软按键开始闪烁。麦克风 被静音。您可以听到呼入的话音,但呼叫方听不见您的 MTM800 传过去的话音。 2. 如要讲话,再按静音软按键。静音软按键不再闪烁。麦克风 可以正常使用。 隐蔽模式 如果您的运营商设置了隐蔽模式, 则您可以完全关闭 MTM800 警报和通知的所有显示和音频指示。此功能使 MTM800 在安 静和黑暗的环境中不易被察觉。 进入隐蔽模式: • 按隐蔽模式单键按钮 (如果运营商已编程好) ,或者 • 选择 “保密”菜单中的 “隐蔽模式” (参阅第 75 页) 。 单站集群服务 此模式,亦称...
- Page 31 当 MTM800 工作于单站集群服务时,将提供如下功能: • 注册 • 通话组连接 • 组呼 • 紧急组呼 • 紧急告警 退出单站集群服务 当与通信网络中央控制器的链路重新建立起来时, MTM800 将退出单站集群服务,随后: • MTM800 发出一声提示音。 • 在单站集群服务中正在进行的任何通话都被挂断。 使显示变暗 如果背景灯被设置为 “手动” , (请参阅第 77 页中的 “设置 背景灯” ) ,则背景灯强度一共有四个强度选项。要改变背景 灯强度,按 。 在电话模式下、 模式下或者进行文本编辑时不能使强度 PABX 无效,背景灯按键 用于输入 符号和...
- Page 32 要打开或关闭 “声光报警” ,按 。 要让 “声光报警”工作,您必须将点火器关闭。 在电话模式下、 模式下或者进行文本编辑时不能使用 PABX * 符号。 “声光报警”功能,此时 键用于输入 分组数据 分组数据 (PD) 业务允许您在 TETRA 系统中使用 Internet 协 议 (IP) 传送数据。有关此业务的提供信息请咨询您的运营商。 当标准计算机使用活动数据电缆 通过无线连接与 GMKN1022 之间进行数据传送时,运营商需要在计算机上安装 MTM800 附加的应用程序。 如果您的运营商安装了这些应用程序,则通过使用多信道分组 数据 (MSPD) 业务就可以加快数据的传输速度 (参阅第 88 页 中的 “分组数据” ) 。...
- Page 33 TMO 组呼 概述 组呼是在您所选定的通话组里,您和同一通话组的其他人员之 间的一种即时通信。通话的人员可以加入 (稍后加入)和离 开正在进行的组呼。一个通话组就是预先设定好的一组用户, 他们可以参与和/或请求发起一个由您的运营商设定的组呼。 通话组在屏幕中显示为名称或号码 (例如:Sales、 Service、 Electricians、 Talkgrp10) 。 通话组被划分为不同的范围。每个范围 最多可以包含 16 个 通话组。 为便于使用,您的 MTM800 还提供以下功能: • 对通话组别名按字母顺序搜索。 • 用浏览键在整个通话组列表中滚动。 • 拨打通话组 (由您的运营商设置) 。 • 将您的首选通话组组织到一个称为 “我的通话组”的归类 中 (由您的运营商设置) 。 您也可以把您的通话组设置到扫描列表中 (这可以由您的运营 商设置或您自己通过菜单设置) 。当您激活其中一个扫描列表 时,您的...
- Page 34 每个通话组都有一个相关的通播组 (ATG),此通话组对它进行 监听 (如果您的运营商进行了设置) 。 通播组 ATG 是一个特殊的通话组,它联系着大量通话组并拥 有最高的优先级,可以把呼叫广播给所有这些通话组。 当选定一个通播组时,扫描图标不会显示。MTM800 将监听这 个通播组扫描列表而不再监听选中的扫描列表。通播组扫描列 表包含了与选定通播组相关的所有通话组。您的运营商会告诉 您哪些通话组与哪个通播组相关联。 您的 MTM800 将一直监听通播组扫描列表中的组呼。要发起 一个通播呼叫,您必须按照运营商的说明首先选择指定的通 播组,否则您只能在收到一个通播组呼叫后才能加入。 激活和关闭通话组扫描功能不会影响通播组扫描列表。 选择通话组 您可以通过以下方式之一选择一个通话组, 范围 10 使用: 通话组 1 选项 • 浏览键 状态 • 字母搜索功能 • 数字键盘输入 (如果已设置) • 首选通话组 (如果已设置) 有关通话组范围滚动配置,请参阅第 32 页中的 “选择范围” 中的说明。...
- Page 35 使用字母搜索 1. 在组呼模式中,按选项。 范围 10 通话组 1 选项 状态 2. 选 “abc” 使用按字母顺序搜索功能。 1 abc 2 范围 3 激活扫描 返回 确定 3. 您现在处在通话组按字母顺序搜索屏幕。 abc: 通话组 输入一个字母或数字, MTM800 就开始 搜索以这个字符开头的第一个通话组别 返回 名。使用浏览键滚动到相邻别名。在此 例中,输入的是字母 “a”。 4. 按下确定选定您要的通话组,或者直接 A = A 组 按 PTT 选定该通话组并在这个新的组发 3500 起一个呼叫。...
- Page 36 滚动时浏览快速拨号号码 (仅待机模式) 1. 在组呼模式下,案浏览键滚动到所需的 范围 10 通话组。 通话组 1 选项 状态 2. 按 。 Menu 范围 10 通话组 2 取消 确定 3. 选择 “1 浏览速度 # ”以浏览通话组 1 浏览速度 # 快速拨号号码。 返回 确定 4. 在此例子中 “2” 为快速拨号号码。 范围 10 按返回返回到加入通话组屏幕。 2*= 通话组...
- Page 37 从组呼模式屏幕添加通话组 1. 在组呼模式屏幕中滚动到所需的通话组 范围 10 并按选项。 通话组 1 选项 状态 2. 选择 4 添加到我的通话组。对讲机显示 3 激活扫描 短消息中添加的通话组别名,然后返回 4 添加到我的通话组 5 浏览速度 # 到待机状态。 返回 确定 TG 101 已添加 从我的通话组选项菜单中添加通话组 请参阅第 70 页中的 “我的通话组” 。 从我的通话组范围中选择一个通话组 请参阅第 70 页中的 “我的通话组” 。 在接收到呼叫时或在通话期间更改通话组...
- Page 38 选择范围 要选择一个范围: 1. 在组呼模式中,按选项,然后按范围。 2. 使用四方向浏览键滚动浏览覆盖范围。 3. 按确定选择范围 (或按住 PTT 开始在新的范围发送 呼叫。 ) 运营商可以设置滚动的范围为: 始终处于范围内 当通话组滚动到范围末尾时,继续滚动将 • — 会使屏幕返回到通话组列表的范围开始。 滚动到下一个范围 当通话组滚动到范围末尾时,继续滚动 • — 会进入下一个范围的通话组列表。 启动/关闭扫描 请参阅第 84 页中的 “设置通话组扫描” 。 发起一个组呼 1. 请按住 直到屏幕中显示 “组呼模式” 。在本例中, Mode ” 是最后选定的范围,而 是最后选定 “通话组...
- Page 39 请按确定来选定范围 (或者按住 PTT 以在新的范围中发起 一个呼叫) 这个呼叫被设定在一个新的范围并且是该范围 。 内最后选定的通话组。 当您发起一个呼叫时,选定通话组中已经开机的组员将会收到 您的呼叫。 当您超出了所选定的通话组正常覆盖范围,则会显示 “没有通 话组”信息。请选择在您的工作范围内有效的新通话组。 接收组呼 除非 MTM800 正在进行通话,否则它将自动切换到组呼模式 并接收此呼叫。要应答该呼叫,请按住 PTT。 您的 MTM800 将显示通话组名和呼叫方的个人号码或姓名 (别名) (如果以前存储在您的号码簿中) 。接收到首选通话 组时,对讲机将显示 “我的通话组”范围和通话组别名。 以下屏幕举例说明如何显示呼叫方的身份码 (ID 7712)。 ID: David 范围 1 ID: 7712 或 或 通话组 1 通话组...
- Page 40 正在进行组呼时接收到一个组呼 按照运营商对呼入呼叫所作的设定,呼入的呼叫将会: • 强占通话并打断您正在进行的呼叫 (如果该呼入呼叫的优先 级比正在进行通话的优先级更高) 。 或 • 提示给您选择 (如果该呼入的优先级 ID: 7712 高于当前通话的优先级) 。 TG 4 > 按加入接收该呼叫。 结束 加入 > 按结束取消呼叫。 扫描打开时接收组呼 扫描打开时,您除了可以从所选定的通话组或相关 ATG 接收 组呼外,还可以从所设置的扫描列表接收组呼。 接收扫描呼叫功能与在扫描关闭时接收相关 ID: 7712 ATG 或选定呼叫相同 (请参阅上一页) , TG 4 但以下情况除外: 结束 • 与您在待机模式下接收呼叫的显示屏幕 不同,如图所示。...
- Page 41 禁止传输 在用户进入射频敏感区域,例如在进入医院或具有潜在辐射的 区域前,用户可以激活禁止传输 (TXI) 模式,因为在这些区域 可能会由于对讲机传输辐射而危及安全。 激活 模式或将此对讲机与电源隔离只是抑制 MTM800 的辐射。 禁止传输模式只能在组呼模式中被激活。当此对讲机处于禁止 传输模式时,在任何情况下都不会进行通信,但紧急组呼除外, 即使 MTM800 处于 TXI 模式也会发起紧急组呼。 所有用于传输的对讲机功能和按键,例如:网络入网登记、 改变通话组或范围、发送短消息,按 PTT 等都被关闭。此时 屏幕显示 “不允许在 TXI 模式” ,同时此对讲机发出 “禁止 传输”提示音。 当对安全产生影响的危险因素消失后 (例如如果您离开了射 频敏感区域) ,您可以关闭禁止传输模式,此对讲机将返回正 常操作模式。 有关 TXI 模式的设置,请参阅第 83 页中的 “设置禁止传输 (TXI) 模式” 。 要激活或关闭...
- Page 42 动态通话组号码指配 (DGNA) DGNA 功能使网络运营商或授权的用户能够通过空中接口为 选定的对讲机分配新的或更新现有的通话组。使用辅助服务 短消息 (SS-DGNA),网络运营商能够命令对讲机将通话组添 加到现有通话组列表中,或者从列表中删除通话组。此操作 是通过发送数据到您的 MTM800 来实现的。 您的运营商可以将一些通话组汇总在一个超级通话组之下,然后 将它作为一个 发送给您的 。在这种情况下, DGNA MTM800 您就能够参与该超级通话组中所有通话组的呼叫。 DGNA 接收时的通知信息 如果您的运营商已为您设置了动态通话组 6 TG 已添加 号码指配 (DGNA) 通知功能,当接收到一 个动态通话组号码指配 (DGNA) 时,您将 查看 返回 听到一声提示音以及信息提示 ( “可编辑 条目 ...” ) ,然后显示这个 新的动态通话组号码指配结果。 如果您的运营商没有为您设定...
- Page 43 数秒钟后,显示屏将返回初始 DGNA 显示 所更新的细节。 12 TG 已删除 返回 查看 如果接收到的 DGNA 是所有 “通话组删 所有通话组 除”的分配,则您的 MTM800 如右图显示。 已删除 返回 DGNA 接收时无通知信息 如果您的运营商没有为您设定 DGNA 通知功能,那么只有当 一个已选定通话组被 DGNA 更改时,您才会收到一声提示音 和通知信息。 DGNA 自动选择通话组 如果您的运营商对 “DGNA 自动选择”进行了设置,无论何 时您的对讲机接收到一条 DGNA 消息,此通话组将自动成为 您的对讲机选定的通话组。 按键/脚踏开关 此功能允许用户通过按紧急键/脚踏开关来发送预定义短消息。 TMO 紧急模式、紧急告警和发起 TMO 紧急组呼/个呼不可用。 短消息寻址和发送:...
- Page 44 DMO 组呼 概述 在直通模式 (DMO) 中, MTM800 可以在没有系统覆盖的情况 下使用。 直通模式允许在选择了相同通话组的对讲机之间进行通信。 在 模式中可以发起组呼、紧急组呼和半双工个呼。 您可以接收呼叫,此呼叫来自: • 选定的通话组。 • 同一对讲覆盖范围内的其他用户 (如果您的运营商已设置) 。 这称为 InterMNI (移动网络标识)呼叫。 • 开放组。 (一个开放组是所有 DMO 组所属的超级通话组) 。 当您发起呼叫时,选定通话组中已打开设备的人员和属于此通话 组用户身份 (根据运营商的设置)的用户,都会接收该传输。 如果对讲机的 “网关”选项被激活,在 DMO 模式下 MTM800 便可与集群系统通信 (反之亦然) 。 为了扩大此对讲机的 DMO 覆盖范围,如果对讲机中的 “转发 器”选项被激活,则...
- Page 45 从 TMO 切换到 DMO 或者从 DMO 切换到 TMO 通过以下方式之一进入 TMO 或 DMO: 6 2 2。 • 从 TMO 切换到 DMO,按 Menu 6 2 1。 • 从 DMO 切换到 TMO,按 Menu • 按指定的 TMO/DMO 单键按钮 (由您的运营商进行设置) 。 选择网关/转发器 使用 DMO 配置子菜单来设置网关和转发器 选项。...
- Page 46 选择 通过网关的 DMO 组呼 处于 DMO 时,请按照下列步骤选择网关以便为所选择的通话 组建立通过网关的呼叫: 1. 按选项滚动到 “3 配置” ,然后按确定。 2. 滚动到 “2 网关”并按确定。 1 移动台 – 移动台 2 网关 3 转发器 返回 确定 3. 屏幕显示上一个网关类型。使用浏览键滚动到您的选项然后 按确定: 自动 — MTM800 将为该通话组使用第一 个可用网关。在选择该选项时网关图标 1 自动 2 指定 将闪烁。 返回...
- Page 47 选择 通过转发器的 DMO 组呼 处于 DMO 时,请按照下列步骤选择转发器选项以便为所选择 的通话组建立通过转发器的呼叫: 1. 按选项使用浏览键滚动到 “3 配置” ,然后按确定。 2. 滚动到 “3 转发器”并按确定。 3. MTM800 将使用此通话组的第一个可用 DMO 范围 1 转发器。在选择转发器时转发器图标将 DMO TG10 闪烁。 当 MTM800 找到合适的转发器信号时, DMO 范围 1 转发器图标将变成稳定的,不再闪烁。 DMO TG10 选择 通过网关和转发器的 DMO 组呼 处于...
- Page 48 • “无”表示没有为该通话组选择网关。 已选择网关 : 通过键盘输入一个地址。然后按确定。 无 在选择网关时网关和转发器图标将 返回 确定 闪烁。 当 MTM800 找到合适的网关和/或转发器 DMO 范围 1 时,网关和/或转发器图标将分别变成稳定 DMO TG1 的,不再闪烁。 选项 发起 DMO 组呼 (移动台到移动台) 1. 按 直到 “组呼模式”显示在屏幕上。 Mode 范围 10 通话组 1 选项 状态 2. 按 6 2 2 (请参阅第 83 页) 。更改 Menu 1 集群模式...
- Page 49 • 如果当选定网关可用时按 PTT,但此 移动台 – 移动台 呼叫被网关拒绝,您的 MTM800 将发 呼叫 出提示音并通过屏幕显示通知您通过 网关的呼叫失败,此对讲机将自动发 起不通过网关的 DMO 呼叫。网关图标将消失。 • 如果您在网关可用时按 PTT,您将通过网关发起 DMO 呼叫。网关图标将变为稳定的。 发起 DMO 组呼 (通过转发器) 1. 处于 DMO 时,选择 第 41 页中的“选择通过转发器的 DMO 组呼” 中所述的转发器选项。 2. 发起所选通话组的呼叫: • 当转发器不可用时按 PTT, 您将不通过转发器发起 DMO 呼叫。转发器图标将消失。...
- Page 50 不成功 > 如果 ,您的 MTM800 会显示消息 “移动台 – 移动台呼叫” ,将建立移动台到移动台的呼叫。网关 和转发器图标将消失。 可用 时按 PTT,将尝试通过网关发起 • 当网关和转发器都 呼叫。 成功 > 如果 ,您的 MTM800 将通过网关发起 DMO 呼叫。 网关图标将变为稳定的。转发器图标将消失。 不成功 > 如果通过网关发起呼叫 ,则将尝试通过转发器 发起呼叫。 成功 > 如果 ,您的 MTM800 会显示消息 “转发呼叫” , 将通过转发器建立呼叫。网关图标将消失而转发器图 标变为稳定的。...
- Page 51 如果选择了移动台到移动台模式,但移动台接收到一个通过 • 转发器的呼叫,将显示转发器图标 (如果运营商启动了转发 器模式,否则就不会接收到此呼叫) 。 如果选择了网关模式但网关不可用,则在接收到网关呼叫时 • 网关图标将变为稳定的。 DMO 个呼模式呼叫 如果您的运营商已配置好,则您可以发起和接收 DMO 个呼。 但即使启用了网关和/或转发器选项, 也不会将它们用于 DMO 个呼。 DMO 个呼是两个 TETRA 对讲机之间的直接通信 (移动台 – 移动台) 。 详情请参阅第 49 页中的 “DMO 个呼” 。 接收紧急组呼 详情请参阅第 61 页中的 “在 DMO 模式中的紧急呼叫” 。...
- Page 52 个呼 概述 个呼模式呼叫,也称为点对点或个人呼叫,是发生在两个个 人用户之间的呼叫通信。其它对讲机都不能听到他们的对话。 此呼叫可以是 • TMO 模式下的 全双工呼叫 (如果系统允许) ,或者 • TMO 或 DMO 模式下的 半双工 呼叫。 在全双工呼叫时,通话的双方可以同时讲话,而在半双工呼 叫时,同一时间只有一方可以讲话。 如果您的运营商已限制了对号码簿的访问,则不能创建一个新的 联系人、编辑现有的号码簿或拨打号码簿中没有的号码。 进入个呼模式 要进入个呼模式,请按 直到 Mode 个呼模式 “个呼模式”出现在屏幕上。 8008801 状态 在本例中, 8008801 是上一次呼叫或被呼 叫对讲机的个人号码。别名不会被显示, 因为没有在个人号码列表上预先设定它。如果这就是您想与 之通话的人,请按 PTT。 如果您想与之通话的人没有显示,您可以通过以下方法输入 此人的个人号码: • 上次呼叫的号码 •...
- Page 53 有关在射频敏感区域使用 MTM800 的信息,请参阅第 35 页 中的 “禁止传输” 。 当激活禁止传输功能时,会指示有个呼呼入,但不能应答此 呼入。 输入个呼号码 上次呼叫的号码 当在个呼模式处于闲置状态时,上次呼叫的号码将会立刻出现 在显示屏上,可按 PTT 呼叫这个号码。 直接输入 1. 输入个人号码。如果您所输入的号码已经存在于预先设定 的私人号码簿中, MTM800 将找到此号码。 2. 当需要将这个号码存入号码簿中时,请按保存存储并遵循 有关指示操作 (请参阅第 68 页中的 “更新个呼模式呼叫 号码簿”一节) 。 缩位拨号 如果运营商设置了缩位拨号功能,您只需拨打您要呼叫方号码 的一部分即可。您的 MTM800 将自动补全该号码并根据您的 对讲机标识发送此号码。 例如: 1. 拨 456 (而不用拨全部号码 4282456) 。 2.
- Page 54 按字母顺序搜索 按字母顺序搜索可以使您通过输入姓名 D=David (或别名)的首个字母快速找到所存储的个 1024 人号码。 取消 1. 按 “abc”。 2. 请按您在预先存储列表中搜索姓名首字母的数字键 (在本 例中为 ) 。 如果在预先存入的姓名中没有以输入的字母打头时, MTM800 就会自动地按字母顺序向前搜索,直到下一个姓名被找到。如 果在这个列表中有多个姓名以此字母开头,使用滚动键来查看 其他姓名。 发起 TMO 模式下的个呼 1. 输入您要呼叫的呼叫方号码。 2. 按下 PTT 后再松开。您将听见振铃音。等待被叫方应答您 的呼叫。 3. 通话时按住 PTT,接听时释放 PTT。 4. 要结束呼叫时,请按 。如果被叫方结束通话,屏幕 显示 “呼叫结束”消息。 发起...
- Page 55 在 TMO 模式下接收个呼 1. MTM800 将自动切换到个呼模式并开始 个呼模式呼叫 振铃。显示屏上将显示主叫方的识别码。 ID: 82114 2. 请按 PTT 应答呼入。 3. 要结束或取消呼叫,请按 。屏幕 自动返回到接收呼入前的模式。 如果被叫方结束通话,屏幕显示 “呼叫结束”消息。 有关呼叫提示的信息,请参阅 “提示音”菜单选项中的设置 。 (第 页) 接收 TMO 模式下的全双工个呼模式呼叫 1. MTM800 将自动切换到个呼模式并开始 个呼模式呼叫 振铃。显示屏上将显示主叫方的识别码。 ID: 82114 2. 请按 或键盘上的任意键应答呼叫 (如果您的运营商进行了设置) 。 3.
- Page 56 发起 DMO 个呼模式呼叫 1. 要进入个呼模式,请按 直到 “个呼 Mode 个呼模式 模式”出现在屏幕上。 2234 状态 2. 输入如第 47 页中的 “输入个呼号码” 中所述的号码。 3. 按住 PTT。等待通话允许音 (如已配置)然后讲话,释放 PTT 接听。 4. 在经过了预先设定的时间后,或者如果您按了 后会 结束呼叫。 对 模式下个呼的被叫方不进行存在性检查。这意味着在 发起该呼叫时您不知道被叫方是否存在。 接收 DMO 个呼 接收 DMO 个呼时,不需要被叫方接受它 正在使用个呼 就可以立即开始呼叫。 David 更多...
- Page 57 发起私密 PPC (先占式优先权呼叫) 此功能只有在您的运营商为您设置后才能使用。 1. 输入个人号码,然后按 PTT,或者 占线 。 中断 ? 否 是 2. 如果屏幕显示被叫方忙,按是打断正在 进行的通话。 3. 您将听见振铃音。等待被叫方应答您的呼叫。 4. 与普通半双工个呼或全双工个呼一样继续此呼叫。 呼叫排队 在呼叫建立阶段如果没有基础设施资源用于此呼叫,或者在 小区重新选择过程中有激活的呼叫时,此呼叫将被排队。 MTM800 将在预先设定的时间段内一直处于排队状态。如果 有可用资源,将继续进行呼叫。如果在这个时间段过后还是 没有可用资源,则 MTM800 将结束呼叫。...
- Page 58 电话及专用自动交换分机呼叫 概述 电话模式可以让您呼叫固定电话号码或移动电话号码。在本 手册中我们用 “电话号码”来指代这些电话号码。 专用自动交换分机 (PABX) 模式使您能够呼叫本地的 (交换 局)分机号码 (如果该模式已由您的运营商激活) 。 这两种模式都有相同的拨号特点。 有关在射频敏感区域使用 MTM800 的信息,请参阅第 35 页 中的 “禁止传输” 。 当激活禁止传输功能时,会指示有电话呼入或 呼叫, PABX 但不能应答此呼入。 如果您的运营商已限制了对号码簿的访问,则不能创建一个新的 联系人、编辑现有的号码簿或拨打号码簿中没有的号码。 发起电话或 PABX 呼叫 1. 请按住 直到屏幕中显示 “电话 Mode 电话模式 模式” 。 039694040 如果需要进行 PABX 呼叫, 再按一下 状态...
- Page 59 如果您想与之通话的人没有显示,您可以通过以下方法输入 此人的号码: • 重拨上次呼叫号码 • 直接拨号 • 快速拨号 • 单键拨号 • 列表滚动 , 或者 • 按字母顺序搜索。 按返回返回模式显示屏幕。 重拨上次呼叫号码 当未显示号码时,按 将进入上次拨打的电话和个人号码 的列表。 1. 请按 或 在列表中向后或向前滚动。 2. 按 发起电话呼叫。 3. 再按一下 即可挂机。 直接拨号 1. 用键盘直接拨全部的号码。 2. 要将号码存入号码簿中,请按保存存储并遵循有关提示操作。 3. 按 发起呼叫。 4. 再按一下 即可挂机。...
- Page 60 单键拨号 单键拨号允许您通过按住数字键 (2 – 9) 中的一个键来发起呼叫。 此号码是号码簿中条目 (2 – 9) 的位置对应的被叫用户。 1. 按住所需的数字键数秒钟。您的 MTM800 将显示此号码并 拨号。 2. 要挂机,请按 。 如果单键功能被激活,单键拨号将无效 (请参阅第 页) 。 列表滚动 1. 请按 或 在存储号码和姓名的列表中向后或向前 滚动。 2. 按 发起呼叫。 3. 再按一下 即可挂机。 按字母顺序搜索 按字母顺序搜索可以使您通过输入姓名 (或别名)的首个字母 快速找到所存储的号码。 1. 按 “abc”。 D=David 2.
- Page 61 DTMF 拨号 如果您的运营商已预先设定 DTMF 拨号,则您可以在呼叫过 程中与一台自动应答设备 (例如话音信箱或录音电话)进行 通信。 在呼叫过程中,按 0 – 9、 *、 # 键。这时, 电话正在使用 此键将发出提示音,并且屏幕中将显示输 12345*#67890 入的数字。 接收呼叫时拨号 请参阅第 50 页中的 “接收呼叫时拨号” 。 应答一个电话或 PABX 呼叫 1. MTM800 将自动切换到电话模式并开始振铃。 2. 要应答呼入,按 或任意键 (电源开/关除外) 。 3. 要结束或取消呼叫,请按结束。屏幕自动返回到接收呼入前 的模式。 如果被叫方结束通话,屏幕显示 “呼叫结束”消息。 有关呼叫提示的信息,请参阅...
- Page 62 紧急模式 概述 在集群模式 (TMO) 下,您可以发送一个紧急告警给调度员。 同时,也可以发起和接收紧急组呼或个呼。 TMO 模式下的对 讲机可以接收发送给与通播组有关的选定通话组、或者扫描 通话组的紧急呼叫。如果通播组为当前选定的通话组,此对 讲机将接收发送给与此通播组有关的通话组的紧急组呼。 (有 关通播组的详情,请参阅第 27 页。 )您可以用 MTM800 发起 一个紧急组呼而不需要按住 PTT (也就是紧急麦克风功能) 。 在直通模式 (DMO) 下,您可以发起和接收一个紧急组呼。 您的运营商可能配置 • 紧急组呼、 • 紧急个呼 (如果基础设施支持) 、 • 紧急告警、 • 紧急麦克风功能和 • 紧急模式指示。 当您从 TMO 切换到 DMO 时,该对讲机会保留紧急模式。 如果紧急模式在...
- Page 63 有关呼叫提示的信息,请参阅 “提示音”菜单选项中的设置 。 (第 页) 进入 TMO 或 DMO 模式 通过以下方式之一进入 TMO 或 DMO : 6 2 1 (TMO) • 按下 Menu 6 2 2 (DMO) • 按下 Menu • 按指定的 TMO/DMO 单键按钮 (由您的运营商进行设置) 进入或退出紧急模式 要从任何其它模式进入紧急模式,按 。 在 模式下进入紧急模式时, 会自动向调度员 MTM800 发送一个紧急告警...
- Page 64 隐形紧急 运营商可以启用 禁用此功能。 隐形紧急模式是一种无语音指示的紧急服务,对于任何紧急 操作,屏幕都对应于待机状态。在该模式下,只有用户才知 道对讲机处于紧急模式并发出紧急告警。 用户退出紧急模式时将恢复所有设置。 按住标有 “退出”的软按键可退出隐形紧急模式。 改变范围或改变通话组 如果 “紧急组呼”被配置为 “tactical”,您可以选择显示通话 组之外的其它通话组。按 浏览键,然后按确定。 要改变范围,按选项,然后按照第 32 页中的 “发起一个组 呼”中的说明操作。 在 TMO 模式中的紧急呼叫 发送一个紧急告警 您的 MTM800 将会发送紧急告警 (如果您的运营商进行了 设置) : • 在进入紧急模式时将自动发送。 • 当 MTM800 处于紧急模式时按 。 • 如果您在紧急模式中改变通话组。 屏幕将显示以下两种提示信息之一: •...
- Page 65 或者 – 如果您的运营商进行了设置,您的 MTM800 将发出 一个紧急告警: • 如果您之前在未进入紧急模式的情况下按了紧急键/脚踏开 关。 - 其它紧急服务如发起 TMO 紧急模式呼叫或紧急个呼 (如果基础设施支持)将无法使用。 - 发送紧急告警将没有可见或音频指示。 当用户处在 “单站集群服务”区域内时,有些系统是不支持 紧急告警功能的。 (请参阅第 页。 ) 发起紧急组呼 在紧急模式中,要发起或应答呼叫: 1. 按住 PTT。 2. 等待通话允许音,然后开始讲话 (如果已设置好) 。 3. 松开 PTT 即可接听。 按 上的紧急键将进入 模式 (如果您的运营商进行 MTM800 了设置)...
- Page 66 当紧急麦克风打开时间超时后,或者如果 您在紧急麦克风状态下按了 PTT,或者如 紧急麦克 结束 果您按了结束:屏幕中将会出现 “紧急麦 克结束”信息,对讲机将返回紧急模式。 此时,紧急麦克风功能关闭, PTT 操作返回正常。 若要恢复,再按一下 。 如果通话组中另一个成员被允许通话,您 ID 123 将会听到 “紧急呼叫已接收”的提示音。 等待紧急麦克打开 选项 结束 如果您的运营商已事先设定好,您的 MTM800 会再次尝试要求通话,屏幕中会 显示 “等待紧急麦克打开”信息。 在这段等待的时间内, 的麦克风将不能使用,直到 MTM800 信息显示。 “紧急麦克打开” 接收紧急组呼 TMO 模式下的对讲机可以接收发送给选定通话组、相关通播组 或者扫描通话组的紧急呼叫。如果通播组为当前选定的通话组, 此对讲机将接收发送给与此通播组有关的通话组的紧急组呼。 (有关通播组的详情,请参阅第 28 页。 ) 当...
- Page 67 在 DMO 模式中的紧急呼叫 您可以发起到通话组的紧急呼叫。 您可以接收来自选定通话组的呼叫 (如果您的运营商进行了 设置) ,也可以接收来自在同一对讲覆盖范围内其他用户的呼 叫,或者是来自一个开放小组的呼叫。 (一个开放组是所有 DMO 组所属的超级通话组) 。 紧急呼叫可以通过网关和转发器发送。有关网关和转发器的 设置,请参阅第 39 页中的 “选择网关/转发器” 。 发起紧急组呼 要发起或应答一个呼叫: 1. 按住 键进入紧急模式。 2. 按住 PTT。 3. 等待通话允许音,然后开始讲话 (如果已设置好) 。 4. 松开 PTT 即可接听。 接收紧急组呼 屏幕显示呼叫方身份码为私密号码或一个名称。如果屏幕处 于待机状态,则会显示 “正使用紧急呼叫” 。...
- Page 68 GPS 定位服务 概述 您的对讲机的 GPS 定位功能从以地球为轨道的全球定位系统 (GPS) 卫星获得信息,并使用该信息确定对讲机大概的地理位 置。位置信息的可用性和准确性 (以及计算这两项所用的时 间)根据您使用该对讲机的环境不同而有所不同。 例如,在没有广阔视野的情况下,如室内、被遮挡的位置、 高楼之间等,都无法获得 GPS 固定位置。 请参阅 “重要 – 必须考虑的事项” 。 GPS 定位服务能在多方面帮助您的调度员或同事,例如可以 更有效的配置资源,以及在启动紧急服务时定位对讲机。 可以配置对讲机在对讲机显示屏上显示位置信息,或配置为 将位置信息无线发送给调度员,并显示在控制中心 (请与运 营商核对您的对讲机配置) 。 重要 – 必须考虑的事项 如果多个卫星提供的信号不足 (通常因为您的 GPS 天线没有 处于广阔的视野中) ,则对讲机的 GPS 功能将不能工作。包括 但不限于以下情况: •...
- Page 69 增强 GPS 性能 有时候您的对讲机的 GPS 功能无法成功完成位置计算。您会 看到一条消息,表示您的对讲机无法看到足够可见的卫星。 最大化对讲机的性能,确定固定位置,并注意以下规则: • 在视野广阔、没有阻挡物的地方使用对讲机时, GPS 功能发 挥的最好。请尽量走到室外,远离高楼和植物茂密的地方。 • 调整车辆位置以增强接收效果,使天线可以顺利接收卫星 信号。 GPS 卫星信号传送到您的对讲机天线中的 GPS 天 线。手指或其他任何物体不要遮盖天线区域。 • 请在网络覆盖范围内使用。根据您所选择的运营商,网络会 为您的对讲机提供信息,帮助您快速精确的确定您的位置。 GPS 启用/停用 9 2) Menu 1. 在主菜单中,按 。 9 定位 – 2 接口 Menu 高亮当前的选择项 (开/关) 。显示屏显示: 开...
- Page 70 查看您的位置 ( 9 1) Menu 1. 在主菜单中,按 。 – 9 定位 – 1 位置 Menu 2. 会显示有关上一次 (如果存在)计算位置时的以下信息: UTC — 上次计算位置的时间。 LAT — 以度数、分、秒显示的纬度。 LNG — 以度数、分、秒显示的经度。 SAT — 用于计算位置的卫星数。通常,卫星越多准确性 越高。 3. 滚动以查看全屏。 要重新计算位置,按更新。对讲机完成确定位置的过程需要 花费几分钟时间。在此期间您的对讲机显示屏上通常会出现 一条消息: 可见卫星不足,或 可见数据不足。 有关获取最好的位置计算结果的提示,请参阅第 63 页中的 “增强...
- Page 71 菜单 进入菜单选项 您可以在呼叫过程中进入菜单选项。如果您在查看菜单时有 新的呼叫,则对讲机会退出此菜单。 通过滚屏进入 1. 从任何模式进入菜单,按 。 Menu 8 最新呼叫号码 1 短消息 2. 要滚动到所需的选项 (例如: “ 2 号码 2 号码簿 返回 确定 ” ) ,请按 或 。 簿 Menu 3. 要输入选项,请按 。 确定 如果子菜单包含更下一层的子菜单,如以下所示的例子那样, 请重复步骤 2 和步骤 3。 通过快捷键进入 您可以使用选项旁边的号码作为到达所需子菜单的快捷键。...
- Page 72 菜单选项列表 1 短信息 1 发送状态信息 1 新增 2 收件箱 2 用户模板 3 发送短消息 3 预定义模板 2 号码簿 1 输入号码 / 输入电话号码 / 输入分机号 1 私密 2 字母顺序 2 电话 3 按位置 3 PABX 4 内存状态 1 选择 4 我的通话组 2 浏览 1 增加...
- Page 73 菜单选项列表 (续) 4 设置 (续) 5 时间和日期 1 显示 1 时间和日期 2 设置 2 时间 3 时间偏移 3 日期 4 时间格式 4 关 5 日期格式 6 附件类型 1 标准 2 手机 3 外部的 4 外部 & 标准 5 本机号码 1 个人号码 2 电话号码...
- Page 74 某些菜单的号码可能与列出的不同。某些选项有可能被运营商 激活或关闭,从而导致实际使用中,菜单列表的号码有可能会 有些不同。 短消息 Menu 有关详情,请参阅第 90 页中的 “短消息” 。 号码簿 Menu 按 进入号码簿子菜单 – 2 号码簿 。 Menu • 此子菜单可以让您添加、搜索、编辑或 1 私密 删除个呼模式呼叫号码簿、电话号码簿 2 电话模式 3 PABX 和 PABX 号码簿中的条目。 返回 确定 更新您的个呼模式呼叫号码簿与更新您的电话号码簿或 PABX 号码簿的做法是完全相同的。当使用快捷键以到达有关的子菜 单时,请确认所使用的数字序列与第 页的菜单选项列表中 所示的完全相同。 如果您的运营商进行了设置,则不能创建或编辑号码簿条目, 或者拨打号码簿中没有的号码。用于创建、编辑和删除号码簿...
- Page 75 1. 按 添加号码。 MTM800 将提示您向现有的列表添加一 添加 个条目。该条目是由一个号码、名称和位置构成的。首先, 输入号码和名称。 2. 按 以确认您的输入。然后选择该条目在列表中的位置。 确定 3. 列表中的第一个空白位置 (如果有)会被建议为存储该条 目的缺省设定位置。您可以选择其它位置,通过在位置列 表中滚动选择或者通过键入该位置的号码即可实现。如果 选定的位置已经被使用,您会被提示是否要在该位置上覆 盖原有信息。 4. 当该信息被成功存储时,屏幕将会在数秒钟内返回到添加 条目屏幕。 搜索号码簿可以按字母顺序 或者按位置搜索号 2 1 2) Menu 码簿 2 1 3) Menu 1. 要进入子菜单,按 和 或 – 2 号码簿 – 1 私密 2 字母顺序...
- Page 76 内存状态 2 1 4) Menu 要进入子菜单,按 。 – 2 号码簿 – 1 私密 – 4 存储器的使用 Menu 此屏幕显示还有多少剩余存储空间供号码簿添加新条目。 我的通话组 ( 2 4) Menu 在菜单中选择 2 号码簿 4 我的通话组。 – 1 选择 2 浏览 这个子菜单可以让您查看首选通话组列表。 3 增加通话组 返回 确定 进入我的通话组 2 4 1) Menu 1.
- Page 77 从我的通话组中删除通话组 2 4 4) Menu 1. 在菜单中选择 2 号码簿 4 我的通话组 4 删除通话组。 – – 2. 选择要删除的通话组。在 “删除?”提示屏幕中选择是确认 删除。 从我的通话组中删除所有通话组 2 4 5) Menu 1. 在菜单中选择 2 号码簿 4 我的通话组 5 全部删除。 – – 2. 在 “删除?”提示屏幕中选择是确认删除。 保密 Menu 要进入保密子菜单,选择 。...
- Page 78 3. 在出现 “ ”提示时,输入 4 位数密码 (出厂设置为 密码? “0000”) 。为了防止 PIN 码的泄露,屏幕中显示的是星号而 不是您所输入的密码数字。按 。屏幕中将显示以下的 确定 信息之一: — 您所输入的密码正确。屏幕返回保密子菜单并 本机已锁 显示启动的设置: 。 1 开 — 您所输入的密码正确。屏幕返回保密子菜单 本机已解锁 并显示启动的设置: 。 2 关 要在开机后解锁 MTM800,根据提示输入密码。 MTM800 进入缺省的本地模式。 如果您没有输入正确的密码,将显示以下信息: — 您将被提示请再尝试。如果三次过后仍不成 密码输入错误 功,您的 MTM800 将被锁定。 如何解锁...
- Page 79 • 如果您所输入的旧密码不正确,屏幕中将会显示 “ 密码 ” ,并返回到保密子菜单。 输入错误 • 如果输入的密码与旧的密码相符,屏幕将提示您输入一 个新的四位密码,并让您重复输入该密码以确认。如果 前后两次的输入不相符,您将被提示重新输入新密码。 3. 如果新密码被接受,屏幕将返回到 “保密”子菜单。 空中加密开/关 ( 3 4) Menu 要进入子菜单,按 。 – 3 保密 – 4 空中加密 Menu 该子菜单可以让您查看空中加密功能是否处于开启或关闭状态。 呼叫加密服务是在您和系统之间秘密进行的。 如果加密生效,而您正在接收一个未加密的呼叫时, MTM800 将会显示 “呼叫未加密”信息。 您不能用菜单手动关闭空中加密功能 (如果该功能已开启) 。 该菜单条目仅仅是用来告诉您此时空中加密功能是否已开启。 空中加密功能仅仅可以由运营商激活。 空中加密密钥删除 请咨询您的运营商,了解此对讲机是否提供了空中界面加密键。...
- Page 80 K 值有效性 ( 3 5) Menu 在菜单中选择 。 3 保密 – 5 K 值有效性 K (密钥)是基础设施用于鉴定系统内 MTM800 的密钥。这 是认证的一部分,可让您的 MTM800 和系统之间保持信息的 机密性。 要鉴定 K 值有效性,按 。屏幕中将显示以下的信息之一: 确定 — 基础设施可以鉴定您的 MTM800。 K 值有效 — 基础设施不可以鉴定 MTM800。请与您的运营商 K 值无效 联系,重新恢复 K 到您的 MTM800。 TMSCK 有效?...
- Page 81 隐蔽模式 3 8) Menu 从主菜单中选择 。 3 保密 – 8 隐蔽模式 将隐蔽模式设置为 “开” 选择 “开” 。所有提示音被设为 “关” , 1 开 所有背景灯和 LED 被立即关闭。 2 关 返回 确定 如果外部扬声器未关闭,则话音会被发送到此扬声器。建议您 在隐蔽模式下使用手机听筒来接收音频。 将隐蔽模式设置为 “关” 选择 “关” 。将恢复提示音和背景灯的所有设置。 LED 被打 开并显示信息 “隐蔽模式关” 。 DMO SCK ( 3 9) Menu 在菜单中选择...
- Page 82 中文、繁体中文或运营商所定义的语言。工厂的缺省设置是 用英语进行操作。 滚屏至所需的语言并按 。屏幕中将显示选定的语言并持续 设置 数秒钟。 设置数据模式 ( 4 3) Menu 您可以将 MTM800 连接到一个外设上 (例如笔记本电脑或台 式电脑) 。 MTM800 能够向这个外设发送数据并从这个外设 上接收数据。但此外设运行的程序必须符合 TETRA 标准。 在 “设置”菜单中选择 。 3 数据设置 屏幕中将显示当前设置: 1 话音 2 数据 — MTM800 仅接收并发送话音呼叫。 话音 3 话音和数据 设置 返回...
- Page 83 在 模式和 模式下,当您将 MTM800 连接到外设 数据 话音和数据 上并且 MTM800 已准备好传送数据后,屏幕中将会出现 “连接了数据终端”图标。数据发送/接收图标表示正在进行 数据传输。 当 MTM800 处于以下状态之一时, MTM800 将会结束氛围聆 听 (AL) 呼叫,关闭麦克风: • 处于服务区之外 • 发出数据包呼叫 要退出数据模式,返回至 “ ”并选择 。除非在 3 数据设置 话音 “数据”模式下, MTM800 将自动返回至话音通信。 只有在 模式下才能提供数据服务。在 模式下数据服务 是被锁定的。 设置背景灯 ( 4 4) Menu 在...
- Page 84 设置时间 & 日期功能 ( 4 5) Menu 在 “设置”菜单中选择 5 。 时间 & 日期 5 日期格式 1 显示 此子菜单允许您控制显示的时间和日期。 2 设置 返回 确定 时间 & 日期显示设置 4 5 1) Menu 在 “设置”菜单中选择 “5 ” ,然后选择 1 。 时间 & 日期 显示...
- Page 85 您可以以 分钟的幅度向前或向后调整最多 个小时的 时差值。 设置时间格式 4 5 4) Menu 在 24 小时制和 12 小时制之间更改时间显示格式: 1. 进入 “ ”菜单。 设置 2. 选择 “ ”并按 。 时间 & 日期 确定 3. 选择 “ ”并按 。 时间格式 确定 选择所需的设置,并按 。按 以退出。 设置 返回 设置日期格式...
- Page 86 设置键盘提示音 4 6 1) Menu 启动/关闭每次击键的键盘音: 1. 进入 “ ”菜单。 设置 2. 选择 “ ” ,接着选择 “ ” ,然后按 。 提示音 键盘音 确定 3. 使用浏览键滚动浏览设置菜单。 4. 选择需要的设置,然后按 或按 退出。 设置 返回 设置所有的提示音 4 6 2) Menu 打开/关闭所有的提示音 (键盘提示音和 MTM800 使用的其 它的提示音)...
- Page 87 设置周期性警告 4 6 4) Menu 周期性警报可用于提示用户存在未接呼叫 提示 和未读短消息。每次发出警报时,对讲机 时长 会播放一则未读短消息提示音,同时黄色 返回 确定 LED 指示灯变亮。用户可以禁用 / 启动此 功能。 1. 进入 “设置”菜单。 2. 依次选择 “提示音” 、 “周期性警报” ,然后按 “确定” 。 3. 选择 “警报”并选择所需设置,然后按 “设置”使其生 效,或者按 “返回”退出此菜单。 用户也可设置警报间隔时间。 1. 进入 “设置”菜单。 2. 依次选择 “提示音” 、 “周期性警报” ,然后按 “确定” 。 选择...
- Page 88 本机号码 Menu 使用这项功能可以在任何时候查看您自己的个人号码或电话 号码。 查看个人号码或电话号码 ( 5 1 或 5 2) Menu Menu 要进入子菜单,按 和 – 5 本机号码 Menu 1 个人号码 或 。 1 个人号码 2 电话号码 2 电话号码 返回 设置 显示的个人号码将无法更改。 要更改显示的电话号码,按 。 设置 新的电话号码不能改变 MTM800 在系统中的号码。 网络 Menu 要进入子菜单,按...
- Page 89 滚动屏幕到您所想要入网登记的网络上并按 。 设置 屏幕中显示 “ ” 。这里 “XXX”代表所选定的网络 选中 XXX 的名称。 数秒钟之后,显示屏将返回到 “网络”子菜单中。 您的运营商会决定是否让您入网登记到列表中的其他网络上。 有些通话组在其他网络上可能不存在。 设置操作模式 ( 6 2) Menu 要进入子菜单, 1 集群模式 按 。 – 6 网络 – 2 操作模式 2 直通模式 Menu 返回 确定 这个子菜单可以让您选择 MTM800 的工作 模式。 要设置操作模式:...
- Page 90 要关闭 TXI 模式,例如当您离开禁止传输的地区后: • 选择 “ ” ,然后按 。 2 关闭 确定 如果直通模式是最后选定的模式,对讲机会发出通话允许音, 然后返回组呼模式或直通模式。 扫描 Menu Menu 要进入子菜单,按 。 – 7 扫描 Menu 这个子菜单可以让您激活或禁止扫描、查看使用中扫描列表, 并对扫描列表进行编辑。 在 模式下,您将无法激活或关闭通话组扫描功能。 设置通话组扫描 ( 7 1) Menu 要进入子菜单, 1 激活扫描 按 。 – 7 扫描 – 1 激活扫描 2 使用中的列表...
- Page 91 改变您的选择: • 选择 , – 7 扫描 – 1 激活扫描 – 1 选择列表 Menu 或 • 进入组呼模式并选择 。 选项 – 扫描 – 1 选择列表 出现一条表明所有扫描列表都为空的信息。 选择 “ ”填充该扫描列表。请参阅第 85 页。 3 扫描列表 当设置为 “ ”时,扫描功能被关闭。 关 完成设置之后,显示屏将返回到扫描子菜单,或者返回到组呼 模式。 请参阅以下的部分查看使用中扫描列表及其通话组的状态。 查看使用中扫描列表 ( 7 2) Menu 要进入子菜单,...
- Page 92 按 以选定以下选项之一: 确定 5 清除列表 1 增加通话组 一个通话组到选定的扫描列表中。每 添加 2 浏览列表 确定 返回 个添加的通话组 (包括一个首选通话组) 都有其范围、名称或号码及其优先级 (如果预先进行了编程) 。 • 在范围列表中滚动选择一个范围。如果某个范围内的所 有通话组都被列在选定的扫描列表中,该范围将不会在 列表中出现。按 选择一个范围。 确定 • 在选定范围内的通话组列表中滚动,选择一个通话组。 该通话组列表显示的是没有在扫描列表中的通话组。 按 确定。 • 要为通话组设置一个优先级,在优先级列表中滚动并选 择:高、中、或低。 来自高优先级通话组的呼叫会打断当前较低优先级的通话。 来自中/低优先级通话组的呼叫不会打断任何当前的通话。 2. 您可以通过滚屏 使用中扫描列表中 浏览 范围 1 的内容...
- Page 93 最近呼叫号码 Menu 您可以查看所有的呼叫记录: 1 呼出号码 2 已接收 • 已拨呼叫 3 未接听的号码 返回 确定 • 来电记录 — 您所应答的所有呼叫 • 未接呼叫 — 您接收到但未应答的呼叫,或者是 MTM800 拒绝接听的呼叫。 每个呼叫的列表最多可以包含所有呼叫模式(电话模式、PABX 或个呼模式)下的十个呼叫号码,最近的呼叫排在列表的最上 层。如果有必要,旧的呼叫会被删除以便为新的呼叫腾出空间。 虽然一个号码拨叫过多次,在列表中也将只显示一次。 在收到一个未接听呼叫的信息时, MTM800 上将显示未接听 呼叫列表。 当您正处于一个呼叫的同时又接收到一个呼叫,该呼叫的号 码将被写入 “未接听呼叫”列表中。该列表在呼叫结束时将 被自动激活。 1. 从菜单中选择 “ ” 。 8 最新呼叫号码...
- Page 94 定位 9 1) Menu 有关详情,请参阅第 62 页中的 “GPS 定位服务” 。 分组数据 9 2) Menu 此子菜单可以显示与分组数据连接有关的 4 加密 统计值。如果您的运营商启动了多信道分 1 已发送 2 已接收 组数据业务,则屏幕会显示以下信息: 返回 确定 • 已发数据量, • 已收数据量, • 数据会话的带宽, • 数据加密状态。 只有在 模式下才能提供数据服务。必须将数据选项设置为 “话音和数据”或 “数据”模式。 (参阅 第 页中的 “设置数据 模式”...
- Page 95 查看带宽状态 ( 9 2 3) Menu 带宽百分数表示在数据会话过程中分配的时隙数 ( “信道” ) 。 1. 在 “分组数据”子菜单中选择 “3 带宽” 。 2. 显示带宽百分数: 带宽 : 75% (举例)— 活动分组数据会话。 返回 N.A. — 备用分组数据会话。 您的运营商已经设置了最大时隙数以便分配给 、 、 或 。 带宽百分数将可能的时隙数 ( 、 、 或 )当作是 。 100% 例如:...
- Page 96 短消息 概述 短消息功能使您可以 • 发送状态信息。 • 发送文本短消息 (任何文本或用户定义文本或预先定义模板 的文本) ,以及 。 • 接收文本短消息 状态信息是通话组成员认可的、对应于列表中预先设定消息 的号码。文本短消息是短文本,最多只能包含 140 个字符。 如果您的运营商进行了设置,就只能发送短消息到号码簿中保存 的个人号码。 进入短消息子菜单 – 1 短消息。 要进入子菜单,按 Menu 子菜单允许您 1 发送状态信息 2 收件箱 • 发送状态信息 3 发送短消息 确定 返回 • 阅读文本短消息 • 发送文本短消息 滚动屏幕到您的选项,然后按确定以到达下一层的显示。...
- Page 97 发送状态信息 1 1) Menu 1. 切换到您要发送状态信息的通话组。 2. 从任何模式选择 “状态信息” ,或者 – 短消息 – 1 发送状态信息 – 确定。 按 Menu 3. 在本例中, Lunch 是上一次发送的状 Lunch 态。要发送一个不同的状态信息,可以 在预先编程的状态列表中滚动选择或输 返回 入状态号码。要停止滚屏,请按取消。 状态信息将自动显示在屏幕中。 从状态子菜单不能在用户状态范围内输入有效的 位数状态号码。 4. 按 PTT 或 或相应的数字键以发送状态信息。 如果您的运营商已经为您激活了 “目标状态”功能, 您将看到状态发送屏幕中多出了一个 “发送到”软键。按下 “发送到”软键,您可以选择以个呼模式呼叫或组呼发送信...
- Page 98 使用收件箱 1 2) Menu 收件箱列表包含新收到的和以往收到的文本短消息。无论任 何时候,收件箱列表最多可以包含 20 条信息。 – 1 短消息 – 2 收件箱。 要进入收件箱,按 Menu 该收件箱列表的状态将显示几秒钟: • 新消息到达,列表已满 — 按确定进行确认。 • 新短消息到达 — 按任意键确认或等候几秒钟。屏幕将显示 刚收到的信息。 • 没有新或旧的短消息 — 屏幕在数秒钟内将返回之前的显示 状态。 新信息 显示屏将显示刚收到的信息:其号码,状态 短消息 1 : 新增 (新/旧) 、发送者,并将显示文本信息的第 From 2006 Lunch 一行。...
- Page 99 • 滚动到 “转发”并按确定激活编辑模式。旧的短消息文本将 作为缺省的短消息。按下 PTT 或 发出呼叫。输入接收 者的号码,并且按下 PTT 或 完成该呼叫。 • 滚动到 “回复”并按确定激活编辑模 2 储存 3 转发 式。旧的短消息文本将作为缺省短消 4 回复 息,并且将发送者作为回复短消息的接 返回 确定 收者。按 PTT 或 开始呼叫短消息 发送者。 按返回返回之前的屏幕。 已读过的信息存放在收件箱内。 此时立即显示新文本短消息。如果此短消息为未读短消息, 再次进入收件箱可以查看更多的新短消息。 处理旧文本短消息 滚动到一条旧文本信息。 短消息 1: 旧 From 2006 Lunch 请按选项并滚动至您的选项:...
- Page 100 • 滚动到 “转发”并按确定激活编辑模 2 储存 3 转发 式。旧的短消息文本将作为缺省短消 4 回复 息,并且将发送者作为回复短消息缺 返回 确定 省的接收者。按下 PTT 或 发出 呼叫。输入接收者的号码,并且按下 PTT 或 完成 该呼叫。 • 滚动到 “回复”并按确定激活编辑模式。旧的短消息文 本将作为缺省短消息,并且将发送者作为回复短消息缺 省的接收者。按 PTT 或 开始呼叫短消息发送者。 2. 滚动到 “删除”并按确定删除此短消息。 3. 滚动到 “全部删除”并按确定,将显示 删除全部短消息? 以下信息: • 选择 “是”删除所有收件箱中的信息。 否...
- Page 101 发送文本信息 1 3) Menu 此功能使您可以发送新的信息,可以按照用户自定义的模板 发送信息,或按照预定义的模板发送信息。 预定义模板是由运营商编程写入 MTM800 中。用户自定义模板 则是收件箱中的短消息,或者是您选定并存储在您的 MTM800 存储器中的发件箱中的短消息。用户定义的短消息也可以编程 并写入您的 MTM800 中。 您可以在发送信息之前编辑您的信息。当此对讲机处于待机 状态或在组呼/紧急呼叫/广播呼叫 (如果设置)过程中,您可 以发送短消息。 如果已经设置,将有信息提示您有呼入的组呼/紧急呼叫/广播 呼叫,您可以加入此呼叫,或者结束此呼叫。 在直通模式下,文本信息在连接到当前通话组的频率上发送。 发送信息前,请确保您选择了需要的通话组。有关选择通话组 的详情,请参阅第 页中的 “选择通话组” 。 在编辑文本短消息的过程中或者在这之前接收组呼 紧急呼叫 广播呼叫 您可以在通话过程中开始编辑短消息。 或者您也可以在开始编辑短消息后,接收一个呼叫并在编辑 此短消息的同时接听此呼叫。 要在短消息编辑过程中接收呼叫,按 PTT。 在组呼过程中发送文本短消息 (如果已设置) 按 。可能会发生以下情况之一: • 在开始编辑短消息前呼叫开始 — 此对讲机将放弃呼叫并发送 短消息。如果呼叫仍然在继续,此对讲机将再加入此呼叫。...
- Page 102 在紧急呼叫 广播呼叫过程中发送文本信息 (如果设置) 按 。可能会发生以下情况之一: • 在开始编辑短消息前呼叫开始。此对讲机将放弃呼叫并发送 短消息。然后此对讲机将返回编辑模式。 • 在开始编辑短消息后呼叫开始。此对讲机将停留在此呼叫中, 同时发送短消息。 在编辑文本短消息过程中接收个呼 电话呼叫 /PABX 呼叫 将自动中断短消息编辑,在此呼叫后再恢复短消息编辑。 进入发件箱 – 1 短信息 – 3 发送短消息。 按 Menu 发送信息子菜单将被显示。 1 新增 2 用户模板 3 预定义模板 返回 确定 编辑、存储和发送一条新信息 1. 滚动到 “1 新增”并按确定。将打开一个空白屏幕。您可 以利用键盘输入/编辑您的信息。请参阅第 15 页中的 “编辑 文本”...
- Page 103 按发送,或者按 PTT 或 发送短消息。屏幕中将显 示以下提示信息之一: 短消息已发送 — 表示已成功发送并接收短消息。 短消息失败 — 没有接收到短消息。 • 滚动到 “储存”并按确定将短消息加 储存到 入到模板列表 (分配给该短消息的号 模板 3 码是最小的可用号码 – 在本例中模板 号码是 3) 。 如果您的运营商允许,您可以从繁忙的通话组编写和发送文本 短消息。在编辑新短消息或模板时通话组的话音将被暂停。在 这段时间内可以接收新的紧急呼叫,并且将中止短消息编辑。 如果接收到的是新的个呼模式呼叫 电话呼叫,当呼叫完成后将 恢复此短消息。 发送、编辑和删除用户定义的模板 用户定义的邮件模板是指存储在 “用户模板列表”中的收件 短消息、新建短消息、已发送短消息或已编程短消息,可以 恢复这些短消息并进行发送。 1. 滚动到 “2 模板”并按确定。将显示模板列表中的第一个 模板。...
- Page 104 发送和编辑预定义的模板 预定义的邮件模板是指运营商预先编程并写入您的 MTM800 中的模板。您只能对预定义模板进行有限的编辑,然后发送 它。但是您不能存储已编辑的模板,也不能从 “用户模板列 表”中删除它。 1. 滚动到 “3 预定义模板”并按确定。 注册 : 将显示预定义模板列表中的第一个模板 abc 27 (如果没有预定义的模板存在,将显示 编辑 返回 “未预先定义” ) 。 2. 使用浏览键在 “用户模板列表”中滚动,并选择所需的模板 (在本例中,显示的是一条注册信息) 。 只能从编辑屏幕发送预定义信息。 3. 按编辑。这时信息已进入预定义信息编 注册 : 辑器。 abc 27 清除 返回 4. 输入您的信息。 • 要前移光标 – 按 。...
- Page 105 如果 ... 怎么办 您的 MTM800 闪烁显示以下信息: 短消息 信息描述 ..模式 在滚动列表中没有已编程的条目。输入此条目。 号码表空白 ...-收到 呼叫被接收但是未被应答或是被拒。 加入通话组失败 对讲机无法执行通话组加入操作。尝试其它通话组。 认证失败 此对讲机不能注册到鉴权系统 (例如,鉴权键不正确 或对讲机的鉴权功能被关闭) 。 呼叫取消 信道有误。请稍后再试。 呼叫结束 信道有误。请稍后再试。 被叫对讲机结束呼叫。 呼叫被抢占 信道被有优先权的呼叫占用。 紧急麦克风时限已过,或用户已按 PTT 取消紧急麦 紧急麦克 结束 克风功能。 紧急麦克打开 紧急麦克风功能激活,此对讲机将自动传输紧急话音。 空条目 您拨打的快速拨号号码不存在,或者号码存在但通话 组未选择此号码。 设备故障 自检失败。您的对讲机检测到一个操作故障。请记录...
- Page 106 短消息 信息描述 已加入部分列表 扫描列表已经被启动,但并非所有通话组都已与它连 接上。 短消息 邮件已成功发送。 已发送 信息失败 邮件发送失败。 我的通话组为空 当 “我的通话组”为空时您不能查看/删除通话组。 我的通话组已满 您不能在 “我的通话组”中增加通话组,因为 “我 的通话组”包含的通话组数量已达到允许的最大数。 网络故障 网络有故障。请稍后再试。 无应答 被叫方没有应答。 没有内容 号码簿列表是空白的。 没有通话组 • 当您超出了所选定通话组的正常覆盖范围时会显示此 信息。请选择在您的工作范围内有效的其他通话组。 • 表示从 “我的通话组”范围中删除一个首选通话组。 无 GPS 信号 请检查 GPS 天线是否已正确连接,卫星的可见度是 否充分。 没有新或旧的短消息 收件箱是空白的。 不在服务区...
- Page 107 短消息 信息描述 注册失败 此对讲机无法在该系统入网登记。请稍后再试。请与 您的运营商联系。 服务被拒绝 无效号码。请与您的运营商联系。 没有这项服务 当前网络不提供这项服务。 服务受限制 您的运营商限制此项服务,或者您没有购买此项服务。 只有一个通话组 在滚动列表中只有一个编程的条目。 通话组 ... 已添加 通话组名称已添加到首选通话组范围。 稍后再试 所要求的服务暂时无法提供。 机器已禁用 请与运营商联系确认。 设备正常 自检故障。您的对讲机检测到一个小故障。此对讲机 警告 ... 仍然可以正常工作。如果再次发生此故障,请记下错 误代码并与维修部门联系。 设备 此对讲机无法连接到系统中。所选通话组可能没有在 未连接 系统中定义。请更换通话组再试。 等待紧急麦克打开 紧急麦克风功能被启动,但是已将信道传输许可授予 了相同通话组中的另一个紧急呼叫。在这段时间内此 对讲机的麦克风不工作,但经过预定时间后,此对讲 机将自动尝试获得通话许可。...
- Page 108 提示音 = 高音; = 低音 说明 类型 重复次数 空闲 • 返回初始屏幕 一次 • 当旋转计时器超过时 返回到旋转音量模式 • 返回覆盖范围 • 返回全服务状态 可以发送 一次 按键无效 一次 • 按键有效 一次 • MTM800 开机时自检 失败 • 从 “不在服务区”状 态变为 “在服务区” 状态 来电 • 呼叫清除告警音 一次 •...
- Page 109 = 高音; = 低音 说明 类型 重复次数 • 通话禁止 直到您松开 PTT 键为止 • 系统忙 • 限时器超时 • 被叫 MTM800 不可用 或正忙。 因为网络原因呼叫被断 一次 开或失败 拨叫号码错误。 无提示音 进入 DMO (直通模式) 一次 退出 DMO 模式 一次 本站集群 — 进入/退出 一次 电话呼叫的振铃回音 每隔三秒重复一次, (发送)...
- Page 110 = 高音; = 低音 说明 类型 重复次数 接收到个呼 按照铃音类型子菜单设置。 直到您应答或拒绝呼 叫为止 个呼主叫方的振铃 直到呼叫被应答为止 半双工私密先占式优先权 每隔 4 秒钟重复一次, 呼叫 (PPC) 振铃。 直到呼叫被应答或拒绝 全双工私密 PPC 振铃 每隔 4 秒钟重复一次, 直到呼叫被应答或拒绝 有限的服务 当进入有限的服务状态 时发出一声提示音 接收到新邮件 两次 新组呼 一次 概述 音量设置 (耳机、键盘、 连续不断 扬声器) 音量设置...
- Page 111 索引 单键 日期 AL (氛围聆听) 时间 ATG (通播组) 隐蔽模式 按键 单键功能 锁定 单站集群服务 进入 BUP (占用繁忙用户优先权) 退出 半双工个呼 电话号码 半双工呼叫 查看和修改 背景灯 电话呼叫 键 按字母顺序搜索 强度 重拨上次呼叫号码 设置 发起 别名 快速拨号 拨号 列表滚动 最近拨号列表 应答 直接拨号 电话或个人号码 菜单 编辑 菜单选项 电话模式...
- Page 112 非战术呼叫 键 氛围聆听 (AL) 背景灯 分组数据 (PD) 服务 编程功能 菜单 紧急呼叫 GPS 启用/停用 软按键 GPS (全球定位系统) 解除静音 GW (网关) 接收呼叫 告警 紧急告警 声光 发送 个呼 正在发送 接收 紧急脚踏开关 个人号码 紧急麦克风 按字母顺序搜索 紧急麦克风 (Hot Mic) 查看 紧急组呼 进入 发起 列表滚动 接收 直接输入...
- Page 113 时间 单键 MSPD (多信道分组数据) 设置 麦克风 显示设置 静音/解除静音 时间和日期 麦克风静音/解除静音 首选通话组 密码 数据流量 模板 数据设置 用户定义 锁定键盘 预定义 缩位拨号 目标状态 TMO (集群模式操作) PABX (专用自动交换分机) TXI (禁止传输) PD (分组数据) 提示音 PIN (个人识别码) 设置 PPC (先占式优先权呼叫) 通播呼叫 PUK (个人解锁密码) 通播组 通话允许音 强度, 显示强度 通话组...
- Page 114 网关 网络 未接听呼叫 未接听呼叫记录 显示 长号码 长文本信息 先占式优先权呼叫 已拨呼叫的记录 隐蔽模式 单键 音量 调节 优先级 语言 显示屏工作语言 占用繁忙用户优先权 战术呼叫 直通模式操作 (DMO) 直通模式的组呼 发起 接收 注解 转发器 专用自动交换分机 状态信息 发送 字母数字键 编辑文本 输入号码 输入文本 组呼 发起 接收...
- Page 115 MTM800 发起电话/PABX 呼叫 发起 DMO 个呼模式呼叫 拨打号码 拨打号码 按 按 Mode Mode 车载台对讲机 按 选择 或从 或从 选择 Menu 6 2 2 确定 号码簿中选择 号码簿中选择 快速参考指南 或 电话 私密 PABX 一声提示音 按住 铃音 按 响起 通话 响起 发起呼叫 (如果已设置好) 开 / 关按钮 松开...
- Page 116 发起 TMO 紧急组呼 发送新的短消息 处理新文本短消息 按住 。紧急告警自动被发送。 屏幕中的 图标将闪烁,同时 选择 写 1 新增 Menu 短消息 按 “ ” MTM800 发出一声提示音。有关详情, 确定 当处在紧急模式时,按住 PTT 讲话。如 请参阅用户手册中的菜单信息部分的 果使用紧急麦克风功能,等到显示 “紧 选择收件人 按 按 “ ” 选项 内容。 急麦克打开”信息,并且不需按下 PTT 然后选择 或输入号码 “ ” 发送...
- Page 117 MTM800 TETRA Mobile Terminal Feature User Guide 6815318H01-V...
- Page 119 Contents General Information ......Safety Information ........Disposal Information .
- Page 120 TMO Group Call ......General ......... . . 29 Selecting a Talkgroup .
- Page 121 Phone and PABX Calls ......General ......... . . 57 Making a Phone or PABX Call .
- Page 122 Quick Reference Guide ......119 MOTOROLA and the stylized M Logo are registered in the U.S. Patent and Trademark Office. All other product or service names are the property of their respective owners.
- Page 123 Before using these products, read the operating instructions for safe usage contained in the Product Safety and RF Exposure booklet (Motorola Publication part number 6866537D37 for Europe, Middle East and Africa or 6804112J96/6804113J25 for Asia and Pacific) enclosed with your terminal.
- Page 124 Accordingly, any copyrighted Motorola computer programs contained in the Motorola products described in this manual may not be copied, reproduced, modified, reverse-engineered, or distributed in any manner without the express written permission of Motorola.
- Page 125 • Operating Time Continuous / Intermittent In general, the terminal transmit and receive time (operating cycle time) is determined by the communication system. On overload, respectively on extensive use beyond the systems specifications at high ambient temperatures, the terminal is protected by its thermal control, which cuts down the RF output power, thus reducing the terminal coverage range.
- Page 126 Getting Started Congratulations on your purchase of the Motorola MTM800. Enhanced TETRA features and state-of-the-art technology help to keep you in constant touch with all of your work and personal contacts. You can operate your MTM800 in English, Simplified Chinese, Traditional Chinese, or in a language defined by your Service Provider.
- Page 127 Controls and Indicators 1. Power On/Off Pushbutton 2. LED indicators, red, orange, green 5. Alphanumeric Keypad 3. Display Icons 4. Alphanumeric Display Police Rescue 1 6. Backlight 7. Function Keys 8. External Alarm 9. Menu Key 10. Send/End Key 11. Soft Keys 12.
- Page 128 Item Description On/Off Pushbutton Turns the MTM800 on and off. (See page 10.) LED Indicators Indicate the service state. (See page 10.) Display Icons Show additional information and MTM800 status. (See page 7.) Alphanumeric Display Backlit view of up to 4 lines of characters or digits (up to 16 characters or digits per line).
- Page 129 Item Description Mode Key Select the Phone, PABX, Private, or Group mode. (See page 12.) Emergency Key Initiates Emergency mode and sends Emergency Alarms. (See page 14.) Microphone Connector Connector for a Fist or Desk microphone with PTT button, or the Telephone Style handset. Volume Knob Adjusts the volume level.
- Page 130 Icon Description DMO Gateway Indicates that you selected to work with a gateway. This icon has three states: Solid — while the terminal is synchronised with the gateway (i.e., when the terminal receives a valid presence signal). Blinking — while the terminal is not synchronised with the gateway or during attachment.
- Page 131 Icon Description Data Connected Displayed when the MTM800 is successfully connected to the external device (laptop or desktop PC) and ready for data transfer. Receiving/Transmitting Data The icon indicates that data transfer is currently taking place. Indicating Loudspeaker On/Off The Loudspeaker On/Off indication is only available in Group Mode.
- Page 132 LED Status Indicators The LED indicators shows the in-service status of your MTM800. Indicator Status GREEN: Solid In use GREEN: Blinking In service RED: Solid Out of service RED: Blinking Connecting to a network / Entering DMO ORANGE: Solid Transmit Inhibit (TXI) in service / Channel busy in DMO First solid then blinking Incoming call...
- Page 133 To power off: • Press the On/Off pushbutton again. • If the radio is powered on via the ignition, it can be turned off via the ignition or the On/Off pushbutton. You will see the message. Powering Off The terminal powers On and Off without visible and audible notification if Covert Mode is activated.
- Page 134 Press the Yes soft key (see “The Soft Keys” on page 13) if you want to deactivate the TXI Mode – e.g. if you have left the RF sensitive area where the TXI Mode was recommended. If the MTM800 was previously used in Trunked Mode (TMO), it will register to the network.
- Page 135 Therefore, the range is critically dependent on the position of the vehicle. Any obstructions (hills, buildings, etc.) between the TETRA terminal users will further decrease the range. Conversely, moving the vehicle to another or higher location may improve the range.
- Page 136 The Menu Key Press to enter the main menu hierarchy (when there is Menu no on-going activity). The MTM800 menus allow you to control your MTM800 settings. Menus are organised in a hierarchy. See “List of Menu Options” on page 73. The menu options provide access to a further list of options called a sub-menu.
- Page 137 Entering Numbers To enter a number in the address book, press the corresponding number key. Entering Text (Letters and Digits) To enter alias text in an address book or text in messages, press the key labelled with the desired character, once for the first character, twice for the second, and so on.
- Page 138 The following screens show examples of how the caller’s private number can be displayed. Prvt In Use Prvt In Use Simon Private ID ID alias (name) without alias Available Characters Press the appropriate keys to display the characters listed in the table below.
- Page 139 Alphanumerics T U V Ü Ù Û Ú t u v ü ù û ú W X Y Z wxyz w x y z Space < > Programmable Keys Your MTM800 supports the one-touch feature that allows you to select/activate commonly used features by pressing and holding a numeric key or one of the three function keys F1 to F3.
- Page 140 Sends a predefined/user defined template to Text Message a dedicated address. (TMO only) Template Call Dial (Private, Initiates a call to a predefined entry in the Phone, PABX) address book. (TMO only) Transmit Inhibit Toggles between activated and deactivated (TXI) TXI mode.
- Page 141 If configured by your Service Provider, your MTM800 will display an internal Home Mode Display until another message is received. This feature is used as a special reminder message to the user. Typically this would consist of a call sign, or work dispatch reference number, or even for a train run number or bus route number.
- Page 142 Terminal Permanent Disable Your MTM800 is provided with a feature that allows your Service Provider to disable it permanently in case it is stolen or lost. When your MTM800 is disabled permanently, it becomes inoperable. After a Permanent Disable the MTM800 can not be re- enabled by your Service Provider.
- Page 143 VOX Control VOX (Voice Operating Transmission) allows the user to transmit voice in a hands-free condition. It detects audio automatically when full duplex private call and telephone call use the fist microphone. This feature is only available if set up by your Service Provider. If it is disabled, transmittion can start upon pressing PTT.
- Page 144 The console operator will then try to set up a private call with you, within a pre-determined period of time after successful call pre-emption. Only emergency calls are allowed within a pre-determined period of time after successful call pre-emption (during BUP wait state).
- Page 145 Receiving an Emergency Group Call during a Call The MTM800 receives the Emergency Group Call, drops the on-going non-emergency voice call, and connects to the Emergency Group Call. <Any> in Use Police Rescue 1 Back Optns Receiving a Private PPC during a Call If configured by your Service Provider, the MTM800 receives the PPC, drops the on-going, non-emergency, lower priority voice call, and connects to the higher priority private call.
- Page 146 sites. The terminals are configured to monitor a Broadcast Call, but the users cannot talk back. The call can be received as normal Emgcy In Use broadcast call or emergency broadcast Broadcast Call. Status The Broadcast Call pre-empts an on-going Group Call that has the same (or lower) call priority.
- Page 147 Using In-call Features The in-call features are only available when using the Telephone Style Handset (see “Setting Accessory” on page 90). Switching the Loudspeaker On/Off Picking the Telephone Style Handset from the hang-up cup will disconnect the loudspeaker and the receive audio will only be heard in the earpiece of the handset.
- Page 148 the MTM800 effectively unnoticeable even in a silent and dark environment. To Enter the Covert Mode: • Press the Cover Mode one-touch button (if programmed by your Service Provider), or • Select Covert Mode in the Security menu (refer to page 83).
- Page 149 Exiting Local Area Service When the link with the central network controller is re- established, the MTM800 exits Local Area Service and the following occurs: • the MTM800 sounds a tone. • any call in progress during Local Area Service is dropped. Dimming the Display If the backlight is set to Manual (see “Setting Backlight”...
- Page 150 Packet Data The Packet Data (PD) Service allows you to transfer data in a TETRA system using the Internet Protocol (IP). Check with your Service Provider for the availability of this feature. For transferring data from a standard computer over the air connect the computer via the Active Data Cable GMKN1022 with your MTM800.
- Page 151 TMO Group Call General A Group Call is an instant communication between you and others in a talkgroup that you select. Participants may join (late entry) and leave an on-going Group Call. A talkgroup is a predefined set of subscribers enabled to participate in and/ or invoke a Group Call and set up by your Service Provider.
- Page 152 Pressing PTT on selection screen switches to a new group and starts a call. Each talkgroup may have one associated Announcement Talkgroup (ATG) that it monitors (If set up by your Service Provider). An ATG is a special group which is linked to a number of talkgroups and has the highest priority level, thus enabling broadcast of the call to all these talkgroups.
- Page 153 Using the Navigation Key Your Service Provider configures the Range 10 MTM800 to display only selectable Talkgroup 2 talkgroups. Press the navigation key to Cancl scroll to the required talkgroup and press Ok. For talkgroup range scrolling configuration, see note in “Selecting a Range”...
- Page 154 Viewing the speed number of an attached group 1. In Group Mode, press Optns. Range 10 Talkgroup 1 Optns Status 2. Select 5 View Speed# to view the 5 View Speed# talkgroup speed number. 1 abc 2 Range Back 3. In this example “1” is the speed number. Range 10 Press Back to return to the attached 1*=Talkgroup 1...
- Page 155 Dialling a speed number 1. Enter a number (for example: “2”). Range 10 Talkgroup 1 Optns Status 2. Press Find or Range 10 Clear Find 3. Press Select to attach the new group, or Range 10 press PTT to attach and call. 2*=Talkgroup 2 Cancel Select...
- Page 156 Changing a Talkgroup during/on receiving a call You can select a group folder without an interruption on receiving and during a call. Selecting a group on receiving a call If you select a group and a non-Emergency call is incoming, MTM800 display remains unchanged while you hear the call.
- Page 157 Making a Group Call 1. Press until appears on your display. In Group Mode Mode this example, is the last selected range and “Range 10” “Talk- is the last selected talkgroup. group 1” If you press , you have the option to select Optns 1 abc , or...
- Page 158 Receiving a Group Call Unless it is engaged in an active call, your MTM800 will automatically switch to Group Mode and receive the transmission. To answer the call, press and hold PTT. Your MTM800 shows the Group Name, and the caller’s private number or name (alias) if previously stored in your address book.
- Page 159 • Presented to you (if it has higher priority ID: 7712 than the on-going call). TG 4 > To accept the call, press Join Join > To cancel the call, press Receiving a Group Call with Scan On With Scan On, you can receive a group call from the scan list you set up, in addition to receiving a group call from the selected talkgroup or from the associated ATG.
- Page 160 Transmit Inhibit The Transmit Inhibit (TXI) Mode can be activated by the user before he enters RF sensitive areas, e.g. in hospitals or in potentially explosive areas, where safety can be jeopardized due to terminal transmission radiation. Radiation of the MTM800 is only suppressed if the TXI Mode is activated or the terminal is separated from it’s power supply.
- Page 161 Dynamic Group Number Assignment (DGNA) DGNA provides the ability for a network operator or authorised user to dynamically allocate new, or update existing talkgroups to selected terminals over the air interface. Using supplementary services messages (SS- DGNA), the network operator can command the terminal to add talkgroups to the existing talkgroups list, or to delete talkgroups from the list.
- Page 162 If this group is de-assigned, and no group changes or power cycling have occurred, the terminal will revert to its previous talkgroup. If a new DGNA is received during scrolling, TG list you will receive a message, indicating that Updated the list of talkgroups was updated.
- Page 163 Message addressing and sending: • address can be predefined by Service Provider if not it will be send to currently selected group • if no group selected, the message is sent to the reserved address • the message is sent even if the user is involved in an active service Indication depend on Service Provider.
- Page 164 DMO Group Call General In DMO (Direct Mode Operation) the MTM800 can be used without your Service Provider’s infrastructure. Direct Mode allows communication among terminals in which the same talkgroup is selected. In DMO it is only possible to place Group Calls, Emergency Group Calls and Private Half-duplex Calls.
- Page 165 Selecting a Talkgroup See “Selecting a Talkgroup” on page 30. Changing a Talkgroup during/on Receiving a Call See “Changing a Talkgroup during/on receiving a call” on page 34. Switching from TMO to DMO or from DMO to TMO Enter TMO or DMO in one of the following ways: •...
- Page 166 Selecting DMO Group Call MS to MS To change from gateway or repeater mode to MS – MS mode (DMO terminal to terminal call): 1. Press Optns, scroll to 3 Config, and press Ok. 2. Scroll to 1 MS – MS and press Ok. The 4 GW + Rep following message to be displayed for a 1 MS –...
- Page 167 • “None”, indicating that no gateway was selected for that talkgroup. Enter Selected GW: None an address via the keypad, and press Back Ok. The Gateway icon will blink upon selecting the gateway. When the MTM800 detects the suitable gateway, the Gateway icon will turn solid. DMO Range1 DMO TG1 Selecting...
- Page 168 Specific — the MTM800 will use only the gateway with the specified Gateway address for that talkgroup. Upon selecting “Specific”, you will see one of the following displays: • The selected gateway address (e.g.: 1022), pre-programmed by your Serv- GW No: 1022 Avail.
- Page 169 To change talkgroup and range, see the Group Mode section, page 30. To change the Operating Mode quickly you can use one of the programmable keys (if set up by your Service Provider). Making a DMO Group Call via Gateway 1.
- Page 170 play the following screen, informing you that the call will be setup without repeater. The Repeater icon will disap- pear. • If you press while the repeater is available, you will start a DMO call with repeater. The Repeater icon will be solid.
- Page 171 The Gateway icon will disappear and the Repeater icons will be solid. > If it is not successful your MTM800 will display the message MS – MS Call and a terminal to terminal call will proceed. The Gateway and Repeater icons will disappear.
- Page 172 However the Gateway and/or Repeater options are activated they are not used for a DMO Private Call. The DMO Private Call will be a direct communication between two TETRA terminals (MS – MS). For detailed information, see “Private Call in DMO” on page 55.
- Page 173 Private Call General A Private Call, also called Point to Point or individual call, is a call between two individuals. No other terminal can hear the conversation. This call can be a • full-duplex call (if the system allows) in TMO, or •...
- Page 174 Operating with MTM800 in RF sensitive areas, see “Transmit Inhibit” on page 38. While Transmit Inhibit is activated, an incoming Private Call is indicated, but it is not possible to answer the call. Entering the Private Number Last Number Called The last number called appears the moment the terminal enters private idle mode.
- Page 175 Alphabetic Search Alphabetic search allows you to locate a D=David stored private number quickly by entering 1024 the first letter of the name (or alias) Cancel associated with it. 1. Press 2. Press the numeric key with the first letter of the name you are searching in the pre-stored list (key in this example).
- Page 176 Receiving a Private Call in TMO 1. The MTM800 automatically switches to Private mode and starts ringing. The dis- Prvt Call ID: 82114 play shows the caller’s identity. 2. To answer the incoming call, press PTT. 3. To end or cancel the call, press .
- Page 177 Private Call in DMO If configured by your Service Provider it is possible to make and receive a Private Call in DMO. You can make or receive a DMO Private Call only when your MTM800 is in DMO. Private Calls via DMO Repeater and/or DMO Gateway are not supported.
- Page 178 Dialling on Receiving a Call If you dial and a call is incoming, the MTM800 stays in current mode and the display remains unchanged while you hear the call. Dialling continues on current display. When an Emergency Call is received, then dialling is aborted, the MTM800 switches to the group mode and Emgcy In Use display appears.
- Page 179 Phone and PABX Calls General The Phone Mode allows you to call a landline telephone number or a cellular mobile phone number. In this publication we use “phone number” when referring to these numbers. The Private Automatic Branch Exchange (PABX) Mode allows you to call local (office) extension numbers, if this mode has been activated by your Service Provider.
- Page 180 If you wish to talk to a person other than the one shown, you can enter another number in one of the following ways: • last number redial, • direct dial, • speed dial, • one-touch dial, • list scroll, or •...
- Page 181 One-touch Dial One-touch dialling allows you to place a call by pressing and holding one of the numeric keys (2 to 9). The number is the location of an entry (2 to 9) in the address book. 1. Press and hold the required numeric key for a few seconds. Your MTM800 will display the number and dial it.
- Page 182 DTMF Overdial If set up by your Service Provider, DTMF allows you to communicate with an automated answering device (for example, the voice mail or answering machine) during an ongoing call. While in an ongoing call, press the keys Phone In Use 0 to 9, *, #.
- Page 183 Emergency Mode General In Trunked Mode (TMO) you can send an Emergency Alarm to the dispatcher and you can initiate and receive an Emergency Group or Private Call. A terminal in TMO receives an Emergency Group Call to the selected group associated ATG (Announcement Talkgroup), or scanned group.
- Page 184 the one displayed on the terminal screen when starting the call. After exiting from non-tactical emergency mode the terminal will be attached to the group that was selected before initiating the non-tactical call. When in non-tactical emergency mode, you will not be able to switch talkgroups. DGNA messages have no impact during non-tactical emergency mode but only after exiting the non-tactical emergency mode.
- Page 185 Pressing the Emergency Key even if Transmit Inhibit is activated causes immediately the terminal to radiate. When entering the Emergency Mode the terminal should not be within the RF sensitive area any longer! The MTM800 interrupts the Ambience Listening call when you press the Emergency key Invisible Emergency This feature can be enabled/disabled by your Service Provider.
- Page 186 The screen will show one of the following delivery reports: • Alarm Sent • Alarm Failed In both cases, the screen returns within a few seconds to the main screen of the Emergency mode. Due to there being no delivery confirmation while in DMO, the Alarm Sent information confirms only the sending of the alarm.
- Page 187 Hot Microphone Feature If the Hot Microphone feature was programmed into your MTM800 by your Service Provider, you can make an Emergency Group Call without the need to press and hold the PTT. The following will happen upon entering Emergency mode: 1.
- Page 188 Group Call to the group associated with this ATG. (For information on the ATG, see page 30.) When the MTM800 receives the call, the display will show the caller’s identity. If the display is idle, it will show Emrgncy In If upon entering Emergency mode your MTM800 receives an emergency call, and Hot Microphone was enabled by your Service Provider, the...
- Page 189 Receiving an Emergency Group Call The display shows the caller’s identity as a private number or an alias. If the display is idle, it will show Emrgncy-In Use...
- Page 190 GPS Location Service General Your terminal’s GPS Location feature uses information from Global Positioning System (GPS) satellites orbiting the earth to determine the approximate geographical location of your terminal. The availability and accuracy of this location information (and the amount of time that it takes to calculate it) will vary depending on the environment in which you are using the terminal.
- Page 191 • When your GPS antenna is covered (for example, by your hand or other object) or facing the ground • In temperature extremes outside the operating limits of your terminal Even where location information can be calculated in such situations, it may take much longer to do so. Therefore, in any emergency call, always report the location to your dispatcher.
- Page 192 GPS Enable/Disable 9 2) Menu 1. From the main menu, press 9 Location – 2 Interface Menu The current selection (On/Off) is highlighted. The display shows: On — Location Service On Off — Location Service Off 2. Scroll to your selection and press Set. If GPS is enabled but the radio is not 1 Position Range 1...
- Page 193 LAT — The latitude expressed in degrees, minutes, and seconds. LNG — The longitude expressed in degrees, minutes, and seconds. SAT — The number of satellites used to calculate the location. In general, more satellites make for better accuracy. 3. Scroll to view the entire screen. To calculate your location again, press Update.
- Page 194 The Menu Entering the Menu Options You can enter the menu options during a call. If you are viewing a menu when a new call starts, the terminal will exit the menu. By Scrolling 1. From any mode, press to enter the Menu 8 RecentCall Menu.
- Page 195 List of Menu Options 1 Messages 1 Send Sts 1 New 2 Inbox 2 Templates 3 Send Msg 3 Predefined 2 Addr. Book 1 Add ID / Add Phone / Add Ext 1 Private 2 abc Order 2 Phone 3 By Loct’n 3 PABX 4 Mem Usage 1 Select...
- Page 196 List of Menu Options (Cont’d) 4 Setup (cont’d) 1 Display 1 Time & Date 5 Time & Date 2 Set 2 Time Only 3 Date Only 3 Time Offset 4 Off 4 Format Time 5 Format Date 1 Standard 6 Acc’ry Type 2 Handset 3 External 4 External &...
- Page 197 It is possible that some menu numbers are than the listed. Some options can be enabled/disabled by your Service Provider which can cause the exact menu index numbers to vary. Messages Menu Refer to “Messages” on page 99 for details. Address Book Menu To enter the Address Book sub-menu, press...
- Page 198 Adding a Number ( 2 1 1) Menu To enter the sub-menu, press – 2 Addr. Book – 1 Private – 1 Add ID Menu 1 Add ID changes to 1 Add Phone or to 1 Add Ext. depending on the address book edited. 1.
- Page 199 tions or type the location number. If a location is already used, you will be prompted to overwrite the existing location. When the location is successfully stored, the screen returns to the list display. • the entry. The screen returns to the list display. Erase Memory Usage ( 2 1 4)
- Page 200 Viewing My Group ( 2 4 2) Menu 1. Once in the menu, select 2 Addr. Book 4 My Groups – – 2 View. 2. Scroll through the favourite group list. Adding a Group to My Groups ( 2 4 3) Menu 1.
- Page 201 Security Menu To enter the Security sub-menu select 7 Covert Mode 3 Security. 1 Keylock 2 PIN Protect Back Locking/Unlocking the Keypad ( 3 1) Menu To prevent accidental key presses: 1. From the menu, select All keys are locked except 1 Keylock.
- Page 202 To unlock the MTM800 after powering on, enter the code at the prompt. The MTM800 enters the default home mode. If you fail to enter the correct code, the following message will be displayed: — You are prompted to try again. Incorrect Code Entered After failing three times, your MTM800 will be blocked.
- Page 203 3. When the new code is accepted, the display returns to the Security sub-menu. Air Encryption On/Off ( 3 4) Menu To enter the sub-menu, press – 3 Security – Menu 4 AirEncrypt This sub-menu allows you to view air encryption On/Off state. Call encryption provides service confidentiality between you and the system.
- Page 204 To verify K validity, press The display will show one of the following messages: — the infrastructure can authenticate your K is Valid MTM800. — the infrastructure shall not authenticate your K is Invalid MTM800. Please call your Service Provider to restore K to your MTM800.
- Page 205 — your MTM800 cannot work encrypted in DMSCK is Invalid DMO. Please call your Service Provider to restore SCKs to your MTM800. 3 8) Covert Mode Menu From the main menu, select 3 Security – 8 Covert Mode Set Covert Mode to On Select On.
- Page 206 Setup Menu To enter the sub-menu, press 1 Ring Style – 4 Setup – Ok. Menu 2 Language 3 Data Setup This sub-menu allows you to change your Back MTM800 configuration: key tones, language, ring style, time, date or data setup. Setting the Ring Style ( 4 1) Menu...
- Page 207 TETRA standards. Once in the Setup menu, select 3 Data Setup. The display shows the current setting: 1 Voice Only 2 Data Only — The MTM800 will receive Voice Only 3 Voice&Data and transmit voice calls only.
- Page 208 Your MTM800 has 4 backlight settings: Manual ( 4 4 1) Menu Press to change the backlight intensity in four steps. Semi-Auto ( 4 4 2) Menu Press to turn on or turn off the backlight. Any other key press does not turn the backlight on. The backlight remains on until you press the to turn it off, or a pre- programmed timer runs out.
- Page 209 4. Off — The MTM800 does not display time nor date. Format Time and Format Date options are disabled. Scroll to the desired setting and press Press to exit. Set. Back Time and date are synchronized by the infrastructure. When not within the infrastructure signal range you can set the values manually.
- Page 210 Setting Date Format ( 4 5 5) Menu To change displayed date format between DD/MM/YY, MM/ DD/YY and DD-MON-YY: 1. Enter the menu. Setup 2. Select , and press Time&Date 3. Select , and press Format Date Choose required setting and press .
- Page 211 3. Scroll through the settings by using the navigation keys. 4. Choose required setting, and press , or press Back exit. Setting Talk Permit Tone ( 4 6 3) Menu There are 3 tone settings: 1 No Tone 2 Short Tone —...
- Page 212 Select and choose required setting, and press Set to Period select, or press Back to exit. Setting Accessory ( 4 7) Menu Once in the Setup menu, 1 Standard select 7 Acc’ry Type. 2 Handset 3 External You can select one of the following Back options: —...
- Page 213 Network Menu To enter the sub-menu, press – 6 Networks Menu This sub-menu allows you to select the 1 Networks Sel network your MTM800 will be registered to, 2 Oper. Mode 3 TXI Mode and what mode it operates on. Back Selecting Your Network ( 6 1)
- Page 214 Setting Operating Mode ( 6 2) Menu To enter the sub-menu, 1 Trunk Mode press – 6 Networks – 2 Oper. Mode Menu 2 DirectMode This sub-menu allows you to select the Back mode your MTM800 will be operating on. To set up your operating mode: •...
- Page 215 Scan Menu To enter the sub-menu, press – 7 Scan Menu This sub-menu allows you to activate/deactivate scanning, view the active scan list, and edit the scan lists. It is not possible to enable or disable Talkgroup scanning in TXI Mode.
- Page 216 After completing the settings, the display returns either to the Scan sub-menu or to Group mode. To view the active scan list and its talkgroup status, see section below. Viewing the Active Scan List ( 7 2) Menu To enter the sub-menu, Active List: press –...
- Page 217 • To select a talkgroup, scroll through the talkgroup list within the selected range. The list shows talkgroups that are not in the selected scan list. Press • To set a priority to a talkgroup, scroll through the priority list: high, medium, or low. A call from a high priority talkgroup and with a higher priority than the on-going call will interrupt it.
- Page 218 Recent Calls Menu You can view the history of all calls: 1 Dialled • Dialled Calls 2 Received 3 Missed • Received Calls — calls you answered Back • Missed Calls — calls received but not answered, or rejected by the MTM800. Each list of calls may contain up to 10 numbers for all modes (Phone, PABX, or Private), the more recent call being at the top of the list.
- Page 219 Location 9 1) Menu Refer to “GPS Location Service” on page 68 for details. Packet Data 9 2) Menu This sub-menu allows you to display 4 Encryption statistical values related to a packet data 1 Sent 2 Received connection. If Multi Slot Packet Data Back Service is enabled by your Service Provider the screens present the following information:...
- Page 220 3. Press More. The throughput is shown in Throughput: the second screen: 9 kbps 9 kbps (e.g.) — active packet data Back More session. N.A. — standby packet data session. Viewing Bandwidth Status ( 9 2 3) Menu The bandwidth percentage represents the number of allocated time slots (“channels”) during the data session.
- Page 221 Messages General The messaging feature let you • send status messages. • send short text messages (free text or according to user defined or predefined templates), and • receive text messages. A status is a number corresponding to a pre-programmed message in a list your group recognises.
- Page 222 Your MTM800 will enter the Inbox automatically and the icon will not blink. Sending a Status Message 1 1) Menu 1. Switch to the desired talkgroup, to which you want to send a status message. 2. Press from any mode, or select Status –...
- Page 223 Wait for the delivery report before sending a new status. If you enter the status menu from a busy talkgroup, the audio is momentarily suspended to allow transmission of your status message. If an emergency group call is received the terminal will immediately join that new emergency call.
- Page 224 After reading the message, you can select Lunch Optns and then one of the following options: • Scroll to Erase and press Ok to erase the Back Optns message. The display shows the next message (if any) or the Messages sub-menu. •...
- Page 225 • Scroll to and press to erase Erase 1 Erase the message. When the display 2 Store 3 Forward shows , the current Message Erased Back message is deleted from the Inbox. The display shows the next message (if any) or the Messages sub-menu.
- Page 226 If your service provider has enabled the PTT Callback feature, then pressing PTT a list containing the message originator (alias or number) and ALL the numbers found in the text message is displayed. Then it is possible to initiate a call to the selected one.
- Page 227 Sending a text message during a Group Call (if configured) Press . One of the following might occur: • The call started before message editing began — The terminal will leave the call and send the message. If the call is still active, the terminal will re-join it. •...
- Page 228 2. Press and scroll to your selection: Optns This is a new message • Scroll to and press Send edited Clear Optns • If set up by your Service Provider 1 Private you have the option to send the 2 Group message to a private number or a Back talkgroup.
- Page 229 2. Scroll through the Templates List using the navigation keys and choose the required template. 3. Press and scroll to your selection: Optns • Scroll to and press Send • Select the mail recipient of your choice by scrolling through the address list (see page 76) or enter the address directly.
- Page 230 3. Press . The message is now in the Edit Register: predefined message editor. abc 27 4. Enter your message. Clear Back • To move the cursor forward – press • To move the cursor backward – press • Press to delete the character to the left of the Clear cursor.
- Page 231 What to do if... Your MTM800 blinks the following messages: Messages Message Description ..Mode There are no programmed entries in the scrolling list. Type List Empty the entry..-Rcvd Call received but not answered, or rejected. Attachment Failed The terminal could not perform talkgroup attachment. Try another talkgroup.
- Page 232 Messages Message Description List Partially Attached The scan list is active, but not all talkgroups are attached to Message Mail successfully delivered. Delivered Message Failed Mail delivery failure. My Groups is empty You cannot view/delete groups when the My Groups range is empty.
- Page 233 Messages Message Description Registration The terminal could not register within the system. Please Failure try again later. Please contact your Service Provider. Service Denied Invalid number. Call your Service Provider. Service Not Available This service is not available on the current network. Service Restricted This service has been restricted by your Service Provider or it has not been purchased.
- Page 234 Tones = High Tone; = Low Tone Description Type Repeated Idle • Back to Home display Once • Back to Rotary volume use when Rotary scroll timer expires • Back to coverage • Back to full service Clear to send Once Bad key press Once...
- Page 235 = High Tone; = Low Tone Description Type Repeated • Talk Prohibit Until you release the • System busy • Time-out timer expire • Called MTM800 not available or busy. Call disconnected or Once failed due to network Wrong number dialled. No tone DMO (Direct Mode) Once...
- Page 236 = High Tone; = Low Tone Description Type Repeated According to the Ring Style Private Call received Until you answer or the call is rejected sub-menu setting. Private Call ringing to Until the call is the caller answered Half-duplex Private Pre- Every 4 seconds until emptive Priority Call the call is answered...
- Page 237 Index covert mode one-touch address book adding a number memory usage data setup phone address book date private address book display settings searching alphabetically one-touch searching by location setting air encryption DGNA (dynamic group number key deletion assignment) air encryption key deletion dialled call history AL (ambience listening) dialling...
- Page 238 making signal strength TMO making in DMO unread message receiving ignition sense receiving in DMO intensity, display intensity encryption InterMNI call air encryption internet protocol (IP) inverted IP (internet protocol) favourite talkgroup full-duplex call K (key) gateway backlight global positioning system (GPS) emergency GPS (global positioning system) menu...
- Page 239 messages phone number status viewing and modifying microphone phone or private number muting/unmuting editing microphone mute/unmute PIN (personal identification missed call history number) missed calls powering on/off MSPD (multi slot packet data) PPC (pre-emptive priority call) multi slot packet data (MSPD) pre-emptive priority call service priority...
- Page 240 speed number status message sending tactical call talk permit tone talkgroup change speed number targeted status template predefined user defined terminal disable/enable throughput time display settings one-touch setting time&date TMO (trunked mode operation) tone setting transmit inhibit (TXI) trunked mode operation (TMO) TXI (transmit inhibit) unmute volume...
- Page 241 MTM800 Making a Phone/PABX Call Making a DMO Private Call Dial No. Dial No. Press Press Mobile Radio Mode Mode Press or select from to select or select from to select 6 2 2 Menu Quick Reference Guide address book address book Phone PABX...
- Page 242 Making a TMO Emergency Group Sending a New Message details see the Menu Messages section Call in the User Guide. Write Select 1 New Menu Press and hold . Emergency Alarm message Press Press Scroll Erase Menu Read is sent automatically. messages Exit Select recipient...
- Page 244 6815318H01-V...
Need help?
Do you have a question about the TETRA and is the answer not in the manual?
Questions and answers