peplink Pepwave AP One Series User Manual
For more information, please visit peplink.com
Hide thumbs
Also See for Pepwave AP One Series:
- User manual (59 pages) ,
- User manual (57 pages) ,
- User manual (59 pages)
Table of Contents
Advertisement
Quick Links
Copyright & Trademarks
Specifications are subject to change without notice. Copyright © 2020 Pepwave Ltd. All Rights Reserved. Pepwave and the Pepwave logo are trademarks of
Pepwave Ltd. Other brands or products mentioned may be trademarks or registered trademarks of their respective owners
AP One AC Mini (HW2) / AP One Flex (HW4) / AP One AX
Pepwave AP One Firmware 3.7.3 / 3.8.1
Pepwave AP One Series:
January 2021
Advertisement
Table of Contents

Related Manuals for peplink Pepwave AP One Series


Summary of Contents for peplink Pepwave AP One Series
- Page 1 Pepwave AP One Series: AP One AC Mini (HW2) / AP One Flex (HW4) / AP One AX Pepwave AP One Firmware 3.7.3 / 3.8.1 January 2021 Copyright & Trademarks Specifications are subject to change without notice. Copyright © 2020 Pepwave Ltd. All Rights Reserved. Pepwave and the Pepwave logo are trademarks of...
-
Page 2: Table Of Contents
AP One AX (APO-AX) Hardware Overview AP One AC mini AP One Flex AP One AX Installation Installation Procedures Dashboard Network Network Settings Port Settings PepVPN Inbound Access Port Forwarding NAT Mapping Captive Portal Bandwidth Control Application https://www.peplink.com Copyright @ 2020 Pepwave... - Page 3 Wireless SSID Wireless Mesh Settings Status Access Point Wireless SSID Wireless Client Mesh / WDS Nearby Device Event Log System Tab Admin Security Operating Mode Firmware Time Schedule Email Notification Event Log SNMP Controller Management Configuration https://www.peplink.com Copyright @ 2020 Pepwave...
- Page 4 Feature Add-Ons Reboot Tools PING Traceroute Wake-on-LAN WAN Analysis Status Tab Device Active Session Client List Event Log WAN Quality Usage Reports Real-Time Hourly Daily Monthly Restoring Factory Defaults Appendix https://www.peplink.com Copyright @ 2020 Pepwave...
-
Page 5: Introduction And Scope
Each member of the AP Series family also features a high-powered Wi-Fi transmitter that greatly enhances coverage and performance while reducing equipment costs and maintenance. https://www.peplink.com Copyright @ 2020 Pepwave... -
Page 6: Product Features And Benefits
● WDS support allows secure and fast network expansion. ● Guest Protect support guards sensitive business data and subnetworks. ● WMM (Wi-Fi Multimedia) and QoS (Quality of Service) support keeps video and other bandwidth-intensive data flowing fast and lag-free. https://www.peplink.com Copyright @ 2020 Pepwave... -
Page 7: Package Contents
1 x AP One Flex 1 x Cable Tie * Power supply or Pepwave Passive PoE Injector are not included AP One AX (APO-AX) 1 x AP One AX 1 x Ceiling Mount 1 x Screw Kit https://www.peplink.com Copyright @ 2020 Pepwave... -
Page 8: Hardware Overview
BLINKING – AP sending/receiving data Wi-Fi GREEN – 2.4/5GHz Wi-Fi radio on Note that this model includes a 2.4GHz Wi-Fi radio and a 5GHz Wi-Fi radio that can operate simultaneously to increase speed and reduce interference. https://www.peplink.com Copyright @ 2020 Pepwave... -
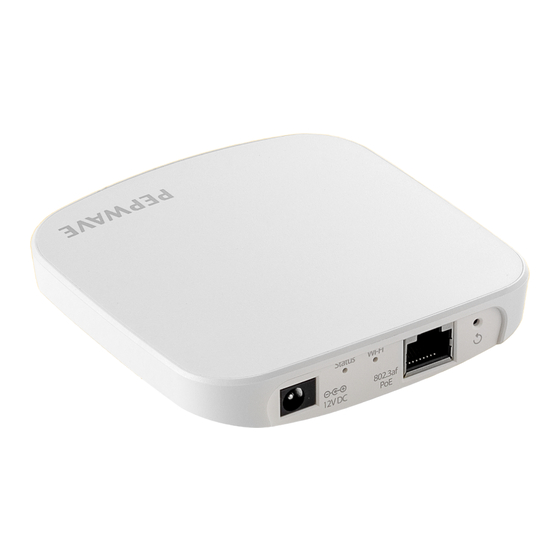
Page 9: Ap One Flex
AP One Flex Connector Panel (Inside the Lid) https://www.peplink.com Copyright @ 2020 Pepwave... - Page 10 Green LED OFF – No device connected to Ethernet port Number of connected clients – SignalBar1: WiFi AP client count > 0 SignalBar2: WiFi AP client count > 10 SignalBar3: WiFi AP client count > 20 https://www.peplink.com Copyright @ 2020 Pepwave...
-
Page 11: Ap One Ax
AP One AX F ront View https://www.peplink.com Copyright @ 2020 Pepwave... - Page 12 Blue LED ON – Powered-on device connected to Ethernet port Port Type Auto MDI/MDI-X ports OFF – 2.4/5GHz Wi-Fi radio off Wi-Fi BLINKING – AP sending/receiving data Blue LED ON – 2.4/5GHz Wi-Fi radio on https://www.peplink.com Copyright @ 2020 Pepwave...
-
Page 13: Installation
Ethernet cable to connect to the Power over Ethernet (PoE) switch or PoE injector. For those Pepwave AP devices that have a DC power source, plug the AC adapter to the DC connector of the unit. 3. Wait for the status LED to turn green. https://www.peplink.com Copyright @ 2020 Pepwave... - Page 14 5. Using your favourite browser, connect to h ttps://192.168.0.3 6. Enter the default admin login ID and password, admin and public respectively. 7. After logging in, the Dashboard appears. Click the System tab to begin setting up your access point. https://www.peplink.com Copyright @ 2020 Pepwave...
-
Page 15: Dashboard
When your access point is connected to a WAN, this field displays the WAN IP IP Address address. For more information, click the D etails l ink which shows connection type details Status This field displays the current WAN connection status. https://www.peplink.com Copyright @ 2020 Pepwave... - Page 16 This field displays your access point’s uptime since the last reboot or shutdown. CPU Load This field shows current loading (0%-100%) on your access point. Throughput This field displays your access point’s transfer rate in kbps. https://www.peplink.com Copyright @ 2020 Pepwave...
-
Page 17: Network
WAN connection details need to be configured in order to connect the router to the Internet. To configure a WAN connection, go to N etwork > WAN from the menu and select the desired WAN connection by clicking on its name. https://www.peplink.com Copyright @ 2020 Pepwave... - Page 18 If this is checked, the connection will be working independently from other backup WAN connections. WAN connections whose Connection Priority are set to Backup will ignore Backup WANs the status of this WAN connection, and will be used when none of the other higher https://www.peplink.com Copyright @ 2020 Pepwave...
- Page 19 Click the square if you wish to enable VLAN functionality for the WAN connection and VLAN enable multiple broadcast domains. Once you enable VLAN, you will be able to enter a name for your network. https://www.peplink.com Copyright @ 2020 Pepwave...
- Page 20 By default, the first two DNS servers of the WAN connection are used as the ping hosts. ● Health Check Method: DNS Lookup DNS lookups will be issued to test connectivity with target DNS servers. The connection https://www.peplink.com Copyright @ 2020 Pepwave...
- Page 21 This is the number of consecutive health check failures before treating a connection as Retries down. This is the number of responses required after a health check failure before treating a Recovery Retries connection as up again. https://www.peplink.com Copyright @ 2020 Pepwave...
- Page 22 Dynamic DNS Settings This setting specifies the dynamic DNS service provider to be used for the WAN based on supported dynamic DNS service providers: ● changeip.com Service Provider ● dyndns.org ● no-ip.org ● DNS-O-Matic ● Others... https://www.peplink.com Copyright @ 2020 Pepwave...
- Page 23 This setting specifies the password for the dynamic DNS service. This setting specifies a list of hostnames or domains to be associated with the public Hosts Internet IP address of the WAN connection. Update All Hosts Check this box to automatically update all hosts. https://www.peplink.com Copyright @ 2020 Pepwave...
-
Page 24: Lan
Clicking on any of the existing LAN interfaces (or creating a new VLAN) will show the following: IP Settings IP Address Enter the LAN IP address and subnet mask of the Pepwave access point on the LAN. NetworkSettings Name Enter a name for the LAN. https://www.peplink.com Copyright @ 2020 Pepwave... - Page 25 When this setting is enabled, the DHCP server automatically assigns an IP address to each computer that is connected via LAN and configured to obtain an IP address via DHCP Server DHCP. The Pepwave router’s DHCP server can prevent IP address collision on the LAN. https://www.peplink.com Copyright @ 2020 Pepwave...
-
Page 26: Port Settings
7.2.2 To configure port settings, navigate to N etwork > LAN > Port Settings . On this screen, you can configure the name of the LAN port and enable or disable a specific port. https://www.peplink.com Copyright @ 2020 Pepwave... -
Page 27: Pepvpn
To set up PepVPN, first give your site a local PepVPN ID. To modify an existing local ID, click on Once you’ve specified a local ID, click the N ew Profile button to configure PepVPN. https://www.peplink.com Copyright @ 2020 Pepwave... - Page 28 Pepwave access point’s VPN Authentication method, as explained above. Pre-shared Key Pre-shared Key defines the pre-shared key used for this particular VPN connection. The VPN connection's session key will be further protected by the pre-shared key. The https://www.peplink.com Copyright @ 2020 Pepwave...
- Page 29 Dynamic-DNS host names are also accepted. Address / Host This field is optional. With this field filled, the Peplink Balance will initiate connection to Names (Optional) each of the remote IP addresses until it succeeds in making a connection. If the field is empty, the Peplink Balance will wait for connection from the remote peer.
- Page 30 When F aster i s selected, a health check packet is sent every second, and the expected detection time is two seconds. When E xtreme i s selected, a health check packet is sent every 0.1 second, and the expected detection time is less than one second. https://www.peplink.com Copyright @ 2020 Pepwave...
-
Page 31: Inbound Access
Check the box to enable the port forwarding profile for Inbound Access. This setting identifies the service to the system administrator. Valid values for this Service Name setting consist of only alphanumeric and underscore “_” characters. https://www.peplink.com Copyright @ 2020 Pepwave... - Page 32 Inbound IP This setting specifies the WAN connections and Internet IP address(es) from which the Address(es) service can be accessed. https://www.peplink.com Copyright @ 2020 Pepwave...
-
Page 33: Nat Mapping
*Please note that the following settings will be available only when your access point is operating in R outer Mode . To add a rule for NAT mappings, click A dd NAT Rule . NAT Mapping Settings https://www.peplink.com Copyright @ 2020 Pepwave... -
Page 34: Captive Portal
The captive portal serves as a gateway that clients have to pass if they wish to access the Internet using your router. To configure the captive portal, navigate to N etwork > Captive Portal . https://www.peplink.com Copyright @ 2020 Pepwave... - Page 35 E xternal Server uses the Access Mode captive portal with HotSpotSystem or CoovaChilli. As described in the following knowledgebase article: https://forum.peplink.com/t/using-hotspotsystem-wi-fi-on-pepwave-max-routers/ User This authenticates your clients through a RADIUS server. After selecting this option, you Authentication will see the following fields: https://www.peplink.com...
- Page 36 Click on the provided link in the Captive Portal Profile to customize the splash page. A Customize splash new browser tab with a WYSIWYG editor of the splash page will be opened. To edit the https://www.peplink.com Copyright @ 2020 Pepwave...
- Page 37 Edit Mode on and select the corresponding elements to edit. page https://www.peplink.com Copyright @ 2020 Pepwave...
-
Page 38: Qos
Select an application by choosing a supported application, or by manually defining a custom application. The priority preference of supported applications is placed at the top of the table. Custom applications are at the bottom. https://www.peplink.com Copyright @ 2020 Pepwave... - Page 39 When a DSL/cable circuit's uplink is congested, the download bandwidth will be affected. Users will not be able to download data at full speed until the uplink becomes less congested. The D SL/Cable Optimization can relieve such issues. When it is enabled, the https://www.peplink.com Copyright @ 2020 Pepwave...
-
Page 40: Misc. Settings
Check the box to enable PepVPN traffic to have the highest priority when the WAN is congested. Misc. Settings Radius Server 7.8.1 RADIUS Server settings are located at N etwork > Misc. Settings > RADIUS Server . Click N ew Profile to display the following screen: Authentication Server https://www.peplink.com Copyright @ 2020 Pepwave... - Page 41 Specifies the IP address or hostname of the RADIUS server host. This setting specifies the UDP destination port for authentication requests. By default, Port the port number is 1813. Secret This field is for entering the secret key for communicating to the RADIUS server. https://www.peplink.com Copyright @ 2020 Pepwave...
-
Page 42: Certificate Manager
7.8.2 Certificate Manager This section allows for certificates to be assigned to the Web Admin SSL and Captive Portal SSL. The following knowledge base article describes how to create self-signed certificates and import it to a Peplink Product. https://forum.peplink.com/t/how-to-create-a-self-signed-certificate-and-import-it-to-a-peplinkprod uct/ AP Tab Use the controls on the ... - Page 43 Select A uto to allow your access point to set the data rate automatically, or select Data Rate Fixed or M inimum to choose a set rate from a drop-down menu. Multicast Filter This setting enables the filtering of multicast network traffic to the wireless SSID. https://www.peplink.com Copyright @ 2020 Pepwave...
- Page 44 Layer 2 Isolation Guest/Visitor Wi-Fi access scenario. Do refer to this link ( h ttps://forum.peplink.com/t/lan-isolation-with-balance30-and-ap-one-ac-minihelp-nee ded/3914/4 ) for visual illustration of the feature. By default, the setting is disabled. Maximum Number The maximum number of clients that can simultaneously connect to your access of Clients point, or enter ...
- Page 45 Frames that are protected include Disassociation, Deauthentication and QoS Frame Protection Action. Fast Transition Fast Transition [802.11r] The transition process of a mobile client as it moves between access points is improved when this option is ticked. https://www.peplink.com Copyright @ 2020 Pepwave...
- Page 46 v 1 . The default is v 2 . Management This feature protects stations against forged management frames spoofed from other devices. Frames that are protected include Disassociation, Deauthentication and QoS Frame Protection Action. https://www.peplink.com Copyright @ 2020 Pepwave...
- Page 47 Frames that are protected include Disassociation, Deauthentication and QoS Frame Protection Action. Fast Transition Fast Transition [802.11r] The transition process of a mobile client as it moves between access points is improved when this option is ticked. https://www.peplink.com Copyright @ 2020 Pepwave...
- Page 48 Select D evice Name , L AN MAC Address , D evice Serial Number or enter a C ustom NAS-Identifier Value When the NAS ID is not defined, the Device Name will be used as the NAS ID in RADIUS requests. https://www.peplink.com Copyright @ 2020 Pepwave...
- Page 49 Enter a value in kbps to limit connected clients’ upstream bandwidth. Limit Enter 0 to allow unlimited upstream bandwidth. Enter a value in kbps to limit connected clients’ downstream bandwidth. Enter 0 to allow Client unlimited downstream bandwidth. https://www.peplink.com Copyright @ 2020 Pepwave...
- Page 50 TCP or UDP traffic from the specified port range. If you have chosen I P Network a s your firewall rule type, enter the IP address and IP Network subnet mask identifying the subnet to allow or deny. https://www.peplink.com Copyright @ 2020 Pepwave...
-
Page 51: Wireless Mesh
To create a new Wireless Mesh profile, go to A P > Mesh , and click A dd . Mesh Settings Mesh ID Enter a name to represent the Mesh profile. Enable Check the box to enable the Mesh Profile. Frequency Select the 2.4GHz or 5GHz frequency to be used. https://www.peplink.com Copyright @ 2020 Pepwave... -
Page 52: Wds
MAC Address Enter the MAC address of the access point with which to form a WDS link. Enable Check this box to enable WDS. Frequency Select the frequency (2.4GHz or 5GHz) for WDS peer connection. https://www.peplink.com Copyright @ 2020 Pepwave... -
Page 53: Settings
Select A ES to enable encryption for WDS peer connections. Selecting N one disables Encryption encryption. 8.1.4 Settings Basic access point operation settings, such as the protocol and channels used, as well as scanning intervals and other advanced settings can be defined and managed in this section. https://www.peplink.com Copyright @ 2020 Pepwave... - Page 54 0 to allow unlimited clients. Discover Nearby Check this box to enable network discovery. Note that setting C hannel to A uto will Networks activate this feature automatically. https://www.peplink.com Copyright @ 2020 Pepwave...
- Page 55 Slot Time transmits. The default value is 9 μ s . Set the wait time to receive an acknowledgement packet before retransmitting. The ACK Timeout default value is 4 8 μ s . https://www.peplink.com Copyright @ 2020 Pepwave...
-
Page 56: Status Access Point
This table shows the detailed information on each AP, including channel, number of clients, power, upload traffic, and download traffic. On the right of the table, you will see the following icons: Click the icon to see a usage table for each client: https://www.peplink.com Copyright @ 2020 Pepwave... - Page 57 Click the icon to configure AP details. Click the icon to see a graph displaying usage. https://www.peplink.com Copyright @ 2020 Pepwave...
- Page 58 Click any point on the graphs to display detailed usage and client information for that device, using that SSID, at that point in time. On the D ata Usage b y drop-down menu, you can display the information by SSID or by AP send/receive rate. https://www.peplink.com Copyright @ 2020 Pepwave...
- Page 59 You may click the E vent t ab which is next to W ireless Usage to view a detailed event log for that particular device. https://www.peplink.com Copyright @ 2020 Pepwave...
-
Page 60: Wireless Ssid
8.2.2 Wireless SSID In-depth SSID reports are available under A P > Status > Wireless SSID . Click the blue arrow on any SSID to obtain more detailed usage information on each SSID. https://www.peplink.com Copyright @ 2020 Pepwave... -
Page 61: Wireless Client
Wireless Client allows you to be able to see your network’s heaviest users as well as search for specific users. Click the icon to bookmark specific users, and click the icon for additional details about each user. https://www.peplink.com Copyright @ 2020 Pepwave... -
Page 62: Mesh / Wds
Mesh/WDS allows you to monitor the status of your wireless distribution system (WDS) or Mesh, and track activity by MAC address. This table shows the detailed information of each AP, including protocol, transmit rate (sent / received), signal strength, and duration. https://www.peplink.com Copyright @ 2020 Pepwave... -
Page 63: Nearby Device
Marking a device with either icon will move the device to the bottom of the table of identified devices.You can sort devices by their assigned mark by clicking the M ark column. You may unmark a device by clicking on the icon. https://www.peplink.com Copyright @ 2020 Pepwave... -
Page 64: Event Log
This event log displays all activity on your AP network, down to the client level. You can use the filter box to search by MAC address, SSID, AP Serial Number, or AP Profile name. Click V iew Alerts to see only alerts, and click the More… link for additional records. https://www.peplink.com Copyright @ 2020 Pepwave... -
Page 65: System Tab
Admin Security Admin Settings This field allows you to define a name for this Peplink Balance unit. Devicer Name By default, D evice Name is set as M odel_XXXX , where X XXX refers to the last 4 digits of the serial number of that unit. - Page 66 M SCHAP v2 and P AP . Authentication This specifies the IP address or hostname of the RADIUS server Host host. Authentication This setting specifies the UDP destination port for authentication Port requests. https://www.peplink.com Copyright @ 2020 Pepwave...
- Page 67 If L AN/WAN is chosen, the WAN Connection Access Settings form will be displayed. Web Admin This field is for specifying the port number on which the web admin interface can be accessed. Port https://www.peplink.com Copyright @ 2020 Pepwave...
-
Page 68: Operating Mode
IP Address(es) Operating Mode You can select the operating mode you want to use for the access point device. The available options are: ● Router Mode ● Bridge Mode ● Bridge Mode, without LAN IP address https://www.peplink.com Copyright @ 2020 Pepwave... -
Page 69: Firmware
Do not disconnect the power during the firmware upgrade process. Do not attempt to upload a non-firmware file or a firmware file that is not supported by Peplink. Upgrading the Peplink Balance with an invalid firmware file will damage the unit and may void the warranty. -
Page 70: Time
Enable and disable different functions such as WAN connections and SSID at different times, based on a user-scheduled configuration profile. The settings for this are located at S ystem > Schedule . Click on N ew Schedule to begin the schedule profile. https://www.peplink.com Copyright @ 2020 Pepwave... - Page 71 Please note that upon selecting a predefined schedule, previous changes on the schedule map will be deleted. Click on the desired times to enable features for that time period. You can hold down your Schedule Map mouse button for faster entry. https://www.peplink.com Copyright @ 2020 Pepwave...
-
Page 72: Email Notification
This field is for specifying the SMTP port number. By default, this is set to 2 5 . SMTP Port When S TARTTLS is selected, the default port number will be set to 5 87 . https://www.peplink.com Copyright @ 2020 Pepwave... - Page 73 Click S end Test Notification to send the test email with the current settings. In a few seconds, you will see a message with detailed test results. https://www.peplink.com Copyright @ 2020 Pepwave...
- Page 74 Copyright @ 2020 Pepwave...
-
Page 75: Event Log
Push Event Router Utility installed. Check the box to activate this feature. For more information on the Router Utility, go to: w ww.peplink.com/products/router-utility SNMP SNMP or simple network management protocol is an open standard that can be used to collect information about the Pepwave AP unit. - Page 76 To add a community for either SNMPv1 or SNMPv2c, click the A dd SNMP Community b utton in the C ommunity Name t able, upon which the following screen is displayed: https://www.peplink.com Copyright @ 2020 Pepwave...
- Page 77 ● ● When MD5 or SHA is selected, an entry field will appear for the password. This setting specifies via a drop-down menu one of the following valid privacy protocols: Privacy ● NONE ● ● https://www.peplink.com Copyright @ 2020 Pepwave...
-
Page 78: Controller Management
● AP Controller - AP is controlled by Peplink Balance with AP controller feature. AP Controller Persistent Check the box P ersistent Controller and enter the IP address of the Peplink Balance under Controller Host. Controller ● InControl - AP is controlled by InControl*... -
Page 79: Configuration
A pply Changes b utton on the page header, or you can cancel Configurations the procedure by pressing d iscard on the main page of the web admin interface. https://www.peplink.com Copyright @ 2020 Pepwave... -
Page 80: Led
Some Pepwave access point models have features that can be activated upon purchase. Once the purchase is complete, you will receive an activation key. Enter the activation key into the Activation Key field, click A ctivate , and then click A pply Changes . https://www.peplink.com Copyright @ 2020 Pepwave... -
Page 81: Reboot
Please note that a firmware upgrade will always replace the inactive firmware partition. 9.14 Tools 9.14.1 PING The ping test tool tests connectivity by pinging the specified destination IP address. The ping utility is located at S ystem > Tools > Ping . https://www.peplink.com Copyright @ 2020 Pepwave... -
Page 82: Traceroute
Pepwave access points can send Magic Packets to any client specified from the Web UI. To access this feature, navigate to S ystem > Tools > Wake-on-LAN . Select a client from the drop-down list and click S end to send a Magic Packet. https://www.peplink.com Copyright @ 2020 Pepwave... -
Page 83: Wan Analysis
9.14.4 WAN Analysis The WAN Analysis feature allows you to run a WAN to WAN speed test between two Peplink devices. You may set up a device as either a server or a client. However, one device must be set up as a server to run the speed tests, and the server must have a public IP address. - Page 84 The default C ontrol Port is 6000 and it can be customized if required. The IP address of the WAN interface will be shown in the W AN Connection Status section. https://www.peplink.com Copyright @ 2020 Pepwave...
- Page 85 Select the WAN(s) that will be used for testing and enter the server’s WAN IP address(es). Once all of the options have been set, click the S tart Test button. https://www.peplink.com Copyright @ 2020 Pepwave...
- Page 86 The test output will show the D ata Streams Parameters , the T hroughput as a graph, and the Results . The test can be run again once it is complete by clicking the S tart button or you can click C lose and change the parameters for the test. https://www.peplink.com Copyright @ 2020 Pepwave...
-
Page 87: Status Tab
This displays the hardware version of this device. Revision Serial Number This displays the serial number of this device. Firmware This displays the firmware version this device is currently running. PepVPN This displays the current PepVPN version. Version https://www.peplink.com Copyright @ 2020 Pepwave... -
Page 88: Active Session
The second table shows the MAC address of each connected LAN/WAN interface. To view your device’s End User License Agreement (EULA), follow the L egal link . Important Note If you encounter issues and would like to contact the Peplink Support Team ( h ttps://contact.peplink.com/secure/create-support-ticket.html... - Page 89 This A ctive Sessions section displays the active inbound/outbound sessions of each WAN connection on the Pepwave router. A filter is available to sort active session information. Enter a keyword in the field or check the box of one of the WAN connections to filter your search. https://www.peplink.com Copyright @ 2020 Pepwave...
-
Page 90: Client List
In the client list table, there is a B an Client feature which can be used to disconnect Wi-Fi clients by clicking the button on the right. There is a blocklist on the same page after you have banned Wi-Fi clients. https://www.peplink.com Copyright @ 2020 Pepwave... -
Page 91: Event Log
The E vent Log displays a list of all events associated with your access point. Check A uto Refresh to refresh log entries automatically. Click the C lear Log button to clear the log. https://www.peplink.com Copyright @ 2020 Pepwave... -
Page 92: Wan Quality
10.5 WAN Quality The S tatus > WAN Quality allows you to select each WAN and view current WAN quality. Detailed information can be seen when selecting a point on the graph. https://www.peplink.com Copyright @ 2020 Pepwave... -
Page 93: Usage Reports
The D ata transferred since installation table indicates how much network traffic has been processed by the device since the first bootup. The D ata transferred since last reboot table indicates how much network traffic has been processed by the device since the last boot up. https://www.peplink.com Copyright @ 2020 Pepwave... -
Page 94: Hourly
10.6.2 Hourly This page shows the hourly bandwidth usage for all WAN connections. Individual connections may be viewed by selecting the desired connection from the drop-down menu. https://www.peplink.com Copyright @ 2020 Pepwave... -
Page 95: Daily
The scale of the graph can be set to display megabytes ( M B ) , gigabytes ( G B ) , or terabytes ( T B ) . https://www.peplink.com Copyright @ 2020 Pepwave... -
Page 96: Monthly
Month . Select the first two rows to view the client bandwidth usage for the last two months. The scale of the graph can be set to display megabytes ( M B ) , gigabytes ( G B ) , or terabytes ( T B ) . https://www.peplink.com Copyright @ 2020 Pepwave... -
Page 97: Restoring Factory Defaults
FCC Caution: Any changes or modifications not expressly approved by the party responsible for compliance could void the user's authority to operate this equipment. IEEE 802.11b or 802.11g operation of this product in the U.S.A. is firmware-limited to channels 1 through 11. https://www.peplink.com Copyright @ 2020 Pepwave... - Page 98 This transmitter must not be co-located or operating in conjunction with any other antenna or transmitter. The availability of some specific channels and/or operational frequency bands is country dependent and is firmware programmed at the factory to match the intended destination. https://www.peplink.com Copyright @ 2020 Pepwave...
Need help?
Do you have a question about the Pepwave AP One Series and is the answer not in the manual?
Questions and answers