Advertisement
Quick Links
USB-to-Serial RS-232 Hub
USB-to-Serial RS-422/485 Hub
UC2322 / UC2324 / UC4852 / UC4854
Quick Start Guide
© Copyright 2007 ATEN
®
International Co., Ltd.
ATEN and the ATEN logo are trademarks of ATEN International Co., Ltd. All rights reserved. All other
trademarks are the property of their respective owners.
This product is RoHS compliant.
Manual Part No. PAPE-1223-330G
Printing Date: 12/2007
UC2322 / UC2324 / UC4852 / UC4854 USB-to-Serial Hub Quick Start Guide
Requirements
Computers
The following equipment must be installed on each computer that is to be
connected to the system:
• USB Host Controller
Operating Systems
• Windows 2000 and higher
• Linux RedHat 2.6x and higher
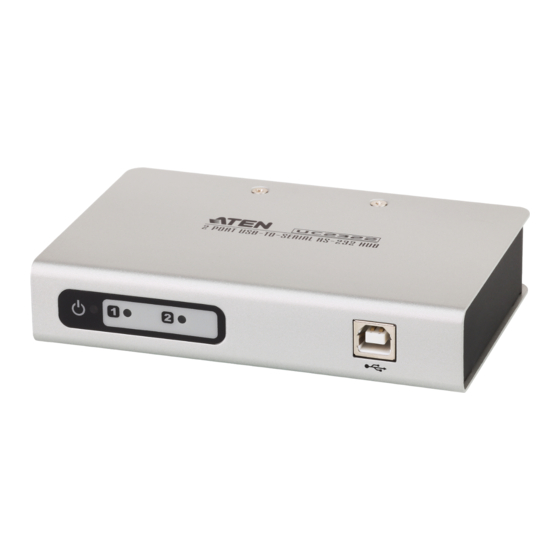
Hardware Review
A
Front View
1. Power LED
2. Port Link LED
3. USB Port
4. RS-232 Serial Port (UC2324) ; RS-422 / RS-485 Serial Port (UC4854)
Rear View & Side View
1. RS-232 Serial Port (UC2322 / UC2324) ; RS-422 / RS-485 Serial Port
(UC4852 / UC4854)
2. Power Jack
Note: The USB-to-Serial Hub is bus-powered so use of a power adapter
is optional.
UC2322 / UC2324 / UC4852 / UC4854 Concentrateur USB-série – Guide de mise en route rapide
Configuration requise
Ordinateurs
Les composants suivants doivent être installés sur chaque ordinateur qui
sera connecté au système :
• Contrôleur d'hôte USB
Systèmes d'exploitation
• Windows 2000 et versions supérieures
• Linux RedHat 2.6x et versions supérieures
Présentation du matériel
Vue avant
1. Voyant d'alimentation
2. Voyant de liaison des ports
3. Port USB
4. Port série RS-232 (UC2324) ; port série RS-422 / RS-485 (UC4854)
Vues arrière et latérale
1. Port série RS-232 (UC2322 / UC2324) ; port série RS-422 / RS-485
(UC4852 / UC4854)
2. Prise d'alimentation
Remarque : le Concentrateur USB-série étant alimenté par USB,
l'utilisation d'un adaptateur secteur est facultative.
UC2322 / UC2324 / UC4852 / UC4854 Hub mit Konverter von USB- auf serielle Schnittstelle Kurzanleitung
Voraussetzungen
Computer
Auf den Computern, die mit dem System verbunden werden sollen, muss
mindestens Folgendes installiert sein:
• USB-Host-Controller
Betriebssysteme
• Windows 2000 und höher
• Linux RedHat 2.6x und höher
Hardwareübersicht
Vista frontal
1. LED-Betriebsanzeige
2. Port-Verbindungsanzeige
3. USB-Port
4. Serielle Schnittstelle vom Typ RS-232 (UC2324) oder RS-422/RS-485
(UC4854)
Rückseitige und seitliche Ansicht
1. Serielle Schnittstelle vom Typ RS-232 (UC2322 / UC2324) oder RS-422/
RS-485 (UC4852 / UC4854)
2. Stromeingangsbuchse
UC2322 / UC2324 / UC4852 / UC4854 Concentrador USB a serie Guía rápida
Requisitos
Ordenadores
En cada ordenador que vaya a conectar al sistema se tienen que instalar
los siguientes componentes:
• Controladora USB
Sistemas operativos
• Windows 2000 o posterior
• Linux RedHat 2.6x o posterior
Presentación del hardware
Vista frontal
1. Indicador LED de alimentación
2. Indicador LED de enlace de puerto
3. Puerto USB
4. Puerto serie RS-232 (UC2324); puerto serie RS-422 / RS-485 ( UC4854)
Vistas posterior y lateral
1. Puerto serie RS-232 (UC2322 / UC2324); puerto serie RS-422 / RS-485
(UC4852 / UC4854)
2. Entrada de alimentación
A
Hardware Review
1
2
3
Front View
1
2
3
4
1
Rear View
1
Package Contents
Side View
1 USB-to-Serial Hub
1 USB Cable
1 Installation Disk
1 User Manual
1 Quick Start Guide
Windows Installation
B
Installing the Drivers
1. Insert the installation disk into your CD-ROM drive and unzip the file
named ATEN_Drivers for Windows.zip .
2. Open the Win32/Win64 folder. Click on MSSetup.exe . A dialog box will
appear.
3. Click Install to install the driver for the USB-to-Serial Hub. To cancel the
installation, click Exit.
4. When the installation has completed, a dialog box will appear.
5. Click Exit to close the wizard. You have successfully installed the driver.
Note: The USB-to-Serial Hub also supports Linux. Please refer to the User
Manual for details.
Installation sous Windows
Installation des pilotes
1. Insérez le CD d'installation dans votre lecteur de CD-ROM et
décompressez le fichier ATEN_Drivers for Windows.zip .
2. Ouvrez le dossier Win32/Win64 . Cliquez sur MSSetup.exe . Une boîte de
dialogue s'affiche.
3. Cliquez sur Installer pour installer le pilote du Concentrateur USB-série.
Cliquez sur Quitter pour annuler l'installation.
4. À la fin de l'installation, la boîte de dialogue suivante s'affiche :
5. Cliquez sur Quitter pour quitter l'assistant. Le pilote est à présent
correctement installé.
Remarque : Le Concentrateur USB-série prend également en charge Linux.
Pour plus d'informations, reportez-vous au manuel d'utilisation.
Hinweis: Der Hub mit Konverter von USB- auf serielle Schnittstelle wird
über den Bus mit Strom versorgt, sodass der Gebrauch des
Netzteils optional ist.
Unter Windows installieren
Treiber installieren
1. Legen Sie die Installations-Disk in Ihr CD-ROM-Laufwerk ein, und
entpacken Sie die Datei ATEN_Drivers for Windows.zip .
2. Öffnen Sie den Ordner Win32/Win64 . Klicken Sie auf MSSetup.exe .
Daraufhin erscheint ein Dialogfeld.
3. Klicken Sie auf Install (Installieren), um den Treiber für den Hub mit
Konverter von USB- auf serielle Schnittstelle zu installieren. Um die
Installation abzubrechen, klicken Sie auf Exit (Beenden).
4. Nachdem die Installation vollzogen ist, erscheint das folgenden
Dialogfeld.
5. Klicken Sie auf Exit (Beenden), um den Assistenten zu schließen. Damit
haben Sie den Treiber erfolgreich installiert.
Hinweis: Der Hub mit Konverter von USB- auf serielle Schnittstelle
unterstützt auch Linux. Für weitere Details siehe das
Benutzerhandbuch.
Nota: El adaptador de puerto USB a puerto serie se alimenta a través
del bus, de forma que el uso del adaptador de alimentación es
opcional.
Instalación en Windows
Instalación de los controladores
1. Inserte el CD de instalación en la unidad de CD-ROM y descomprima el
archivo ATEN_Drivers for Windows.zip .
2. Abra la carpeta Win32/Win64 . Haga clic en MSSetup.exe . Aparece un
cuadro de diálogo.
3. Haga clic en Install (Instalar) para instalar el controlador del
Concentrador USB a serie. Haga clic en Exit (Salir) para cancelar la
instalación.
4. Una vez terminada la instalación, aparece el siguiente cuadro de diálogo.
5. Haga clic en Exit (Salir) para cerrar el asistente. El controlador se ha
instalado con éxito.
Nota: El Concentrador USB a serie también admite Linux. Para más
detalles, consulte el Manual del usuario.
B
UC2322 / UC2324 / UC4852 / UC4854 Installation
C
Connecting the UC2322 / UC2324 / UC4852 / UC4854
2
Connecting the UC2322 / UC2324 / UC4852 / UC4854
1. Connect the UC2322 / UC2324 / UC4852 / UC4854 to a USB port on
your computer. The New Hardware Wizard appears.
2. Select, No, not this time, and then click Next to continue.
3. Leave the default choice (Install from the software automatically), and
then click Next to continue.
4. Click Finish to close the wizard. You have successfully installed the
UC2322 / UC2324 / UC4852 / UC4854.
Peripheral Installation
After you have finished the software installation procedures for your
operating system and have connected the UC2322 / UC2324 / UC4852 /
UC4854 to your computer, connect the peripheral device to the UC2322 /
UC2324 / UC4852 / UC4854 and then turn the peripheral on.
Note:
1. Under Windows 2000, if you connect a modem, you must specify it as a
Standard Modem.
2. Some peripheral devices, such as older PDAs, require that you install the
software for the peripheral device before it will work properly.
Connexion du UC2322 / UC2324 / UC4852 / UC4854
1. Connectez le UC2322 / UC2324 / UC4852 / UC4854 à un port USB de
votre ordinateur. L'Assistant de nouveau matériel s'affiche.
2. Cliquez sur Non, pas cette fois-ci, puis sur Suivant pour continuer.
3. Conservez l'option par défaut (Installer le logiciel automatiquement), puis
cliquez sur Suivant pour continuer.
4. Cliquez sur Terminer pour quitter l'assistant. Le UC2322 / UC2324 /
UC4852 / UC4854 est à présent correctement installé.
Installation du périphérique
Une fois terminé le processus d'installation du logiciel sur votre système
d'exploitation et après avoir raccordé l'UC2322 / UC2324 / UC4852 /
UC4854 à votre ordinateur, reliez le UC2322 / UC2324 / UC4852 / UC4854
au périphérique désiré, puis allumez ce dernier.
Remarque :
1. Si vous connectez un modem sous Windows 2000, vous devez le définir
en tant que modem standard.
2. Pour fonctionner normalement, certains périphériques, tels que les
anciens assistants personnels (PDA) requièrent l'installation préalable du
logiciel pour le périphérique.
An UC2322 / UC2324 / UC4852 / UC4854 anschließen
1. Schließen Sie die UC2322- / UC2324- / UC4852- / UC4854-Schnittstellen
Ihres Computers an. Daraufhin erscheint der Hardwareassistent.
2. Wählen Sie Nein, jetzt nicht, und klicken Sie auf Weiter, um fortzufahren.
3. Lassen Sie die Standardoption (Software automatisch installieren)
markiert, und klicken Sie auf Weiter, um fortzufahren.
4. Klicken Sie auf Fertig stellen, um den Assistenten zu schließen. Damit
haben Sie die UC2322- / UC2324- / UC4852- / UC4854-Schnittstellen
erfolgreich installiert
Peripheriegeräte anschließen
Nachdem Sie die für Ihr Betriebssystem erforderliche Software installiert
und den UC2322 / UC2324 / UC4852 / UC4854 an Ihren Computer
angeschlossen haben, verbinden Sie die gewünschten Peripheriegeräte mit
dem UC2322 / UC2324 / UC4852 / UC4854 und schalten diese ein.
Hinweis:
1. Wenn Sie unter Windows 2000 ein Modem anschließen, müssen Sie
dieses als Standardmodem anmelden.
2. Bei einigen Peripheriegeräten (darunter einige ältere PDAs) müssen Sie
zuerst die Gerätesoftware installieren, bevor das Gerät funktioniert.
Conexión del UC2322 / UC2324 / UC4852 / UC4854
1. Conecte el UC2322 / UC2324 / UC4852 / UC4854 a un puerto USB de
su ordenador. Aparece el Asistente para hardware nuevo.
2. Seleccione la opción No por el momento y haga clic en Siguiente.
3. Conserve la opción por defecto (Instalar automáticamente el software) y
haga clic en Siguiente para continuar.
4. Haga clic en Concluir para cerrar el asistente. El UC2322 / UC2324 /
UC4852 / UC4854 se ha instalado con éxito.
Instalación de periféricos
Una vez finalizado el proceso de instalación del software en su sistema
operativo y conectado el UC2322 / UC2324 / UC4852 / UC4854 a su
ordenador, conecte el UC2322 / UC2324 / UC4852 / UC4854 a los
periféricos deseados y enciéndalos.
Nota:
1. Si conecta un módem en un sistema Windows 2000, debe identificarlo
como módem estándar.
2. Algunos periféricos, como los antiguos PDAs, requieren la instalación
previa del software para el periférico para que funcione correctamente.
Online Registration
International:
• http://support.aten.com
North America:
• http://www.aten-usa.com/
product_registration (ATEN TECH)
• http://support.aten.com (ATEN NJ)
Technical Phone Support
International:
• 886-2-86926959
North America:
• 1-888-999-ATEN (ATEN TECH)
• 1-732-356-1703 (ATEN NJ)
The following contains information that relates to China:
DB-9 Pin Assignments
C
Pin
RS-232
RS-422
1
DCD
TxD-(A)
2
RXD
TxD+(B)
3
TXD
RxD+(B)
4
DTR
RxD-(A)
5
GND
GND
6
DSR
RTS-(A)
7
RTS
RTS+(B)
8
CTS
CTS+(B)
9
RI
CTS-(A)
Affectation des broches du connecteur
DB-9
Broche
RS-232
RS-422
1
DCD
TxD-(A)
2
RXD
TxD+(B)
3
TXD
RxD+(B)
4
DTR
RxD-(A)
5
GND
GND
6
DSR
RTS-(A)
7
RTS
RTS+(B)
8
CTS
CTS+(B)
9
RI
CTS-(A)
DB-9-Stiftzuordnung
Stift
RS-232
RS-422
1
DCD
TxD-(A)
2
RXD
TxD+(B)
3
TXD
RxD+(B)
4
DTR
RxD-(A)
5
GND
GND
6
DSR
RTS-(A)
7
RTS
RTS+(B)
8
CTS
CTS+(B)
9
RI
CTS-(A)
Asignación de patillas DB-9
Patilla
RS-232
RS-422
1
DCD
TxD-(A)
2
RXD
TxD+(B)
3
TXD
RxD+(B)
4
DTR
RxD-(A)
5
GND
GND
6
DSR
RTS-(A)
7
RTS
RTS+(B)
8
CTS
CTS+(B)
9
RI
CTS-(A)
www.aten.com
RS-485
Data-(A)
Data+(B)
-
-
GND
-
-
-
-
www.aten.com
RS-485
Data-(A)
Data+(B)
-
-
GND
-
-
-
-
www.aten.com
RS-485
Data-(A)
Data+(B)
-
-
GND
-
-
-
-
www.aten.com
RS-485
Data-(A)
Data+(B)
-
-
GND
-
-
-
-
Advertisement

Related Manuals for ATEN UC2322


Summary of Contents for ATEN UC2322
- Page 1 © Copyright 2007 ATEN ® International Co., Ltd. 1 USB Cable ATEN and the ATEN logo are trademarks of ATEN International Co., Ltd. All rights reserved. All other 1 Installation Disk trademarks are the property of their respective owners. 1 User Manual 1 Quick Start Guide This product is RoHS compliant.