Advertisement
Quick Links
MULTISENSOR
4 IN 1
QUICK INSTALLATION GUIDE
v1.0
TRADEMARKS
Zipato and the Zipato logo are registered Trademarks. All
other product names mentioned herein may be trademarks or
registered trademarks of their respective companies.
NOTICE
Although Zipato has attempted to ensure the accuracy of the
content of this manual, it is possible that this document may
contain technical inaccuracies, typographical, or other errors.
Zipato assumes no liability for any error in this publication, and for
damages, whether direct, indirect, incidental, and consequential
or otherwise, that may result from such error, including, but not
limited to loss of data or profits. Zipato provides this publication
"as is" without warranty of any kind, either express or implied,
including, but not limited to implied warranties of merchantability
or fitness for a particular purpose. The published information in
the manual is subject to change without notice. Zipato reserves
the right to make changes in the product design, layout, and driver
revisions without notification to its users. This version of the
Installation guide supersedes all previous versions.
ELECTROMAGNETIC COMPATIBILITY
When operated according to manufacturer instructions, the
product complies with all applicable CE harmonised standards
from EMC Directive 2004/108/EC and Part 15 of the FCC Rules.
The connections conducting HF signals must not be damaged or
altered in any way by the user.
TAKE CARE OF YOUR SAFETY
Display extreme caution when using ladders or steps, please
follow manufacturer's instructions. Be careful when using hand
and power tools and follow the manufacturer's guidelines when
using them. Take care that the correct tools are used. Wear
goggles or protective clothing where required.
INTRODUCTION
Thanks for choosing the Zipato Multisensor 4 in 1 (door/window
contact sensor, humidity sensor, temperature sensor, and light
sensor). This sensor is a Z-Wave enabled device (interoperable,
two-way RF mesh networking technology) and is fully compatible
with any Z-Wave enabled network and its security framework. Every
main powered Z-Wave enabled device acts as a signal repeater
and multiple devices result in more possible transmission routes
which helps eliminate "RF dead-spots". Z-Wave enabled devices
displaying the Z-Wave logo can also be used with it regardless
of the manufacturer, and this device can also be used in other
manufacturer's Z-Wave enabled networks. Zipato Multisensor 4 in
1 sends Z-Wave signal when door or window is opened or closed or
there is a humidity, temperature, luminance change.
This product is a security enabled Z-Wave product that is able to
use encrypted Z-Wave messages to communicate to other security
enabled Z-Wave products. A security enabled Z-Wave controller
should be used in order to fully utilize the product.
make your home smart
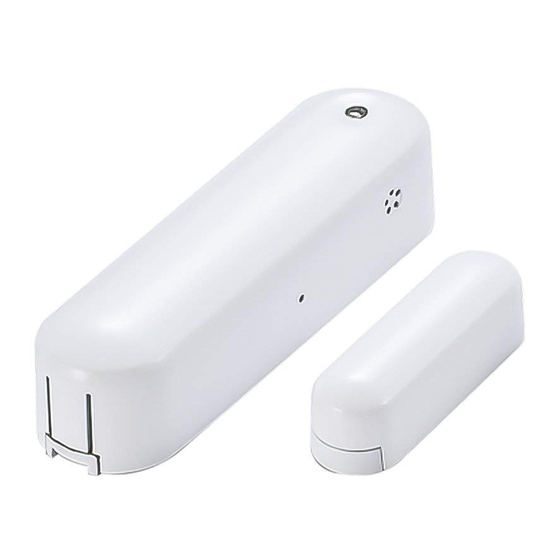
OVERVIEW
Light sensor
Temperature /
Humidity sensor
Program switch
Tamper
Switch
Program
Switch
PACKAGE CONTENT
1PC
Multisensor 4 in 1
1PC
Bracket for Magnet
1PC
Magnet
2PCS
Screw to fix magnet
2PCS
Adhesive tape for Magnet / sensor
2PCS
CR14250 Battery
1PC
Quick Installation guide
FEATURES
Door/Window, humidity, temperature and illuminance sensor in
one device
Primarily used as dry contact Door/Window sensor, it consists of
two parts, magnet and a sensor
New Z-Wave 500 series chip supports multichannel operation
and higher data rates (9.6/40/100kbps)
Can be used with various Z-Wave networks/controllers,
regardless of the manufacturers
Very low power power consumption
Low battery auto report
LED indicator
Over-the-air firmware update
Easy installation
SPECIFICATION
TECHNICAL SPECS
PROTOCOL
Z-Wave
POWER
CR14250 battery
OPERATING VOLTAGE:
OPERATING CURRENT
www.zipato.com
STANDBY CURRENT
OPERATING TEMPERATURE
OPERATING RANGE
Up to 31 meter in line of sight
HUMIDITY DETECT RANGE
ILLUMINATION RANGE
WEIGHT
Sensor (incl. battery): 23 g; Magnet: 14 g
DIMENSIONS
Sesnor: 21x76x20 mm; Magnet: 12x41x25 mm
PACKAGE WEIGHT
PACKAGE DIMENSIONS
REGULATIONS
EMC 2004/108/EC, R&TTE 1995/5/EC, LVD
2006/95/EC, FCC PART 15
WARRANTY
MODEL AND FREQUENCIES
EUROPEAN UNION - EU version
vs-zd2301.eu / 868.42 MHz
UNITED STATES - US version
vs-zd2301.us / 908.42MHz
RUSSIA - RU version
vs-zd2301.ru / 869.02MHz
ISRAEL - IS version
vs-zd2301.is / 916.02MHz
AUSTRALIA - AU version
vs-zd2301.au / 921.42MHz
INDIA - IN version
vs-zd2301.in / 865.20MHz
INSTALLATION
Notice: If you are installing the entire Z-Wave system for the first
time, please refer to the installation guide of Z-Wave Controller
before installing Multisensor 4 in 1.
1 | Push release button to open the rear cover.
2 | Using adhesive tape to affix the rear cover on the frame along
the opening edge of door / window.
3 | Insert CR14250 into the battery compartment, if user presses
the program switch, Multisensor 4 in 1 will send the Node
Information Frame (NIF). Multisensor 4 in 1 will go to sleep if user
didn`t press the program switch within 20 seconds.
LED Status for Z-Wave Network:
If user presses the program switch, the red LED will flash 5
times if the Multisensor 4 in 1 has not been included yet.
If user presses the program switch, the red LED will flash 1
times if the Multisensor 4 in 1 has been included.
4 | "Inclusion" (adding) to the Z-Wave network: Put the Z-Wave
Controller into "inclusion" mode, and follow its instruction to add
the Multisensor 4 in 1 to your controller. To get in the "inclusion"
mode, the distance between sensor and controller is suggested
to be within one meter. Press the program switch once on
Multisensor 4 in 1 for sending the NIF. After sending NIF, Z-Wave
will send the auto inclusion; otherwise, Multisensor 4 in 1 will go
to sleep after 20 seconds.
5 | "Exclusion" (removing) from the Z-Wave network: Put the Z-Wave
Controller into "exclusion" mode, and follow its instruction to delete
the Multisensor 4 in 1 from your controller. Press the program switch
of Multisensor 4 in 1 for 1 second at least to be excluded.
Note: All user and network settings will be cleared and the device
reset to factory defaults when the device is excluded.
6 | Push back the rear cover, the LED should go off.
7 | Fix the Magnet by using the adhesive tape, locate the Magnet
close to the Multisensor 4 in 1. The distance between these two
devices should be 2 cm. Make sure the device is located in a place
whithout a shelter above and nothing blocks the sensor area.
8 | Awake Mode: Press the Program SW, the LED will flash one
time and Multisensor 4 in 1 will send "Wake Up Notification"
after 5 seconds. If Multisensor 4 in 1 received "Wake Up No More
Information" command then the Multisensor 4 in 1 will go to sleep
or it will wait 10 seconds then go to sleep. It will precede all the
commands after sending the "Wake Up Notification".
9 | Auto Wake Up: Use "Wake Up" command to set up the awaking
time and send the wake up notification to controller. User can use
command to change the auto wake up from 10 minutes to 1 week,
Interval increment is 3 minutes.
10 | Battery Capacity Detection:
Use "Battery Get" command to have the battery capacity back in
%
3V
It will detect the battery capacity automatically.
4uA
Low Battery Auto Report (low battery is set as 2.6+/-0.1 Voltage,
make your home smart
2.07 ~ 5.17 uA
detects every 2 hours).
-15°C ~ 60°C
11 | Association:
Support grouping identifier = 1, one group whit 5 nodes.
0~100%
Association is used for other capacity automatically
0~100%
All triggering reports & low voltage report will be sent to the
associated nodes.
12 | Power Level Control:
53 g
Use "Power Level Set" to set up the RF strength.
103x43x35 mm
Use "Power Level Test Node Set" to test specific node`s RF
sensitivity.
13 | Support Explorer Frame Function
1 year
14 | Support AES function. Security enabled Z-Wave controller
must be used to fully utilize the product.
13 | All the rest commands depend on Z-Wave standard
15 | Factory Default Reset: Open the rear cover to send the Alarm
Report and then press the program switch 10 times in 10 seconds,
Multisensor 4 in 1 will send the "Device Reset Locally" command
and reset to the factory default.
Notice: Please use this procedure only in the event if the network
controller is missing or is otherwise inoperable.
The magnet shall be fixed close to the specific area, and the
distance from sensor shall not be more than 2 cm.
or
Fixed without bracket:
or
use screws
WINDOW
www.zipato.com
Fixed with bracket:
01
Advertisement

Related Manuals for Zipato ZD2301

Summary of Contents for Zipato ZD2301
- Page 1 Tamper Zipato assumes no liability for any error in this publication, and for Switch Notice: If you are installing the entire Z-Wave system for the first...
- Page 2 ZIPATO. Your dated sales or delivery receipt, CONFIGURATION - HUMIDITY Over 36 °C IN NO EVENT WILL ZIPATO BE LIABLE FOR LOSS OF DATA OR FOR showing the date of purchase of the product, is your proof of the INDIRECT, SPECIAL, INCIDENTAL, CONSEQUENTIAL (INCLUDING purchase date.
- Page 3 Marketing model: Multisensor 4 in 1 designated by your local authorities, some will accept your Regulatory model: vs-zd2301 product for free or simply drop it off at your Zipato re-seller store. Trade/Brand name: Zipato By recycling the product and its packaging in this manner you help to conserve the environment and protect human health.
Need help?
Do you have a question about the ZD2301 and is the answer not in the manual?
Questions and answers