Table of Contents
Advertisement
Advertisement
Chapters
Table of Contents

Related Manuals for Victoria Arduino MYTHOS 2


Summary of Contents for Victoria Arduino MYTHOS 2
- Page 1 SERVICE MANUAL MYTHOS 2...
- Page 2 EDITION DATE MODIFICATIONS 01/2020 First Edition...
- Page 3 MACHINE DESCRIPTION FIRST INSTALLATION AND PRELIMINARY OPERATIONS REMOVAL OF THE EXTERNAL SURFACE GRINDING CHAMBER AND GRINDERS GRINDER MOTOR ELECTRIC COMPONENTS PROGRAMMATION ALARMS AND TROUBLESHOOTING MAINTENANCE CHECKING DIAGRAMS SPARE PART CATALOGUE MYTHOS 2...
- Page 5 MODULE ......10.7 ACCESS THE GRINDER MOTOR..5.2 10.7 ELECTRICAL DIAGRAM REMOVAL OF THE GRINDER MOTOR 5.3 INVERTER PROTECTION LATCH ..10.8 11. SPARE PART CATALOGUE ..11.1 MYTHOS 2...
- Page 6 MYTHOS 2...
-
Page 7: Table Of Contents
CONTENTS CHECK ............1.6 MYTHOS 2... -
Page 8: Machine General Description
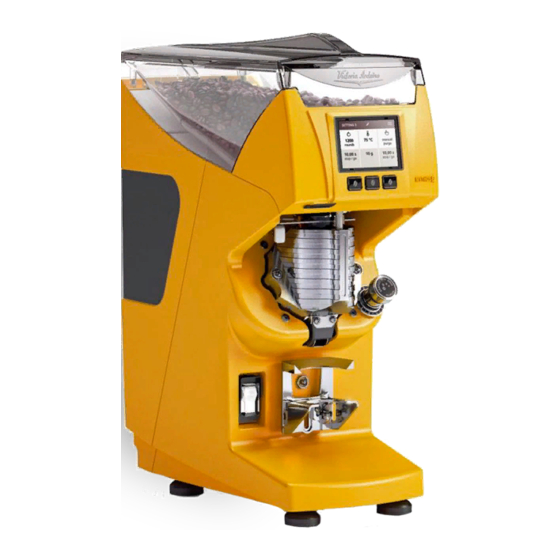
MACHINE GENERAL DESCRIPTION Container cover Filter holder fork Coffee bean container ON/OFF switch Rear blackboard Dispensing spout Grinding adjusting knob Heating element Grinding start button Dose button Machine foot Touch screen display MYTHOS 2... -
Page 9: Safety Regulations
• The power cord of this appliance must never be replaced by the user. In the event of damage, switch off the appliance and only contact profes- sionally qualified technicians for its replacement. MYTHOS 2... -
Page 10: Applications And Use
If the thermal breaker to protect the to determining long machine life. motor is triggered, do not attempt any other manoeuvre. Unplug the machine from the power mains and make sure that any problems have been solved before switching the machine on again. MYTHOS 2... -
Page 11: Important Information
Do not remove, tear out or re-write any part of this manual for any reason. In case of loss of this manual or for further informa- tion, please contact your area retailer or the manu- facturer. MYTHOS 2... -
Page 12: Contents Check
In case of damage or faults, contact your local dealer. For any communication, always communicate the serial number. The communication must be carried out within 8 days from the receipt of the machine. Machine Coffee bean container MYTHOS 2... - Page 13 GRINDING SIZE ..............2.8 MYTHOS 2...
-
Page 14: First Installation
Voltage 110 / 220 Frequency 50 / 60 Power consumption Hopper kg/lb 2 / 4,4 Grinding speed Net weight kg/lb 21,9 22,1 Gross weight kg/lb 23,5 24,5 24,7 Dimensions Width (X) mm/inch Height (Y) mm/inch Depth (Z) mm/inch MYTHOS 2... -
Page 15: Positioning The Machine
PROCEDURE OF FIRST INSTALLATION After the positioning of the machine, to complete the installation, it is necessary to: Insert the coffee bean container into the machine. Connect the machine at the electrical mains using the relevant socket. Switch ON the machine. MYTHOS 2... -
Page 16: Basic Programming
2.1.4 BASIC PROGRAMMING MYTHOS 2 has six grinding scenarios called MY COFFEE, each one with three doses and its proper settings. My coffee 1, 2 and 3 can only be modified from pro- gramming menu. - Page 17 To choose a scenario: Press the select scenario icon. Choose a MY COFFEE. To change doses on MY COFFEE 1, 2 or 3: Press the main menu icon. Select the MY COFFEE menu. MYTHOS 2...
- Page 18 Set the grinding time or weight by pressing - / +: • ✓ = Confirm • = Cancel To exit menu, press NOTE To change doses on MY COFFEE 4, 5 or 6, proceed directly from the use page. MYTHOS 2...
-
Page 19: Grind Coffee
Leave the filter holder until the grinder finishes, oth- erwise it never stop. NOTE There may be an excessive distribution of coffee in the filter holder for the first 10 - 20 ground doses. If it persists, check the clump crusher (see the relevant paragraph 3.3.1). MYTHOS 2... -
Page 20: Grinding Size
0.4 mm of the burrs. The machines equipped with resetta- ble knob can be set to zero at a preset grinding point by holding the top part of the knob in position and using the ring nut on the base. MYTHOS 2... - Page 21 REMOVAL OF THE MICROSWITCH (TIMER VERSION ONLY) ..... 3.9 REMOVAL OF THE GRAVIMETRIC SENSOR (GRAVIMETRIC VERSION ONLY) ..3.9 MYTHOS 2...
- Page 22 REMOVAL OF THE REAR PART Slide out the tab under the coffee bean container. Remove the coffee bean container from the machine. MYTHOS 2...
- Page 23 "MOTOR TEMPERATURES" (see the relevant description into the User Manual) and for the second chosen in the setting "FANS TIME", each time a dose of cof- fee is ground. MYTHOS 2...
- Page 24 Remove the coffee bean container from the machine. Utilising a Phillips screwdriver, loosen the two screws that lock the display control unit cover. Remove the two screws that lock the display support to the front part of the machine, using a Phillips screwdriver. MYTHOS 2...
- Page 25 Slide out the dispensing spout from the machine. Remove the spout from its support. NOTE The dispensing spout is composed of a plastic cover, a metal channel and the clump crusher. MYTHOS 2...
- Page 26 NOTE The clump crusher is not interchangea- ble between MYTHOS 1 and MYTHOS 2. When the clump crusher is replaced, put it over the metal channel and ensure that: •...
-
Page 27: Removal Of The Grinding Adjustment Knob
Rotate anticlockwise the knob until it's free from the machine. 3.4.1 INSTALL THE KNOB To re-install the knob on the machine, rotate it clock- wise until it locked on its place. NOTE To set the knob, see the relevant para- graph 2.1.6. MYTHOS 2... -
Page 28: Removal Of The Filter Holder Fork
Raise or lower the fork in order to adjust it according to filter holder dimensions. Once having reached the correct position, make sure that is properly levelled and tighten the fork fasten- ing screw. MYTHOS 2... -
Page 29: Removal Of The Microswitch (Timer Version Only)
From the back of the machine pull the microswitch by its cable. REMOVAL OF THE GRAVIMETRIC SENSOR (Gravimetric version only) To access the gravimetric sensor, is necessary to remove the rear panel of the machine as described in paragraph 3.1. MYTHOS 2... - Page 30 REASSEMBLY OF THE GRAVIMETRIC SENSOR (Gravimetric version only) When reassembling the Gravimetric sensor, please put attention in positioning the sheet thickness scale (A) on the bracket (B). After this, mount the sensor (C). MYTHOS 2 3.10...
- Page 31 GRINDERS REPLACE ............4.3 MYTHOS 2...
- Page 32 OFF and the grinding chamber resistance is cooled. Slide out the tab under the coffee bean container. Remove the coffee bean container from the machine. Disconnect the electrical cable of the heating element. MYTHOS 2...
- Page 33 Using a flat-head screwdriver remove the three screws on each grinder and then slide out them. WARNING Ensure to fix the new grinders with the screws to prevent internal damage to the machine. MYTHOS 2...
- Page 34 MYTHOS 2...
- Page 35 REMOVAL OF THE GRINDER MOTOR ......... 5.3 MYTHOS 2...
- Page 36 Disconnect the ground connections of the motor and the temperature probe, utilising a Phillips screwdriver. NOTE For more comfort, it's advisable to remove the grinding adjustment knob (paragraph 3.4) and the dispensing spout (paragraph 3.3). Access the grinding chamber (paragraph 4.1). MYTHOS 2...
- Page 37 After accessing the grinder motor: Remove the motor support, by loosing the two screws utilising a 10mm key. Loosen the four silent block on the front of the machine. Slide out the motor from the rear of the machine. MYTHOS 2...
- Page 38 MYTHOS 2...
- Page 39 REMOVAL OF THE MAIN SWITCH ..........6.7 MYTHOS 2...
-
Page 40: Main Board
To remove the main board from its holder, slide the screws along the slot until it's free. NOTE If you replace the main board, you must configure the new one for your Mythos 2. Follow the procedure shows in the paragraph 7.1. 6.1.1 FUSES Relays protection (F1A) -
Page 41: Main Board Connections
To access the display board, it is necessary to remove its cover in the front part of the machine (paragraph 3.2). 6.2.1 DISPLAY BOARD CONNECTIONS USB port Display board - main board connection Optical sensor plug Gravimetric sensor plug Ground connection LEDs connection MYTHOS 2... -
Page 42: Gravimetric Sensor Plug
This probe allows to keep the motor's temperature constant. In the event of overheating, it automatically switch- es on the cooling fans. If it's necessary to replace the probe: Loosen the screw from the motor. Disconnect the black connector from the main board. MYTHOS 2... -
Page 43: Grinding Chamber Temperature Probe
Disconnect the red connector from the main board. INFRARED SENSORS The infrared sensors are installed in the upper part of the machine, under the coffee bean container. Allow to signal the possible missing of coffee inside the container. MYTHOS 2... -
Page 44: Removal Of The Sensors
To remove the infrared sensors, loosen the screws using a Phillips screwdriver. NOTE The two sensors are mirrored and must be aligned with each other, therefore pay due attention during the assembly phase. Use the slots for centering the transmitter and receiver. MYTHOS 2... -
Page 45: Removal Of The Main Switch
Lever the higher side of the switch using a flat- head screwdriver. WARNING Be careful or cover the screwdriver because you could ruin the paint. Then, lever the lower side of the switch as described in the step 1. Pull the switch. MYTHOS 2... - Page 46 MYTHOS 2...
- Page 47 SOFTWARE UPDATE ............7.4 NOTE For all settings parameters and functions, please refer to the User Manual. MYTHOS 2...
- Page 48 Select the Information Page. Technical set. Information Motor temp. Fans time Check the informations shown: • Model • Firmware version • Heating element temperature • Motor temperature Keep pressed the information bar until you enter the machine settings page. MYTHOS 2...
- Page 49 Select the correct brand and go back. Press Tare Speed. Select to enable or disable it an go back. Quit the menu and if the screen displays "Restart the display", switch OFF and then ON to restart the grinder. MYTHOS 2...
- Page 50 Connect the USB stick to Mythos 2. Turn the Mythos 2 ON. Mythos 2 will upgrade automatically, very quickly. As it finishes, turn the Mythos 2 OFF. Remove the USB stick. Turn the Mythos 2 ON to check. NOTE If Mythos 2 has not been upgrade, please try with a different USB stick.
- Page 51 The alarms and the errors signalled by the display control unit are listed below. Please note that some alarms or error messages are significant only from certain releases on. NOTE On the display, the WARNING messages are signalized in yellow, instead the ALARM messages are signalized in red. MYTHOS 2...
- Page 52 Motor is blocked at low speed. • Clean grinding chamber and chute. Error motor temperature • Output chute is stopped. • Enlarge grinding size. • Grinder size is too much fine. • Replace clump crusher. • Check motor and/or replace it. MYTHOS 2...
- Page 53 Check scale sensor assembling. • Replace display if necessary. • It is normal within tolerance 10 seconds. Tare time too long • Increase tare precision value. Touch screen • Turn machine OFF/ON. not functioning • Replace display board if necessary. MYTHOS 2...
- Page 54 • Turn machine OFF/ON. When machine achieve • Touch the dose selection on the display to stop grinding it may occurs due dose set and will not stop to interruption during machine grinding. grinding • Turn machine OFF/ON. MYTHOS 2...
- Page 55 MAINTENANCE EVERY 100000 CYCLES ........9.3 MYTHOS 2...
- Page 56 Check for cracks on beans hopper. Check ON/OFF switch. Check LCD display. Replace the clump crusher. Bend the flaps and be sure they are really will opened with an angle of approximately 30 degrees. Check for wear on product button selection. MYTHOS 2...
- Page 57 Replace grinder blades. Replace the clump crusher. Bend the flaps and be sure they are really well opened with an angle of approximately 30 degrees. Check for wear on product button selection. Check ON/OFF switch. Check LCD display. MYTHOS 2...
- Page 58 MYTHOS 2...
- Page 59 ELECTRICAL DIAGRAM INVERTER WITH VINCOTECH MODULE ....10.7 10.7 ELECTRICAL DIAGRAM INVERTER PROTECTION LATCH ..... . . 10.8 MYTHOS 2 10.1...
-
Page 60: Electrical Diagram Inverter Currents
10.1 ELECTRICAL DIAGRAM INVERTER CURRENTS MYTHOS 2 10.2... -
Page 61: Electrical Diagram Inverter Control Microswitch
10.2 ELECTRICAL DIAGRAM INVERTER CONTROL MICROSWITCH MYTHOS 2 10.3... -
Page 62: Electrical Diagram Inverter Input/Output
10.3 ELECTRICAL DIAGRAM INVERTER INPUT/OUTPUT MYTHOS 2 10.4... -
Page 63: Electrical Diagram Inverter Insulated
10.4 ELECTRICAL DIAGRAM INVERTER INSULATED MYTHOS 2 10.5... -
Page 64: Electrical Diagram Inverter Power
10.5 ELECTRICAL DIAGRAM INVERTER POWER MYTHOS 2 10.6... -
Page 65: Electrical Diagram Inverter With Vincotech Module
10.6 ELECTRICAL DIAGRAM INVERTER WITH VINCOTECH MODULE MYTHOS 2 10.7... -
Page 66: Electrical Diagram Inverter Protection Latch
10.7 ELECTRICAL DIAGRAM INVERTER PROTECTION LATCH MYTHOS 2 10.8... - Page 67 Update to 12/2019. NOTE CODES IN BOLD ARE REFERRED TO COMPONENTS CURRENTLY IN USE. CODES IN ITALIC WITH VALIDITY END DATE ARE REFERRED TO PREVIOUSLY USED COMPONENTS. CODES WITH (*) NEED TO SPECIFY THE COLOURS OF THE COMPONENT. MYTHOS 2 11.1...
- Page 68 15030098 04480009 15070079 00300019 15030195 15030155 15030217 05080037 15030095 15030221 15030222 15030218 15030137 15030186* 15030189 00000119 15030213 15030219 03003251 15030223 15070053 - 220V 15030157 15070054 15070075 - 110V 15030158 15030159 "MZ" 05001350 15030189 15030189 15030189 15030220 15030189 MYTHOS 2 11.2...
- Page 69 15030167 GF RELE' + CABLAGGI - 110V 00000113 00000017 15030197 15030151-NS 15030152-VA 15030211 15030189 15030198 00000011 15030204 15030207 15030206 15030131 15030189 15030203 15030188* 15030215 15000064 110V 05000408 15030205 220V 15030210 15030189 00000011 15030087 00000011 15030085 15030199 04000198 15030200 00000113 MYTHOS 2 11.3...
- Page 70 15030166 COMPLETE ENGINE FIXED SPEED 110V MOTORE COMPLETO MYTHOS 2 GIRI FISSI 110V 15030167 RELAY KIT FOR ENGINE FIXED SPEED 110V KIT RELE' MYTHOS 2 PER MOTORE GIRI FISSI 110V 15030168 SCALE GROUP GRUPPO BILANCIA 15030169 WEIGHT SCALE FILTERHOLDER SUPPORT SUPP.
- Page 71 MYTHOS 2 TEMPERATURE SENSOR SONDA TEMPERATURA MYTHOS 2 15030207 CALIBRATION ROD ASTA REGISTRO MYTHOS LOW 15030208 MYTHOS 2 FORK CALIBRATOR MDL/C-MCD FORCELLA REGISTRO MDL/C- MCD - MYTHOS 2 15030209 SPRING PIN 5x12 SPINA ELASTICA 5x12 15030210 SPRING PIN 5x20 SPINA ELASTICA 5x20...
- Page 72 MYTHOS 2 11.6...
- Page 76 Simonelli Group | Via E. Betti, 1 | 62020 Belforte del Chienti (MC) | Italy T +39 0733 9501 | F +39 0733 950242 | info@victoriaarduino.com www.victoriaarduino.com...
Need help?
Do you have a question about the MYTHOS 2 and is the answer not in the manual?
Questions and answers